2x72 Grinder WIP

Joined
Dec 5, 2008
Messages
1,597
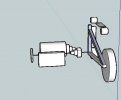
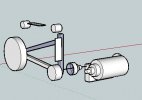
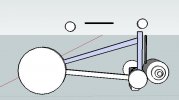
Over the next two months, I plan on building a 2x72 belt grinder. I already have a 1.5hp reversible motor, so I plan on utilizing the reversible effect in my grinder design. After a month or two of designing it, here's what I have come up with so far. The front wheel will either be 8-10", and then a 4" drive wheel, a 2" tracking wheel, and then either a 1" or 2" contact wheel and both a vertical and horizontal flat platen. I haven't decided exactly how to attach the top wheels and horizontal flat platen. I also haven't measured it all out to see if the distance around everything is 72".

On the other side of the drive shaft, I was planning on leaving it open to change. I was thinking of paper wheels for sharpening, and a buffing wheel, so I could slow it down a lot.

I am also planning on a 5-step pulley system, but I am having trouble finding them anywhere except ebay.

attachment.php

attachment.php

attachment.php


Please comment with suggestions.
 

Attachments

  • grinder1.JPG
    grinder1.JPG
    15.2 KB · Views: 745
  • grinder2.JPG
    grinder2.JPG
    15.7 KB · Views: 742
  • Grinder3.JPG
    Grinder3.JPG
    23 KB · Views: 739
Mike:

What software did you use to desing your grinder?

I did mine in SolidWorks and it has a belt length calculator, worked perfectly. Have you come up with a tensioner?

I made mine using a 3 pulley system. The top pulley is attached to a tube that is installed vertically, sliding into another tube with a spring in the bottom for tension. It also has a hand knob for tracking adjustment.

The grinding wheel is mounted on another tube that again slides in a tube, and is locked in place with a couple of half inch bolts.

I also made a flat platen that slides in the same tube so I can swap them out.

You're definitely on the right track.

As I tacked mine up to weld it all together, I had one hell of a time aligning everything to get it to track right. Perhaps if I'd bolted it together it would have aligned better.

Good luck. I could not believe how well my grinder worked compared to the cheap ass 1 x 30 Harbor Freight grinder I was using.
 
Just a thought. Unless you plan to hollow grind every knife you make, I'd move the platen somehow. Having the flat platen at the top like that is going to make it REALLY difficult to do a flat grind (without grinding off your bellybutton!).

Why not take a look at the pics of some folks NWG setups? The swappable tooling are really is a very handy setup.

-d
 
Mike:

What software did you use to desing your grinder?
I used google sketchup
I did mine in SolidWorks and it has a belt length calculator, worked perfectly. Have you come up with a tensioner?
I was considering using a see-saw method for the tracking wheel and have a bungie cord or something like that pulling one side down, and the wheel up.
I made mine using a 3 pulley system. The top pulley is attached to a tube that is installed vertically, sliding into another tube with a spring in the bottom for tension. It also has a hand knob for tracking adjustment.

The grinding wheel is mounted on another tube that again slides in a tube, and is locked in place with a couple of half inch bolts.

I also made a flat platen that slides in the same tube so I can swap them out.

You're definitely on the right track.

As I tacked mine up to weld it all together, I had one hell of a time aligning everything to get it to track right. Perhaps if I'd bolted it together it would have aligned better.

Good luck. I could not believe how well my grinder worked compared to the cheap ass 1 x 30 Harbor Freight grinder I was using.
The 1x30 is my grinder currently :barf:

Just a thought. Unless you plan to hollow grind every knife you make, I'd move the platen somehow. Having the flat platen at the top like that is going to make it REALLY difficult to do a flat grind (without grinding off your bellybutton!).

Why not take a look at the pics of some folks NWG setups? The swappable tooling are really is a very handy setup.

-d

I have a vertical flat platen on the side opposite the contact wheel

I was thinking of doing a nwg swappable setup, so I might do that style with the square tubing.
 
You can use a cloth measuring tape or even a string tied in a 72" length and some cardboard cutouts to mock up your wheel sizes and positions.

Can't wait to see it finished.
 
I certainly recommend a 10" wheel. You will soon want one if you don't install it to begin with. Frank
 
What are different sized contact wheels used for? I mainly think of them for hollow grinding, but can smaller ones be used for inside curves in handles (and recurves)?
 
Just as an FYI, you may find the belt will track differently in reverse than in forward. Start slowly and keep an eye on things the first few times.

And yes smaller contact wheels are like spindle sanders for metal, useful for finger grooves in handles, coping stuff to fit pipe...
 
I can have a few different wheels on it, so what sizes should I try to have? (Or what sizes are most common in knives?)
 
Good luck!
In sketchup, if you shift-click and select a loop (belt) then hit something like properties it will show the circumference (I am at school on a break and don't have the program)
 
Good luck!
In sketchup, if you shift-click and select a loop (belt) then hit something like properties it will show the circumference (I am at school on a break and don't have the program)

Thanks. I didn't know about that.
 
If you are still having trouble finding pullies, try looking for "sheaves". It's the same thing.
 
Mike if i were you i would not have the brace come down to the 10 inch wheel the tooling arm should slide inside the frame and aids in belt tension and ajustments fast.
 
I sketched something up, it has issues, especially where the shaft meets the frame. Where should I put it? FileFront, Megaupload... ?
 
Back
Top