A "WIP" The Bruce Bump "Allan Pinkerton Bowie"

Status
Not open for further replies.
Joined
Oct 28, 2006
Messages
13,363
I have been admiring Bruce Bump's work for a long time so I was naturally very excited when my order came up.
After our deciding on a design which in addition to Bruce's magic includes the masterful engraving of Jere Davidson and the the color-case hardening process of Doug Turnbull Bruce immediately went to work on the "Allen Pinkerton Bowie". He's been sharing his efforts in a work in progress over on the CKCA forum for about 6 weeks.
The full thread including the forging of the damascus, questions/answers etc. can be found @ http://www.customknifecollectorsassociation.com/vbulletin/showthread.php?t=520

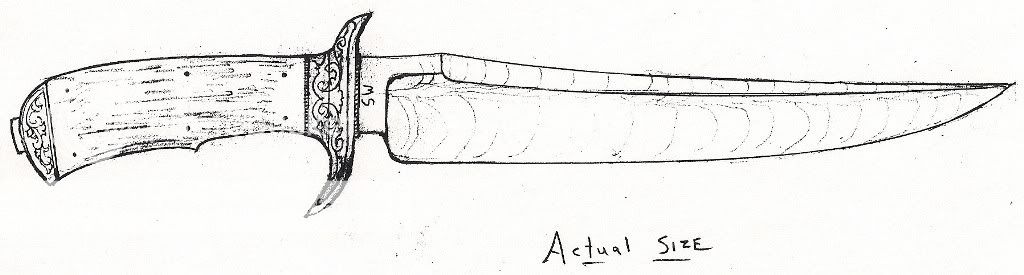
Here's a peak at what the finished Bowie will look like though we've made some subtle adjustments along the way.(these drawings have been reduced so not actual size)

scan0005.jpg


scan0004-1.jpg


Bruce started off forging a 9" Feather Pattern Damascus Blade and we will start here with the completed billet.

Bruce take us on the journey:
I used my brand new Jet band saw and cut this one lengthwise. I like this saw!

I forged the best slice out into a blade and did some quick grinding to see what I have as far as problems and pattern. Its hard to see the pattern until I do a deep etch but it looks pretty good so far. There were a couple hair-line cracks along the edge but they ground right out. We might have a good one this time but like I've said before "keep your fingers crossed".

I have it in the annealing oven at 1325 deg. for 30 minutes.

Don't go too far away, I'm heat treating and grinding the blade next asap.

100_6845_edited.jpg


100_6846_edited.jpg


100_6852_edited.jpg


100_6853_edited.jpg


100_6855_edited.jpg
 
Last edited:
I heated the blade in my Even Heat electric digital oven to 700 degrees, removed them and sprinkled both with PBC anti-scale compound and put them back in, ramped up to 1500 deg. and let them soak for about 5 minutes. I took the bowie out first and quenched it point down into "Tough Quench" from Brownells. It gives consistant results and I've used it for years. Also quenched the dagger.

As usual the camera went off too late to see the austinizing color going into the quench. In a dark room its a thing of beauty. Anyway here it is still smoking from the quench.

100_6860_edited.jpg


And here is the blade in my rockwell tester. It will tell me if the hardening process went right. Heat treating is a mysterious thing to me and I've never claimed to be an expert. In fact I bought this tester so I can be sure each blade is hardened and tempered to a given hardness. I tested it within 5 minutes after quenching it and the hardness was only 49 so I tested it again and again and each time it read about 5 points harder. As you can see its at 62 right now. That tells me it is good. Steel hardens for several minutes after the quench. Maybe I'm just easily entertained but that is amazing to me. This should tell you that you can straighten a blade from the quench if you are fast. If its still smoking you can put some really heavy gloves on and straighten one out by hand in a vice. This one didnt need it though because I normalized it, stress relieved, and annealed it. I also left it fat and will grind after the heat treating is done. If there is any amount of warp or bend I can grind it out. More on that later.

100_6862_edited.jpg


I tempered the blade at 395 degrees for one hour twice and checked the hardness. It read 57-58 rockwell hardness. Thats good.

I hollow ground the primary bevels on the 14" wheel and the top clip on a 1.5" wheel. I have a 400 grit belt finish right now and will hand rub it out to 2000 grit before etching. This is a good blade after looking it over real well there are no cracks, voids, inclusions or any thing wrong. Whoo Hooo. :)
I wonder what the pattern looks like. I'm going to etch it tomorrow and we'll see.

100_6864_edited.jpg


100_6863_edited.jpg


100_6867_edited.jpg


100_6871_edited.jpg
 
It's a real privilege to be able to witness these knives being produced. Thanks for sharing and many thanks to the maker for taking the time!
 
Can't be anything but another winner. Of course, I've read ahead a bit with this story.

Roger
 
Kevin, I have been thoroughly enjoying the WIP on the CKCA site. This is going to be another fantastic knife from Bruce. His work is absolutely top shelf and this is no exception. I am looking forward to seeing the final product.

Congratulations on what I am sure will be one of your most prized knife possessions.

Jon
 
The Work in Progress is always exciting. In addition to understanding how the bladesmith create their masterpieces. Thank you for showing Kevin and congratulations Bruce.
Eduardo Berardo
 
I love it Kevin, this is going to be a real special piece.
 
Last edited:
I had company today but still finished hand sanding and polishing the blade. I took it to 2000 grit and quickly hit it on the buffer, degreased and etched it in a weak ferric cloride for about 90 minutes for an even deep etch. It needs to be deep enough to polish the proud 15n20 without rubbing touching the lower 1080 for the best contrast. I used two coats of cold blue to darken the 1080 and let it dry for an hour or so and hit the tops with new 2000 grit paper dry.
I like this pattern as its much the same but much different. It looks like ruffled feathers to me. Its a uniform pattern and goes one way and then the other way. The bigger billet and stacking it higher than before gave it a unique dramatic look. Its a good blade and I'm using it. :cool:

Next comes the hand drawn plan and guard construction. Whew, the worst is over.

100_6872.jpg


100_6877.jpg


100_6874.jpg


100_6887.jpg


100_6888.jpg


100_6893_edited.jpg
 
Thanks for the positive comments guys.
Bruce is such a pleasure to work with.
He's communicates every step of the way.
If there's an issue he contacts you equipped with solutions.

It's really been fun.
 
Really dig the indepthness of this thread. :cool:
It should be fantastic when finished.
Thanks, Kevin and Bruce ! :thumbup::thumbup:

Doug
 
This is going to be a great one


Doug Turnbull restored a 100 year old Fox Shotgun for me that was my grandfathers. He did the original period Fox style case coloring and charcoal blueing. I do not think there is anyone better
 
This is going to be a great one

Doug Turnbull restored a 100 year old Fox Shotgun for me that was my grandfathers. He did the original period Fox style case coloring and charcoal blueing. I do not think there is anyone better

Joe, that's the same process (charcoal) Doug will use on the guard, frame/rear bolster of the piece here. It's being done now.

Here's an example of Jere Davidson's engraving/inlay and Doug Turnbull's "Color Case Hardening" process on Bruce's "Deadwood" pistol knife. Kind of gives the piece a nice antique look in my opinion.

Bump_Pistolknife02-www.jpg
 
Last edited:
Today I worked on the guard, spacer and tang. I want this to be a framed handled "Take Down" bowie so the guard and spacer needs to slide on tightly but also slide back off again. I like to mill the slot in both and mill some of the spacer back off and leave a pair of tabs that engage in the backside of the guard. They lock the two together and no alignment pins are needed. The frame will also have tabs that engage into the back of the spacer. I rounded off the tang to match the rounded slots.

100_6896_edited.jpg


100_6898_edited.jpg


100_6902_edited.jpg


100_6900_edited.jpg


100_6903_edited.jpg


100_6905_edited.jpg


100_6907_edited.jpg


100_6908_edited.jpg


100_6910_edited.jpg


100_6911_edited.jpg
 
I love the lines of that one. More of a fighter than a bowie maybe, but who cares.
 
These detailed WIP threads are awesome. Appreciate all effort, and look forward to the result. This will be a special addition, Kevin. :thumbup:

- Joe
 
I roughed out the guard on the bandsaw and grinder and heated and bent both ends to a lazy "S" shape. This is where its good to have the drawing for the shape and the length.
I have a 1/4 hp foredom that loves to make inside radious's on guards. It took a couple times of grinding and heating/bending before I got the correct shape.

100_6912_edited.jpg


100_6917_edited.jpg


100_6919_edited.jpg


100_6921_edited.jpg


Next I cut the drawing up and glued it to the handle steel for the frame. Its a 3/4" 1018 steel bar and slow to cut out but very accurate. I traced the tang onto the paper and cut it also. Next I drilled and counter bored the pommel for the finial nut. This is a take down and the nut is the only thing holding this bowie together. I will thread the tang soon.

100_6923_edited.jpg


100_6924_edited.jpg


100_6929_edited.jpg


100_6930_edited.jpg


I want to remove allot of steel next and leave the rear bolsters so the bandsaw is handy for roughing it off. The mill works good for removing the rest and surfacing the frame to the same thickness as the tang plus a couple thousands of an inch.

100_6934_edited.jpg


100_6935_edited.jpg
 
Status
Not open for further replies.
Back
Top