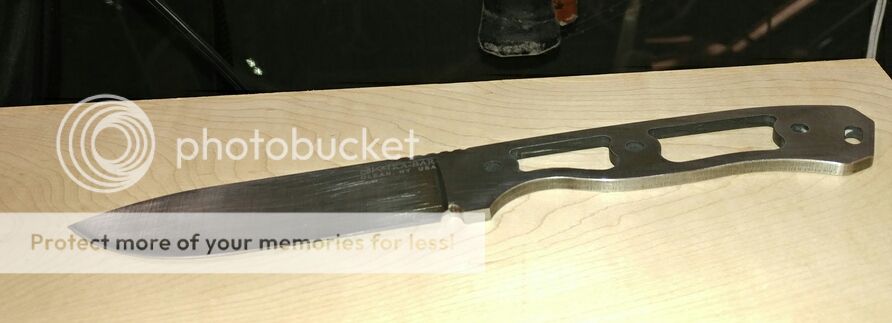
Acid - Etch BK16

Joined
Mar 31, 2011
Messages
3,006
I got a sweet 16 for my b-day the other day.
First FFG one.
I just can't leave these stock.
Bought some fancy scales before the knife arrived, and had already cut some liners. But they're a bit proud and need to be trimmed back to fit flush with the handle.

So far it's just been stripped. Everyone here knows what that looks like, so no point in posting it up.
But I do expect to do a couple somewhat unconventional procedures to it, so I'll try to document those here as I go along.

Feel free to let me know what you think.
 
Used the Citri-Strip stuff on this one. Let it sit overnight. Still took a lot of scraping, and missed a couple spots. So did it again - overnight.
I think I got all the black coating off now.
 
If the weather holds out (so I can do it outside) I'm planning on the HCL/H2O2 soak, followed by a tumble.
Following the Acid/Brass(/Stone) Instructable.
I like the finish he got on the Tenacious, and want to see how it turns out on carbon steel with possibly slightly modified media.

My first 16 was "clitched" in gunblue (FPR 16 bought off clitch, actually.) I stripped the blackened "blue", polished the blade, and vinegar-patina'd it in case I decided to cut comestibles whilst camping.
So not going back to blue for now.
 
Decided this one will be guardless.
Got started on the arduous task of satin finishing prior to etch.

 
Skiing on Friday and running sound for daughter's play rehearsal this weekend so not much time spent playing with pointy things. Got the blade sanded too 120.
It doesn't look different enough to justify a pic.
Next weekend is the play, and weekend after that I've gotta keep an eye on my Pops. So this will be slow going.
But I'll be back each time some progress is made.

I did manage to clean up the nickel-plated brass I'm going to try to use as media in the tumbling process. Mostly 38 special with a box of 357 thrown in.
 
Handle's still at 60, but brought the blade up to 220 grit. Not sure if I should work up to 400 (or 800) then back down to 220, or simply leave it there since I'm going to acid-etch it anyway. Gonna work on some taxes while I think about it - arm is kinda tired.

 
Thanks for the updates tjswarbrick. I'm fascinated to watch this project develop and hoping to learn something new.
 
Looks good. You should go up to at least 400 on carbon steel, IMO. 600 preferred. It will keep corrosion down by making it harder for moisture to hide in the scratches.
 
Handle's still at 60, but brought the blade up to 220 grit. Not sure if I should work up to 400 (or 800) then back down to 220, or simply leave it there since I'm going to acid-etch it anyway. Gonna work on some taxes while I think about it - arm is kinda tired.


Looks good. You should go up to at least 400 on carbon steel, IMO. 600 preferred. It will keep corrosion down by making it harder for moisture to hide in the scratches.

What daizee says - even if you're going to etch it. The "deep" scratches leftover from the coarser grits let rust take hold a lot easier. My highly polished Beckers are much less rust-prone - and my acid etched and patina'd ones much more so, if they weren't sanded first. I like the "no guard" look!
 
Cool.
Have had a heck of a time locating 600 (tried 3 shops), but have 320, 3 different kinds of 400, and some 800 wet-dry. If I'm going there, I also have 1000, 1200, 1500, 2000, 2500, 3k and 5k... Where does it ever stop???
Now that I kinda have a system, and the deep machining marks are gone, it isn't too bad.
I usually have trouble getting ALL the lower grit scratches out, so the fancy stuff leaves patches of mirror. But it's easier on the FFG. So we'll see.
Gonna take some time. Thinking I should get the handle a bit smoother to keep rust out - not planning to bond the G10 liners. Then need to work on the exposed tang/completed handle - preliminary fit assessment says scales and liners are a tad proud.
Plus, got business travel next week, and a visit with Pops the week after. (May bring some of the equipment to his place - not a ton on the agenda there.)
So, it'll be slow going and a week off from updates, but progress with continue.
Thanks for the tips, guys.
 
Hit it with 320 last night, then brought up to 400.
Now I see some horizontal scratches which had been hiding beneath the satin finish.
I only went horizontal with some really coarse stuff when working on the machine marks. But I forgot if it was 60 or 80 - so back to square one with me! Ugh.
 
I've discovered that perfection is a really hard target to hit.
Spent an hour and a half, that I should used for taxes and a walk, playing out in the garage.
Started over at 60 grit, and worked through: P80, P100, X200, P120, P150, X100, P220, X65, P320, X45, P400, X22 followed by 320 wet/dry, 800wd, 1000wd, 1500ws, X5, 6000AO, 12000AO, 2000wd, 2500wd, P3000 foam-backed, 5000 on foam, gray scotch-brite, white scotch-brite, Mother's Mag polish, and Flitz polish.
Tired.
Good enough to etch, I think, but not good enough to be called "polished steel" if I were paying my money for it.
Looks like this:


That's the reason I was planning on a 220 or 400-grit satin finish. But I think I'm ready to mask the edge and start fitting the scales in preparation for the chemical bath.
What do you think?
 
Keep the high satin.
It will show the etch better and your time invested will be shown, while making it so your arm/shoulder pain wasn't in vain.

Nice work.
 
Thanks.
Now that my arm has rested I'm thinking of making a nice, even scratch pattern at 800 grit prior to acid dip.
Gonna do scales first, though, and think about it.

The G10 liners and TKC scales that fit pretty well on the untouched 15 stand pretty proud on the stripped 16 - particularly in the forward finger groove on the bottom of the tang.
 
It looks like you might have beveled the edges of your tang on your handle. The outer perimeter of the tang has an angle that is not 90°. This will make fitting scales and liners slightly more difficult as you may have a gap there.

The only things that I can think of is:
Keep the tang slightly proud and sand the slabs to be flush with the angle where they meet. Then round the tang for comfort.
Or
Distal taper th tang to try to remove the bevel and restore the 90° tang flat/spine intersection to allow for your scales to mount flush.

Please let me know if I am seeing an optical illusion and there is not a slight bevel there.
 
It looks like you might have beveled the edges of your tang on your handle. The outer perimeter of the tang has an angle that is not 90°. This will make fitting scales and liners slightly more difficult as you may have a gap there.
The only things that I can think of is:
Keep the tang slightly proud and sand the slabs to be flush with the angle where they meet. Then round the tang for comfort.
Or
Distal taper th tang to try to remove the bevel and restore the 90° tang flat/spine intersection to allow for your scales to mount flush.
Please let me know if I am seeing an optical illusion and there is not a slight bevel there.

Slight bevel is very real, though minimal.
Around the edge and spine of the blade, as well.
The x200, x100, x65, x45, x22, x5, 6000AO and 12000AO abrasives were on the Ken Onion WorkSharp belt sander. Even though I used the taut shorter side - it tried to Convex everything.
Did get the best, smoothest, most highly-polished finish in those areas...
If it causes a problem, I guess I'll head back to files followed by paper on a (Corian or ceramic tile) platen.
Or, take your advice and just grind the scales down a bit farther.
Will find out soon enough...
 
Another idea would be to sand the tang down to meet the base of the bevel.
This would would also shorten the handle height slightly, so if you have a smaller hand, this might be a viable option.

Please keep us posted and good luck.
 
Back
Top