AHHH!!!! This etching will be the death of me

Joined
Oct 10, 2002
Messages
1,551
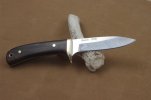
I am, as far as I can tell, the most completely inept etcher to ever live. I've burned up 8 stencils from Ernie so far, and gotten ONE good etch. I stepped back the voltage on my Crawford etcher to 12v, and that helped a bit, but I still burn the hell out of the stencils. I'm holding the pad on there for a spurt of maybe a second, and then off for 2 seconds or so. I do this 10 times or so. Switch voltage and do the same thing 3 or 4 times. Pull it off, I have a big blob of an etch and a destroyed stencil. I back off the number of cycles, and then I end up with a faint, barely visible etch...... and a burned up stencil.

I got a couple that just had a little extra black around the edges. I was told I could lightly sand it to remove those. Well, I did that. Then I had an etch that still had extra black, only now it had scratches all over it too. Even worse. I sand until the scratches are gone, and then so is the etch.

I ask people and they're just confused how this can be so hard for me. "Dampen pad, touch knife, pull off, touch knife, pull off..... switch voltage, touch knife, pull off... How is this so hard??"

What am I doing wrong? Still too long to hold it on there? Pad too wet? Not wet enough? Pressing too hard? Not hard enough? Do I ditch the pad and just use a q-tip? Wrong kind of electrolyte? I have a bottle of something called C-50 that my dad got from work where they etch part numbers on stuff all day long.

I read conflicting advice about the direction of current. Some said clip group to the blade and touch hot. Some said clip hot to the blade and touch ground. That have anything to do with it?

Son of a bitch this is infuriating!!! Even Ernie felt bad enough for me that he gave me a couple stencils to practice on.
 
I switched from the pad to the Q-tip and it did help. It gives you much more control.

Sorry that's all I have to offer.

Patrice
 
If you're getting a lot of black around the etch, the pad is likely too damp. You want it where it barely leaves moisture when dabbed gently to a paper towel.

Also, the blade should be at finished state prior to etching and clean (use some alcohol and wipe it clean of all oils prior to etching). If you're hand finishing, this means it needs to be completely done. Then you just take a piece of your finish grit sand paper, place it over the edge of the counter, and draw the knife across it from ricasso to tip (the same as your hand finish lines), contacting just the edge of the counter. If you do this several times and pull straight, you'll have a clean etch without extra scratches. If it's a machine finish, it should be completely done, and your direction of sanding should follow the grinding line direction. Use a hard backing such as micarta to avoid sanding away the dark middle of the etch.

I use the Q-tip as well and feel I have better control. My stencils don't last forever, but I can get 4 or more etches if I'm careful and wash them afterwards.

My method, using a stepped back 12V Crawford etcher, is to very briefly dab-dab-dab-dab, moving around the entire stencil in an orderly fashion. I bet I don't hold the Q-tip on for more than half a second at a time, and lift for a second or two. I work over the entire stencil about 3 times, overlapping my dabs as I move over the stencil, switch to AC and repeat about twice over the entire stencil.

Try a dryer pad and try shorter touches. You may consider switching to a q-tip. I just crimped on an alligator clip to the wire that would normally have the felt pad, and use that to clip to the q-tip. The way my etcher is wired up (directly from the plans except for the step-down to 12V), the black clip goes to the blade (really the positive lead) and the red clip goes to the stencil (really the negative lead).

--nathan
 
This is why I went to a jewelers engraver. I could not get consistent results with a quality etcher esp on Damascus. I know others can and do on a regular basis, it just did not work for me. With the engraver I can repeat my mark reliably in many different sizes without having to make a new stencil. I can also have a new master made for less than $100 and will last just about forever.
 
This is where an etcher designed for etching will save you a lot of trouble and money. I've got a Lectroetch vt-15a power unit, and i can get literally hundreds of perfect etches from each stencil. I get my stencils from TUStech, a sheet of 5 or 6 is around 11$ after a one time 30ish dollar setup fee.
 
silver pilate has it right - the black fuzzies are from too-wet a pad.


You guys are confusing me with this talk of q-tips....got pics?


I use a homemade etcher, works great. Deep and black.

I count to 12 at approximately the same speed as in seconds and I'm done.

But take all the above with a major grain of salt because I have a rather "open" stencil design (no small lettering) that all etches pretty evenly. If you have a large dark area as well as fine lines....you'll under-etch the large area or over-etch the fine lines. Just FYI for anyone else reading.


I have stencils from a few different places and they have their strengths/weaknesses. I am getting probably 30-40 etches from each before I have to toss it. I do clean it inbetween every etch and take good care of it.

Best of luck

:thumbup:

Dan
 
I use the q-tip method as well... Built an etcher before I ever built a knife; I love little sit-down DIY projects! Anyway, I didn't want to do the pad so I decided to go with q-tip; just have 2 alligator clips instead of the one. Clip the black to the blade and clamp a q-tip in the jaws of the red lead (on the cotton, there has to create a current between the 2 alligator clips to create etch and the etching solution, or appropriately named electrolyte, is that bridge to complete the circuit), dip your q-tip in your etching solution and dab at your stencil. I don't have any pics of the process (etcher is in kids room and I ain't gonna wake 'em up!) but I have a "just after" pic where you see the q-tips after use.

*DISCLAIMER* I have no idea what the hell I'm doing - I followed the directions and it makes a great etch, but if you have questions I'm not the idiot to ask!

IMG00061.jpg
 
I built mine from the Crawford plans and Radio Shack components. Other than my initial wiring error it has worked well. Problems I had were: having trouble keeping stencil sealed against blade, solved by using good electrical tape; poorly defined edges, solved by using 3 on 3 off for 10 or 12 cycles on DC then AC. Also, had trouble cleaning stencil until I commandeered my wife's unused ultrasonic jewelry cleaner. My stencils last about 20 knives. They seem to last longer on stainless, but not a lot.
An etcher is just a current controller. I doubt that there is much difference between the "real etcher" and a homebuilt one except for the cost.
I have never seen a burned stencil. Are you getting your stencil tight against the blade? If not, maybe there is some current flowing through the stencil itself. With only 12 volts, there shouldn't be enough heat to burn it.
Can you post a picture of a burned stencil?
Chip Kunkle
 
Is it possible the etcher was wired incorrectly when built?

I'm starting to think about building this etcher, but this is the first I've heard about a 'Stepped-back' 12V version. Does anyone have a link or any info about this?
 
You guys may be geniuses.......

Here's my experience last night. Did my first etch with a brand new stencil. Came out great. REDAMPENED THE PAD and did the second etch. This time I noted that I had fizzy liquid around the edges of the pad like it was squishing out when I pressed down. Came out black blob.

I think I'm getting the pad WAY too wet.

Now... I still melted the stencil a bit on that first one that came out great. The stencil afterwards looked perfect from the top, but flipped over it was blurred, like for example, the three parallel lines of a capital "E" were thickened to where they almost touched. So I think I have two things working against me here. Lack of experience with how long to cook it to get a good imprint without burning the stencil, and fine lines that burn easily.

I have never seen a burned stencil. Are you getting your stencil tight against the blade? If not, maybe there is some current flowing through the stencil itself. With only 12 volts, there shouldn't be enough heat to burn it.
Can you post a picture of a burned stencil?
Chip Kunkle

I don't know if "burned" is the right word. The lines all thicken and therefore blur into each other. I can only assume that the edges are burning and shrinking back on themselves. It's weird though, because the stencil look clean and sharp from the top, but underneath i.e. the part that touches the blade, it was blurred.
 
I'm still an extreme newb to etching but the last few etches came out perfect. I follow others q-tip method but I do etch on 20v with homemade Crawford style etcher.

This is my theory so TIFWIW- If your burning up your stencil using a felt pad try the Q-tip. It seems to me that less surface area while etching = less heat applied to the stencil at that specific time and place. You'll end up with the same total amount of heat over the entire stencil just in spread out in a controlled fashion.

Think of extinguishing 20 matches on your skin versus a short burst with a propane torch. :eek: but you get the principle behind the theory.

My etching regiment is as follows.

-wet q-tip, dab on paper towel till nearly dry

-etch on 20v DC approx 1/2 second 5 times in one spot (with 1/2 second off between dabs) then move forward and repeat untill stencil has been covered.

-repeat 3 times

(Get Q-tip wet enough to sizzle without hard pressure against stencil. No sizzle means its time to re-wet & re-dab NOT press down harder. Sometime I don't make it all the way around without having to re-wet.)

-Swith to 20v AC and follow previous steps.

-remove stencil and clean blade and stencil with dishsoap immediatly.

I did experiment with 10v setting but got lackluster results but 20v is working well for me. If this reduces stencil life then so be it. While experimenting I made probably 15 marks with 1 stencil though so I'm not worried about stencil life. I kinda feel that the mark is a very important feature that catches the eye so I'm considering something like 5 marks then discard stencil just as a quality control measure.

Etching solution recipe-
1/2 cup hot tap water
1 tablespoon salt
1 tablespoon vinegar

I've only used it on ATS-34, 1080, and 1095 thus far but appears to work fine on everything just as I read it would.

It's so quick and easy I mix it up and just dump when finished. I tried to save it once but the salt reformed into big chunks of salt balls, LOL.

Experimenting is going to be the key to success here. Just FYI my etcher is a homemade but I did confirm the voltage I'm getting with a multi-meter :D

Hope this helps you in figuring out your etching issues.

-Josh
 
This etch was made with the cheapest unit on the market- the Etcho-matic. The stencil was made by Ernie Grospitch. This etch was made with the clip that converts the voltage to DC. I cleaned the blade with alcohol first. I applied pressure from the wetted pad for about 3-4 seconds, then lifted it off. I repeated this procedure about 7-8 times. Then I applied the neutralizer, then washed in running water. Finally, I applied some mineral oil to the etch and rubbed with a felt pad. The etch is a nice deep etch.


Milt
 

Attachments

  • swede.jpg
    swede.jpg
    33.8 KB · Views: 109
Hmm, the Etch-O-Matic starter kit is only $80...not much more than the cost of parts to build the Crawford etcher. Does it have any limitations compared to the Crawford type?
 
-wet q-tip, dab on paper towel till nearly dry
(Get Q-tip wet enough to sizzle without hard pressure against stencil. No sizzle means its time to re-wet & re-dab NOT press down harder. Sometime I don't make it all the way around without having to re-wet.)

Ya I'm getting it seriously too wet. My pad is to where you can squish it against a table and electrolyte will run out. Gotta be the problem. I'll try the q-tip method and see how it goes (after I take my black blob blades back out to the belt and try to fix them).

Thanks again all!
 
Damp is all you need, I use the crawford and it works great. I now use a q tip. damp, dry with paper towel. I will etch 2-3 blades and not rewet!!!

The water is only there to deliver the electricity from the probe to the blade, its a simple solution to conduct electricity so you dont need much. BTW you need to make sure that the cotton part of the q-tip is connected to your machine, it you connect by the plastic or wood middle section it wont work.
 
I have only used the Echo-matic. There was a learning curve, but it seems to work quite well for knives. You can also get a very nice black mark by using it without the DC clip.

Ernie makes very nice stencils at a very reasonable price, but I would like to start making my own stencils just for convenience. I think one could build the light box easily and simply buy supplies.

If anyone can elaborate on that, I would be grateful.

Milt
 
Alright I think using a q-tip is getting me closer. The stencil still looks horrible when I get done. I think I need a better cleaning procedure. The stencil looks really grainy, and the edges all look blurry. Then it hardens up and takes a slight curl to it. Pretty much junk at that point.

As far as the etch itself, I think the q-tip thing helps. I still get anywhere from very faint to blurry, but it's not horrible. I think I need a finer sand paper to use to "sharpen" it up a bit. I used 1200 grit, but it still left scratches. I am machine finishing them with a scotchbright belt, and it seems no matter what if I touch sandpaper to the blade it will leave scratches.

I think I'll get it. I'm going to take a junk blade and etch all over it with some of the practice stencils I got.
 
how about you do this:

finish out a bar of steel to 200 grit
etch it a couple times
take a pic of it and post it here


That will make it much easier to see what's going on.


There are actually a number of things that could be going wrong - from your technique to the machine itself...but it'll be much easier to diagnose if we can see it.

Dan
 
Yeah way to wet and holding for to long. If the electrolyte starts to sizzle lift the Qtip.
take care
TJ
 
Back
Top