An Interactive WIP - Resurrecting an Old Bread Knife

Cushing H.

Gold Member
Joined
Jun 3, 2019
Messages
2,714
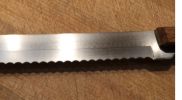
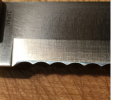
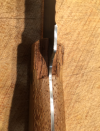
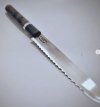
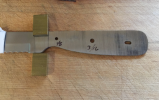
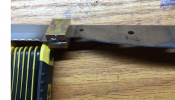
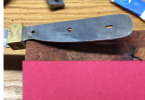
Ok .... this is purely meant to be a fun thread, with all involved enjoying - hopefully it will play out that way. I have an "old" bread knife, bought in maybe something like 1998 or just a little before (I say that because my second son was born in 1998, and I walked into a knife store in a local mall (actually, "Southdale mall" - the first indoor mall in the world) and picked this baby up. It has been used continuously since then - slicing home made loaves, store-bought and home made french bread in the years since then. I have no earthly idea what alloy or hardness it is ... other than over the years it has shown no evidence of corrosion, so .... 410 maybe???. By the pictures below, it probably has a handle of maybe walnut (but not sure) .... but clearly had problems with adhesion ... since one side broke off, then a year or two after the other side lost is also. My guess is the rivets are Corbys (but can not be sure until I drill them out). At least once I have taken a file to the serrations. the knife still works ok (I used it tonight on some home made whole wheat french bread) .... but for several months I have been wondering... "what if......". New handle? Mosiac pin in the middle? re-grind the bevel? re-grind the serrations? I do not know what the current TBE is ... but to my finger-feel, it is not great (maybe 0.15 or thereabouts).

so ... here is an opportunity for you to chime in. Ive got to strip this handle off, but until then, I think the basic question is - re-grind to establish a lower TBE (however that is defined with a serrated edge....... Have at it....
upload_2020-10-6_20-8-30.png

upload_2020-10-6_20-9-1.png

upload_2020-10-6_20-9-35.png

upload_2020-10-6_20-10-17.png
 
How well does it cut crusty bread?

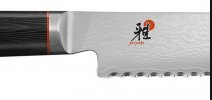
This is the first (and only) bread knife I have made. The serrations are pointy like the one you show and when cutting crusty bread it throws crumbs everywhere not unlike using a chainsaw. We have a Myabi Bread knife that has much shallower and rounder serrations that works much better. My knife is in the rack but it never gets used because of the mess it makes.

Screenshot 2020-10-07 082054.jpg
 
Probably uses Cutler’s rivets. I would chase the original serrations with a round slip stone, since it cut well for so long and then do a nice stabilized handle or custom whatever. Just my thoughts...
I did the same to a cleaver some time back.
Scott
 
Scott - I would not say it throws crumbs everywhere ... but there a few that drop around the cut. Interesting you see such a difference. Can you supply close up photos of the two knives serrations? It would be not good for me to mess up its cutting ability in trying to make it better...

SS369 - good points .. parallel to above - if it ain’t broke, don’t fix it? And yeah, primary is to replace the handle. Maybe this is my chance to try my hand at a mitered two part handle with liner?
I'll try to get some picks.
Scott - I would not say it throws crumbs everywhere ... but there a few that drop around the cut. Interesting you see such a difference. Can you supply close up photos of the two knives serrations? It would be not good for me to mess up its cutting ability in trying to make it better...

SS369 - good points .. parallel to above - if it ain’t broke, don’t fix it? And yeah, primary is to replace the handle. Maybe this is my chance to try my hand at a mitered two part handle with liner?

Here's a website photo of the Myabi Kaizen Bread knife. To be honest, we just use a sharp chefs knife for bread most of the time.

As that was my first attempt at serrations, they were too even. Not sure if that plays a role. As noted above, if it works leave it be.

Capture.JPG
 
Scott - on your myabi, and also on my knife, it looks like the individual serrations each have their own “internal” primary bevel (kind of like how a chainsaw bit would be sharpened) ... and it looks like your knife does not have those “internal” bevels? If not, you could try adding them and seeing how the knife performs?

we make crusty French bread often .. and the serrated blade is really kind of a necessity to get through that crust...
 
well, I guess "interactive" does not mean fast :-( . With my current batch of handles starting to process, I thought it was finally time to take this bread knife apart. Someone mentioned the "pins" in the handle were likely rivets - they were right. A little grinding down of the heads and the thing just came apart (whatever glue might have been there was totally gone after 20 odd years. This is what I got:
upload_2021-4-12_17-15-25.png

looks like the holes are just perfect for 1/8 pins in the front and rear, and that center hole would seem to be a nice place for a mosaic pin (which I need to buy, as I dont have any in that size :-( ).

Im also thinking I will take advantage of this to take a third shot at soldering bolsters on, which I have milled to size and are shown in the photo. I just need to decide what kind of wood to put behind those bolsters, and whether to use some liner - either underneath or in front of the wood .... or both.....
 
Bolsters and liners, yes, but a mosaic pin will be to much I think. Maybe keep it clean with hidden pins
 
Last edited:
I would enlarge the factory holes as needed to take Corby bolts. A carbide or diamond burr will do it easily.
Practice soldering your bolsters on some scrap stainless. It takes a bit of skill. DO NOT OVERHEAT the joint.
 
I would enlarge the factory holes as needed to take Corby bolts. A carbide or diamond burr will do it easily.
Practice soldering your bolsters on some scrap stainless. It takes a bit of skill. DO NOT OVERHEAT the joint.
thanks Stacy. I also like Corbys .... but not sure if I want to take the time to drill hardened steel .... then again, this would be an excuse for me to buy a few carbide bits to use with my recently acquired mini mill :-).

No problem with heat on the soldering - I have a lifetime of soldering electronics and copper pipe, and have had no problem with excess heat on the two bolsters I have done. My issues were with size uniformity and alignment of the soldered on bolsters. the mill and other acquired skills address the uniformity .... and it finally occurred to me (duh) that I can use a filing guide to get the alignment right prior to lighting the torch :-) . Famous last words, but I dont really expect any significant problems there...
 
Ok - that is done. There is certainly more clean up needed with soldering than with JB Weld (but no pins to deal with). Also, after doing all I needed to clean up and fine-sand the fronts of the bolsters prior to soldering, they get discolored from the heat and the little flux that drips and spits onto them while heating. Ugh - that is a pain.
upload_2021-4-14_16-18-38.png
Now is the hard part. Since I am "esthetically challenged", I have never trusted myself with this choice. Right now I am thinking stabilized cherry burl, with red liners. How does that sound???
upload_2021-4-14_16-20-16.png
 
I'd go brass pins to match the bolster and cherry burl with no liners. That fancy burl doesn't need liners imho, but it's just a matter of taste. It's your knife, so you should decide.

We will be here to tell you "I told you so" :D
 
I'd go brass pins to match the bolster and cherry burl with no liners. That fancy burl doesn't need liners imho, but it's just a matter of taste. It's your knife, so you should decide.

We will be here to tell you "I told you so" :D
Hmmm. Blackdirt cowboy says he likes liners with bolsters. I might need to toss a coin :-)
 
I'm not a fan of the fuchsia liner against the cherry. Maybe with a thin black liner in between?
 
I'm not a fan of the fuchsia liner against the cherry. Maybe with a thin black liner in between?
That might work ... and I think I have the thin black liner. I’m traveling the next couple days, will resurface with shop access on Saturday or so...
 
Ok - that is done. There is certainly more clean up needed with soldering than with JB Weld (but no pins to deal with). Also, after doing all I needed to clean up and fine-sand the fronts of the bolsters prior to soldering, they get discolored from the heat and the little flux that drips and spits onto them while heating. Ugh - that is a pain.
View attachment 1546080
Now is the hard part. Since I am "esthetically challenged", I have never trusted myself with this choice. Right now I am thinking stabilized cherry burl, with red liners. How does that sound???
View attachment 1546081

Wrong red, get the cinnamon red looks like brick red. Work better with your cherry. Scarlet red looks pinkish a lot of times in use. Ended up tossing all I had away. Black would be best yet.
 
I'm interested in seeing if those bolsters stay on when you go to shape them. Soldering alone is pretty weak. I would drill two holes with a carbide bit and put in brass rivets.

I agree with the others that the pink liner is wrong. Use a dark red or black.

Not opening up the holes because you don't want to "take the time" is a poor excuse for not doing it right.
 
Back
Top