-
The BladeForums.com 2024 Traditional Knife is available! Price is $250 ea (shipped within CONUS).
Order here: https://www.bladeforums.com/help/2024-traditional/
You are using an out of date browser. It may not display this or other websites correctly.
You should upgrade or use an alternative browser.
You should upgrade or use an alternative browser.
Buck 119 dulling.
- Thread starter zmaj
- Start date

Thank you for sharing the process with me. How many handles have you done before this one?Thank you. That knife was a “rescue” that I inherited from a member here. Leo had convexed the blade but the handle was beat up and chipped.

It looks like an attempt to cut off the butt cap was made….
I very carefully () beat the handle with a hammer breaking all of the plastic/phenolic/whatever off.
Then I drilled the olive wood & buffalo horn and cut holes in the spacer material.

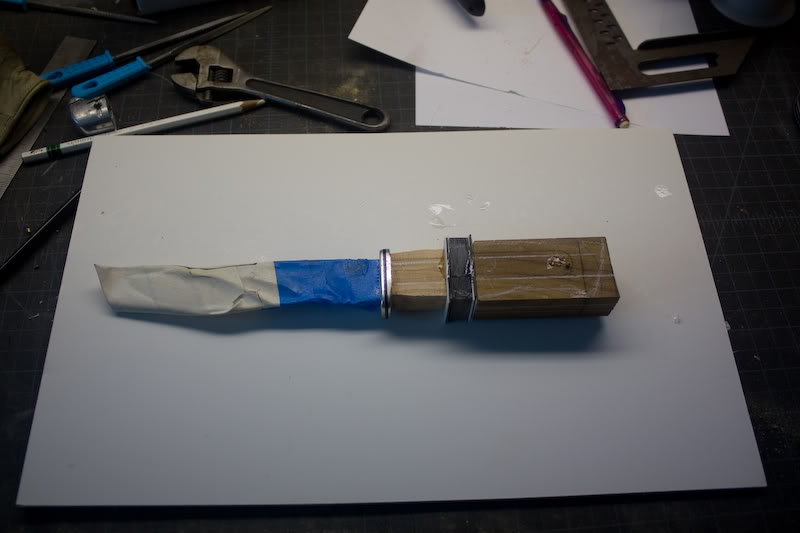

Epoxied together, pin hole located and drilled with the pin epoxied in place the shaping began
All by hand. A rasp, files and sandpaper were used. An 80 grit belt cut and stretched over a paint stick or large old file removed a lot of material quickly.
Some work on the blade with finer and finer sandpaper and it was done.
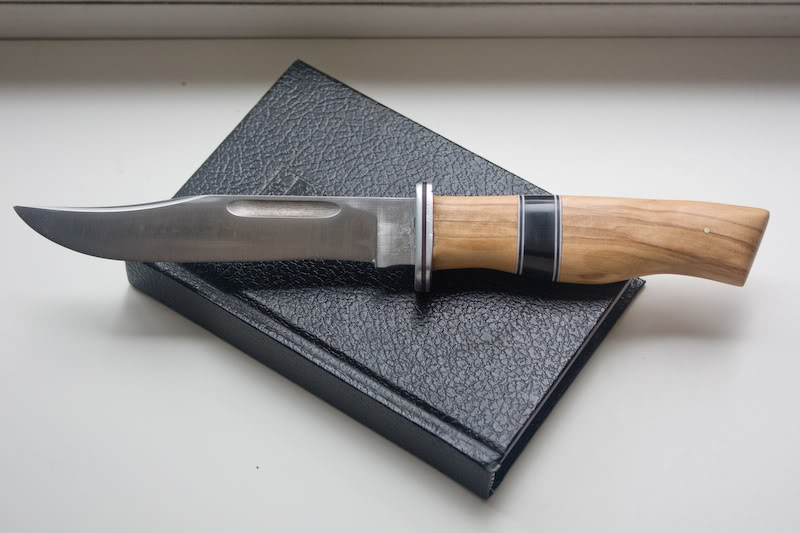
If you have questions ask away.
Rescues and blade blanks are great fun. They build a special appreciation for the pieces in your collection.
ETA: after breaking the plastic off, I used a hacksaw to cut through the butt cap and pin.
Thank you for sharing.View attachment 2222436
Possibly another option to consider. I cut the stitches then cut the leather flap restitched and riveted it back together. I turned it from a taco into a sandwich. No more rattling.
Alone
Gold Member
- Joined
- Nov 11, 2021
- Messages
- 3,248
I haven't read thru all the posts, but know that some of the guys here use him.
Rob Kellenberger (*"RK Leatherworks") makes quality, simplistic, and functional leather sheaths for the 119... (*He has an Etsy shop, where they're usually readily available in different styles/designs)
.jpg")
If you don't like the fit, it's leather...You can pretty easily "wet-form" it, to tightening it up a bit. (*I haven't needed to)
*The bottom sheath is a custom job he did for my Ontario SP-10 Bowie.
Rob Kellenberger (*"RK Leatherworks") makes quality, simplistic, and functional leather sheaths for the 119... (*He has an Etsy shop, where they're usually readily available in different styles/designs)
If you don't like the fit, it's leather...You can pretty easily "wet-form" it, to tightening it up a bit. (*I haven't needed to)
*The bottom sheath is a custom job he did for my Ontario SP-10 Bowie.
Ebbtide
Gold Member
- Joined
- Aug 20, 1999
- Messages
- 8,008
Thank you for sharing the process with me. How many handles have you done before this one?
5 or 6. There may be another stick tang leather handle not in that photo.
The important thing is not to rush towards results.
Enjoy the process. Take your time.
Learn by doing.
Walk away when you hit an impass so you can think of a work around or research a solution.
The carver stag piece at the top was to have a mahogany handle, a scrap from the Steinway piano factory. I was over zealous and shaped the handle down to the tang hole.
Learn by doing.
The big leather handle piece slipped in the clamp and the epoxy dried with the guard, leather and butt cap all 1/2” away from the ricasso.
I walked away (crushed) and researched. Turns out you can soften epoxy in boiling water.
I got it all apart. Had to cut new leather and clean it all up. But the project was saved.
Would you say a beginner would be able to do this and not mess it up badly?View attachment 2222436
Possibly another option to consider. I cut the stitches then cut the leather flap restitched and riveted it back together. I turned it from a taco into a sandwich. No more rattling.
Taking my time with projects is something I've been realizing I have to do recently. I'm realizing some things cannot be rushed if you want a good result and somethings may take hours.
5 or 6. There may be another stick tang leather handle not in that photo.
The important thing is not to rush towards results.
Enjoy the process. Take your time.
Learn by doing.
Walk away when you hit an impass so you can think of a work around or research a solution.
The carver stag piece at the top was to have a mahogany handle, a scrap from the Steinway piano factory. I was over zealous and shaped the handle down to the tang hole.
Learn by doing.
The big leather handle piece slipped in the clamp and the epoxy dried with the guard, leather and butt cap all 1/2” away from the ricasso.
I walked away (crushed) and researched. Turns out you can soften epoxy in boiling water.
I got it all apart. Had to cut new leather and clean it all up. But the project was saved.
Im assuming the butt-cap to the leather handle is something you made, it looks so professional, along with the entire handle and the other knives as well, those are beautiful pieces. How long would you say you take to do an entire handle on average?
ferider
Platinum Member
- Joined
- Jun 20, 2018
- Messages
- 16,389
I haven't read thru all the posts, but know that some of the guys here use him.
Rob Kellenberger (*"RK Leatherworks") makes quality, simplistic, and functional leather sheaths for the 119... (*He has an Etsy shop, where they're usually readily available in different styles/designs)
View attachment 2222752
If you don't like the fit, it's leather...You can pretty easily "wet-form" it, to tightening it up a bit. (*I haven't needed to)
*The bottom sheath is a custom job he did for my Ontario SP-10 Bowie.
His sheaths are very good, I also have some larger ones for 7” blades. Sometimes - for non Bucks with smaller guards, I adjust the straps. I like how high they carry, good for sitting in the car with seat belt on.


That buck sheath is absolutely beautiful, but it seems like the knife may have an easier time slipping out compared to the original sheath, would you say thats a problem youve had?I haven't read thru all the posts, but know that some of the guys here use him.
Rob Kellenberger (*"RK Leatherworks") makes quality, simplistic, and functional leather sheaths for the 119... (*He has an Etsy shop, where they're usually readily available in different styles/designs)
View attachment 2222752
If you don't like the fit, it's leather...You can pretty easily "wet-form" it, to tightening it up a bit. (*I haven't needed to)
*The bottom sheath is a custom job he did for my Ontario SP-10 Bowie.
Alone
Gold Member
- Joined
- Nov 11, 2021
- Messages
- 3,248
That buck sheath is absolutely beautiful, but it seems like the knife may have an easier time slipping out compared to the original sheath, would you say thats a problem youve had?
I have not had any issues with retention.
Alone
Gold Member
- Joined
- Nov 11, 2021
- Messages
- 3,248
His sheaths are very good, I also have some larger ones for 7” blades. Sometimes - for non Bucks with smaller guards, I adjust the straps. I like how high they carry, good for sitting in the car with seat belt on.
You know man, I've been in need of a coupla' customs sheaths for two of my knives, and I can't seem to be able to get in touch with Rob or Harry. I was going to message you the other day, but this seems as good a place as any. (*Maybe it'll help someone else, too)
eveled
Basic Member
- Joined
- Mar 11, 2016
- Messages
- 8,286
I think it’s an easy project. Everyone has to start somewhere. Even if you ruin it, you don’t like it anyway. Plus it will be a learning experienceWould you say a beginner would be able to do this and not mess it up badly?
Ebbtide
Gold Member
- Joined
- Aug 20, 1999
- Messages
- 8,008
Thanks for the kind words!Taking my time with projects is something I've been realizing I have to do recently. I'm realizing some things cannot be rushed if you want a good result and somethings may take hours.
Im assuming the butt-cap to the leather handle is something you made, it looks so professional, along with the entire handle and the other knives as well, those are beautiful pieces. How long would you say you take to do an entire handle on average?
I really couldn’t tell you how long it takes. I’d work on it when I had time, sometimes more time than others.
I remember doing one over Christmas vacation, so a week? But not a 40 hour week lol.
The leather handled knife has a brass plate / buttcap. The tang comes through it and is peened over it.
Peening works with carbon steel, stainless tends to crumble IME.
Jump in, do a handle, make a sheath.
I knew nothing when I started. Like you, I saw someone else’s cool work and decided to give it a go.
Interesting. Thank you for your insight.I have not had any issues with retention.
Once I can get enough money together I think I might just give it a shot. Thank you for help and insight, I might even take some inspiration from your work.Thanks for the kind words!
I really couldn’t tell you how long it takes. I’d work on it when I had time, sometimes more time than others.
I remember doing one over Christmas vacation, so a week? But not a 40 hour week lol.
The leather handled knife has a brass plate / buttcap. The tang comes through it and is peened over it.
Peening works with carbon steel, stainless tends to crumble IME.
Jump in, do a handle, make a sheath.
I knew nothing when I started. Like you, I saw someone else’s cool work and decided to give it a go.