Butchers knife for a friend - WIP

weo

Basic Member
Joined
Sep 21, 2014
Messages
3,029
Hello all. I thought I'd try a WIP for my next project, now that I'm getting back into the swing of things...literally.
default_biggrin.png


My sister asked me to make a knife for a chef friend of hers who donated time and food for a dog rescue she volunteers at. In answer to the question of what size/style he wants, his response was: A small butcher's knife to break up turkeys. 5 1/2" blade length, 5 cm high at the heel, 5mm thick at the spine, square shaped WA handle 12 cm long. (Not sure why he mixed metric and english units, but I'm adaptable....)

Here are the sketches I sent him:
1.jpg.d2954a5c1965239402c64637089aee73.jpg


He picked the top shape, which kinda surprised me because he initially said he was thinking he wanted a santoku, but then changed his mind, saying he'd rather have a butcher's knife....

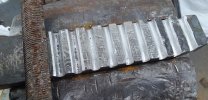
I decided to do a ladder pattern using a billet I had laying around. I'm not 100% sure, but I think this is 3 pieces of 25 layer 0.125" 1084/ 0.140" 15N20 separated by 0.140" thick layers of 15N20.

Here's the billet while grinding the grooves:
4.jpg.b9ee0031e295d5607bd6976a3b5e4dad.jpg


Looks like I need to go a bit deeper here:
4a.jpg.10e293f8f6d2fa0f915ae13eef5dcb61.jpg


Ladder grooves complete:
5.jpg.ce2effe2c4d67701d5b10ed3874d0407.jpg


Stay tuned...forging planned for later today (if the wind stays down, but there is a winter storm forecast starting this afternoon).

PS - let me know if I y'all would rather I shrink the pics.

Suggestions, and constructive criticism is always welcome.
 
This is awesome - really looking forward to updates!

I think the pics are perfectly sized, btw.
 
Pictures are perfect - a good balance between too small for fast loading and too large. They're just right.

I'm following this thread.
 
Thanks for the input, guys.
Looks like I was wrong about the initial billet makeup.

Here's the billet after a quick, 30 second dunk in acid:
6.jpg6a.jpg
It looks like this is two 25 layer damascus pieces separated by 4 layers of 15N20.

It also looks like I need to do a bit more grinding/filing at these spots that don't go quite down to the 15N20... 6b.jpg
 
Wouldn't that make the pattern disappear, if you grind to a mono-steel? (asks the guy who's never forged anything in his life...)
 
BillyO, looking at the etched billet I'm not sure what I'm seeing. I can clearly see the 4 layers of 15N20 in the center (that is the 4 dark stripes?) separated by the thin shiny stripes. What are the thin shiny stripes? The 25 layer Damascus on each side is the dark part that doesn't show any layers?

I can see where you wish the grooves for the ladder pattern to extend into the 15N20 layers for the better contrast. As deep as those grooves are is there any danger of cold shunts when drawing out? If so, how do you prevent them? Do you use flux as you're drawing out to help the grooves weld as they are drawn out?

Understand, I'm asking these questions from the standpoint of NEVER made any Ladder or any other patterned Damascus. I've got a small billet of 10 layer that's about an inch square I need to draw out a bit more, then fold to increase layer count. I'm in the learning mode {g}
Ken h>
 
Wouldn't that make the pattern disappear, if you grind to a mono-steel? (asks the guy who's never forged anything in his life...)

Hi Sam. If you grind everything down to that, then yes. But here's what I'm thinking this is going to turn out like:
6c.jpg

What are the thin shiny stripes? The 25 layer Damascus on each side is the dark part that doesn't show any layers?

Those thin lines are just light shining off the weld line.

As deep as those grooves are is there any danger of cold shunts when drawing out?

Yes :)

If so, how do you prevent them? Do you use flux as you're drawing out to help the grooves weld as they are drawn out?

Patience, Grasshopper.....;) (I'm merely quoting Karate Kid here because it was the first thing that came to mind, but in no means want to imply that I'm a Master.:rolleyes:o_O)
 
Last edited:
So here's where we are today, this looks better:7.jpg
And here's how to help prevent those aforementioned cold shuts. Along with careful forging. 8.jpg

Ending up with this before going into the fire:9.jpg
Starting to make progress:
10.jpg
Getting closer:
11.jpg
Almost there:13.jpg
And.......here's where I hopefully learn that I need to listen to that voice in my head a few heats ago at around 4pm when I thought to myself, "It's starting to get dark. Perhaps I should stop now."
Then I thought, "The forge is hot, let's see if these shop lights are bright enough to forge by."

And here's what happened a few heats later when I noticed this:15.jpg

Apparently I wasn't careful enough.:(:poop::thumbsdown: Fortunately it's at the tip and I've got enough left to cut it off and move on...:rolleyes:
 

Attachments

  • 7.jpg
    7.jpg
    40.4 KB · Views: 10
  • 8.jpg
    8.jpg
    91.7 KB · Views: 11
  • 12.jpg
    12.jpg
    35.4 KB · Views: 13
BillyO, looking at the etched billet I'm not sure what I'm seeing. I can clearly see the 4 layers of 15N20 in the center (that is the 4 dark stripes?) separated by the thin shiny stripes. What are the thin shiny stripes? The 25 layer Damascus on each side is the dark part that doesn't show any layers?

I can see where you wish the grooves for the ladder pattern to extend into the 15N20 layers for the better contrast. As deep as those grooves are is there any danger of cold shunts when drawing out? If so, how do you prevent them? Do you use flux as you're drawing out to help the grooves weld as they are drawn out?

Understand, I'm asking these questions from the standpoint of NEVER made any Ladder or any other patterned Damascus. I've got a small billet of 10 layer that's about an inch square I need to draw out a bit more, then fold to increase layer count. I'm in the learning mode {g}
Ken h>

you will get something like this if you go down to the core.

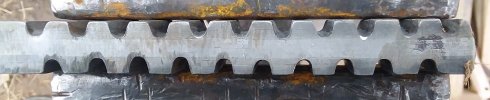
4D467A92-107F-47DE-B308-C2B845DDA0C1 by Wjkrywko, on Flickr

this was a billet that had some problem areas, so to save it, i did a san Mai with Damascus/W2/damascus. I didn’t keep the core centered, so there are areas where the core shows through. Weo is doing this on purpose, and evenly, so it will look better than this. I think it will make an interesting knife.
 
Weo is doing this on purpose, and evenly, so it will look better than this. I think it will make an interesting knife.

Thanks for the vote of confidence, Warren. But this is me adapting to conditions, not really executing what I had planned.....:rolleyes:

"evenly".....that's the key... I'm hoping I can keep things centered from here on out. It's a lot easier to hide forging/grinding mistakes on a completely layered billet.

I'm afraid I may be a bit overconfident in my abilities on this WIP...:(:oops::)
 
Good afternoon, all. Hopefully you're having a better one than me:(.

Here's the update after an hour or so.

First thing to do is clean off the forge scale to see how well I did avoiding those aforementioned cold shuts.

Looking towards the tip, apparently I either didn't bevel the edges enough (as shown in post #9) or pay enough attention while forging. Looks like I've got a bit more clean-up to do. Hopefully they aren't too deep.
20191219_104414.jpg

Here's what a cold shut looks like as you grind it away, gotta get rid of those dark lines!
20191219_104541.jpg

I didn't take a picture of what the billet looked like with all the cold shuts ground out, but other than the one at the tip, they were all fairly shallow and I didn't have to remove much material for them to disappear.

Unfortunately, I came across this in the middle of the billet at the spine:18.jpg

After a bit more grinding:
19.jpg

And more....20.jpg

You're getting longer, not shorter:mad:?!!? Grrrr...... More grinding:(...
21.jpg
Dammit!!! it's getting longer, not shorter!!!!
22.jpg

At this point, I'm now about halfway through the billet and it's been obvious for a while that this isn't a cold shut, but rather a poor forge weld at the multi-bar/15N20 junction...

So here's where I have to put this down, re-group, and start getting ready for my annual trip to Chicago to visit my folks. When I get back, I'll have to start from scratch.

Sorry about that all, but I have yet to achieve perfection.

Have a great end of the year all!

Stay tuned for part II....
 
Really sorry for such loss and disappointment;many of us have chased flaws just like this and i know just how rotten it feels:(
Thank you for an Excellent report and photos,If there's anything good to come out of this it's the shared info,which is so rare and valuable.
Thank you,have great holidays,and the best of luck in the next try.
 
Man, that seriously sucks! We're only human; still, sometimes it feels like mistakes and setbacks are the only name of this game (I've lost count of the junked blades hanging on my walls....)

I really appreciate that you shared your stumbles - please pick this thread back up when you return!!
 
BillyO, that's a real bummer but I do wish to say THANK YOU for sharing. Many times I learn more from my mistakes than when things work first time. I will say it takes a "real man" who is comfortable with his abilities to share mistakes so other folks can learn from them. Enjoy your visit with folks.

Merry Christmas and a Happy New Year to you and your family.

Ken H>
 
This is too bad. I liked where this was going. Next one is going to work out, probably, lol! I’m new to oattern welding, and it’s a steep learning curve. I destroyed a 304/316 SS billet last week. I learned a few more things not to do....
 
Hello all. I decided to clean this up a bit to see if there's salvageable steel here (and I think there might be enough to resume this in a couple of weeks...)

Sam Dean Sam Dean - Here's what it looked like after another quick etch, maybe this will give you a better idea what I was shooting for?20191220_151539.jpg
 
Back
Top