-
The BladeForums.com 2024 Traditional Knife is ready to order! See this thread for details: https://www.bladeforums.com/threads/bladeforums-2024-traditional-knife.2003187/
Price is$300$250 ea (shipped within CONUS). If you live outside the US, I will contact you after your order for extra shipping charges.
Order here: https://www.bladeforums.com/help/2024-traditional/ - Order as many as you like, we have plenty.
You are using an out of date browser. It may not display this or other websites correctly.
You should upgrade or use an alternative browser.
You should upgrade or use an alternative browser.
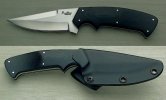
Different light and background photo setup
- Thread starter Boink
- Start date
- Joined
- May 9, 2000
- Messages
- 29,205
Nice; it seems that the top picture has more shading than the bottom picture which to me is very well lit.
- Joined
- Jun 6, 2002
- Messages
- 2,986
Originally posted by nifrand
Sorry Boink,
Think this one belongs in the Gallery.
Randy
Well, thanks for the compliment!!
")
As regards the picture-taking - Tough part with these having black handles is now not to blow out the high tones in the blade when trying to show some detail in the dark handle areas.
Since the bottom photo had no steel to speak of, I took the liberty of lightening the whole thing to bring out the G-10 grain more. This had the unanticipated side-effect of lightening the wall paper. I know there must be a way of keeping that from happening.
- Joined
- Feb 6, 2000
- Messages
- 3,021
Nice! Looks like a handy sheath 
- Joined
- Jul 9, 1999
- Messages
- 3,316
Boink!
How are you setting up your lights to get those great pics?
What kind of lights are you using?
I've got some knives I'm finishing up and want to get them posted, I'm just not getting along with my digicam very well.
FWIW, I have a Sony Mavica 10x MVC-FD73.
Thanks! and all the best,
Mike U.
How are you setting up your lights to get those great pics?
What kind of lights are you using?
I've got some knives I'm finishing up and want to get them posted, I'm just not getting along with my digicam very well.
FWIW, I have a Sony Mavica 10x MVC-FD73.
Thanks! and all the best,
Mike U.
- Joined
- Jun 6, 2002
- Messages
- 2,986
I went out and bought a soft box using hot lights. I set the box close to the table at a 45 degree facing toward the table top. The camera is in front and also facing somewhat of a 45 degree down at the knives that are set upon the table. Hot light remain on, not unlike the bright lights that work with a camcorder. They are very warm in color, so you need to use the white balance controls on your digicam to ensure the colors are not made too yellow looking in the finished shots. Experiment with various exposure settings on the camera to get the output that shows the details you want to bring out. Being digital, if it looks funky, then trash it and shoot some more.
Our forum friend, RL, has a series of photos on this custom forum of a knife collector's get-together. In it, he documents several collections of knives. One of those photos shows how one of the visitors gets his good shots.
What this man has done is to build a "poor man's" softbox that is probably better than what I use. He essentially set up a frame that hold fabric stretched on it that diffuses the lights. Then he puts the lights in place behind it.
What this means is, depending upon how far away the lights are and how big a frame he stretches out, you wind up with a "soft box" that is not limited by the dimensions of the box as one would have been manufactured in a particular size.
As regards shooting the pictures, bear in mind that with satin and polished steels, you are not shooting the steel per sé; you are shooting the reflection in the steel. You need to play around with moving the knife to and fro to where it looks best in the given light source, then, move your camera in position to take advantage of that viewpoint.
Some exercise that helps you tune into this idea is simply putting a knife on a table in whatever existing light there is, and then observing what happens when you move the knife around on the table. Sometimes, you will see the blade go completely black, other times, very light with a very black area, or sometimes exceptionally bright. Of the bright views, sometime you lose the "finish" on the surface, other times, that finish is beautifully shown. That is what you want to grab ahold of in the pictures.
The rest is what you do in an image editing program like Photoshop. This is not only in enhancing what you have captured. This is where you balance how much detail shows along with that of fast download times, meaning small image files. There is no reason to have giant photos that take a long time to download. It only irritates folks who want to spend their time buying new knives!
- Joined
- Aug 24, 1999
- Messages
- 2,292
Hi Boink,Originally posted by Boink
Our forum friend, RL, has a series of photos on this custom forum of a knife collector's get-together. In it, he documents several collections of knives. One of those photos shows how one of the visitors gets his good shots.
Thanks for the mention...our host, Murray White is a professional photographer...his "lightbox" is constructed of Spandex, I believe...here's a pic of the setup to which you were referring...
RL
- Joined
- Jun 6, 2002
- Messages
- 2,986
I got one called a "Rifa LIght" that went for $440.00. That did not include the stand or bulbs.
The home made soft box the guy did in RL's photo was made with PVC tube and fabric. I do not know what exact lights he used; they looked like a bank of bulbs that were screwed into a raceway and attached to a stand.
I may have oversimplified the process of taking some shots. There is some investment involved and I did get some books on still life lighting. I have a sign company and I needed to learn also for taking shots of signs we make that happen to also be in materials that knives are made of (steel and aluminum and plastic, mostly)
 That's one wicked looking little fighter!
- Joined
- Feb 17, 1999
- Messages
- 2,914
well, nice to see so many trying to learn how to do nice photos othe great knives made available.
two of my crusades are prices on knives and good photos
The setup shown was sent to TKCL by Mitch Lum (UW Mitch. He tells me he got it from Tom Mayo. I am not nor ever have been a Commercial Photographer. I did spend a career of 33 years as a professional Wedding and Portrait photographer and earned a Masters of Photographic Arts.
However, that is not overly significant as the method used is quite easily learned in about 10 minutes. I'm not trying to recreate the great work of photographers such as Jim Weyer whose reputation is outstanding and a photographer whom I admire greatly. No collector should be without his books and I certainly look forward to seeing many more.
The light box/tent is basically some 1/2" pvc pipe. One panel is 32 x 32" and the back panel is 20 x 32" and is the support panel. this can be bought at Home Depot and it will take approximately 20' of pipe.
The bit left over is used to create stabilizers one of which can just be seen in the photo at the lower RH corner. These were attached using T joints and the rest of the frame was connected via 90 degree elbows.
In the one I created, I also cut the pvc and then used some unions. This was done because I take the whole tent in a carry bag and do photos at some knife shows so they can be posted on the forums.
This is not necessary if you plan to just use the unit at home.
The lights. I use a movie light bar to hold 4 Daylight flourescent bulbs (6500K) of 15w=50w. The bulbs are made by Phillips #810608 and are also available at Home Depot. The reason for the Daylight Flourescents is because you don't have to concern yourself with white balance and I have not found the other settings of the Nikon 995 to accurately render the correct color of light. These lights will probably last a lifetime as they are good for 10,000 hours. The bulbs in Canada run at $20 and they were $16.95 in the US when I checked this Fall during my travels.
If you don't have a movie bar then a track light bar could be attached to a ball/socket head (from a camera store) so the lights can be properly aimed at the diffusion material.
The diffusion material is white spandex and is stretched across the front panel with velcro. I also use a piece on the LH side panel and then a piece of highly reflective material on the RH side panel. One could also just use the spandex on both side and add additional lighting thru the panels. Just need more light stands, light bar and lights but it is not necessary.
You will need a light stand and a tripod. A tripod is necessary because the exposures will be about 1/4 sec @ f 3.8. For a tripod, I recommend one with a ball and socket head. A good one recently marketed by Manfrotto is the Digi 719b and is not very expensive.
The last part of the setup is the background material. It is easiest to work with a darker background than a light one as the meter in the camera will be fooled by the light being reflected by the background and this will yield an underexposed subject.
A neutral (18% gray) background will make life quite easy.
Beyond the basic photography, one can then move to the fine digital imaging work done by photographers such as PhilL and Coop 747 who are geniuses with the photoshop.
The image that RL posted of his knife is actually straight from the camera with no digital work on it.
The setup shown can also be used without the lighting shown but can be done with natural light from a window or patio door. Avoid strong direct sunlight though. If you can use North light, that is preferred. The biggest problems with daylight are limitations of time of day, color of light, bouncing of light from other objects such as a neighbors nice red brick wall etc. With the light setup and daylight flourescents, I can go down at any hour and get good images.
A couple of reflectors and even another lamp aimed thru some difussion material for filling dark areas of the handle/tang can be beneficial also.
Good luck and hopefully you will all have great images to show of knives in the forums and on websites or on EBay.
- Joined
- Oct 8, 2001
- Messages
- 12,336
....I listen! Thanks for the nice mention.
He has a damn good setup and knows more than I do about the particulars. All he said was good info.
You are going to laugh at my lightbox setup, but I have produced some pretty good pics with it. I haven't built one of M&M's setups yet, but I seem to make out with this easily folded box. It all fit's in my large cardboard 'portfolio' suitcase with my backgrounds.

Three-sided posterboard with white tape joining it, a translucent flourescent light diffuser, and I just started using an overhead flourescent lamp (which comes closer to the original colors than incandescent quartz lamps alone). I never use a tripod. I feel it's too limiting and slow.
Most of my learned experience is figuring out blade reflection, and working with software to adjust the image. Here's a sample of this setup's output:

(Frank Potter Auto - courtesy of www.thecustomknife.com )
Sony DSC-S70 3.3mp camera. About $350 these days. I never shoot above 1260 resolution for the net.
Keep at it. We spend a lot of time going over these discussions on the Photography Forums on the CKD.
Coop
He has a damn good setup and knows more than I do about the particulars. All he said was good info.
You are going to laugh at my lightbox setup, but I have produced some pretty good pics with it. I haven't built one of M&M's setups yet, but I seem to make out with this easily folded box. It all fit's in my large cardboard 'portfolio' suitcase with my backgrounds.
Three-sided posterboard with white tape joining it, a translucent flourescent light diffuser, and I just started using an overhead flourescent lamp (which comes closer to the original colors than incandescent quartz lamps alone). I never use a tripod. I feel it's too limiting and slow.
Most of my learned experience is figuring out blade reflection, and working with software to adjust the image. Here's a sample of this setup's output:
(Frank Potter Auto - courtesy of www.thecustomknife.com )
Sony DSC-S70 3.3mp camera. About $350 these days. I never shoot above 1260 resolution for the net.
Keep at it. We spend a lot of time going over these discussions on the Photography Forums on the CKD.
Coop
- Joined
- Feb 17, 1999
- Messages
- 2,914
a few questions Coop?
what do the incandescents on the light stand do? If they are boumcing from white foam core or something like that, I'd be concerned about casting a shadow from the flourescent light container.
Second concern would be the mixing of the light. What is the true color of the handle material of the knife. It seems you are getting a yellow cast into the image as I note the bottom of the background material in the second shot is a yellow tone whereas in the top it seems to be white.
How much work is being done in Photoshop after the image is taken? don't include the work to do the multiple images which you do wonderfully well.
what bulbs are in the flourescent setup? I'd recommend trying to obtain daylight 5500K bulbs for that or check to see if they have 6500 K in those too now.
What is the material and from where were you able to obtain it that you are using as a background. I thought you were doing that in PS but it appears to be pre-made. It is nice but I'm not sure how it will be if there is not the color shift from white to yellow.
I still prefer a tripod as the shutter speeds are very slow. I also do all images via self-timer of 3 sec so there is no chance of camera movement.
- Joined
- Oct 8, 2001
- Messages
- 12,336
what do the incandescents on the light stand do? If they are boumcing from white foam core or something like that, I'd be concerned about casting a shadow from the flourescent light container.
They are what I used to use, and were responsible for the yellowish cast on the pic above. That one was NOT done with this setup.
How much work is being done in Photoshop after the image is taken? don't include the work to do the multiple images which you do wonderfully well.
I make sure I work on a number of things. I try as best as I can, but images STILL need to be reworked after emerging from the camera, or they look 'flat'. This alone is an area I have played with a lot. is it artificial? Not at all. increasing clarity on a screen for display is what is wanted.
what bulbs are in the flourescent setup? I'd recommend trying to obtain daylight 5500K bulbs for that or check to see if they have 6500 K in those too now.
You're probably right. There is plain 'ol 20watt bulbs in there. four of them. Still much whiter light than the quartz or incandescent.
What is the material and from where were you able to obtain it that you are using as a background. I thought you were doing that in PS but it appears to be pre-made. It is nice but I'm not sure how it will be if there is not the color shift from white to yellow.
See? I'm not manipulating them THAT much!
The material is a desktop photo background called 'Varitone'. I saw an item on eBay once and I was so curious I emailed about the image. He pointed me in the right direction. I buy them from www.setshop.com. Now you know ALL my tricks! ")
Here's a pic I did do with this setup and the image has less shift. Still not perfect, but it's OK.

Coop
- Joined
- Feb 17, 1999
- Messages
- 2,914
this is a good discussion Coop. You and I always have good ones. One day I'll have to visit and then you can show me stuff right at the computer.
I tried the site www.setshop.com but did not seem to get anywhere with a search for Varitone. will have to try again or if you have the direct url that would be good also.
Maybe it is just the monitors we use but the image of the JWS 4 image folder appears to be yellow/green to me. Maybe it does not appear that way to other monitors. I use a KDS Avitron.
I decided to see if I could adjust the image to look more like I'm sure the knife appears in the hand. Tell me what it looks like on your end. To my viewing, the knife is more steel looking and the green/yellow has been removed. This was done with one click in the image editing program I'm currently using. I don't know what is required in PS.

I really like the program by ULead Photo Express 3 but can't find a tutorial on it online (so far anyway) and I'd really like to learn how to do the things you do. I have your post from some months ago but the tutorial would be good regarding layering and selecting the individual images.
I really enjoy being able to exchange the info amoung knife knuts.
I tried the site www.setshop.com but did not seem to get anywhere with a search for Varitone. will have to try again or if you have the direct url that would be good also.
Maybe it is just the monitors we use but the image of the JWS 4 image folder appears to be yellow/green to me. Maybe it does not appear that way to other monitors. I use a KDS Avitron.
I decided to see if I could adjust the image to look more like I'm sure the knife appears in the hand. Tell me what it looks like on your end. To my viewing, the knife is more steel looking and the green/yellow has been removed. This was done with one click in the image editing program I'm currently using. I don't know what is required in PS.
I really like the program by ULead Photo Express 3 but can't find a tutorial on it online (so far anyway) and I'd really like to learn how to do the things you do. I have your post from some months ago but the tutorial would be good regarding layering and selecting the individual images.
I really enjoy being able to exchange the info amoung knife knuts.