Enter the Kodiak

Opinion of the Kodiak

  • Love it

    Votes: 0 0.0%
  • Its just OK

    Votes: 0 0.0%
  • Dislike it

    Votes: 0 0.0%
  • Same OI thing, big yawn

    Votes: 0 0.0%

  • Total voters
    0
Joined
Apr 30, 2001
Messages
1,742
Lately there has been alot of talk about the relationship between maker and customer. The two main topics have been "don't make anything your not pround of" and "don't be afraid to let a customer push you out of your comfort zone".

Well, I finally let myself get pushed. Most of you know my work by now. I have prefered drop point hunters (and small ones at that), well this latest piece blows that out of the water.

I have had several requests for large bowies and fighters, I generally have hemmed and hawed long enough so that the potential customer looses interest, or finds someone else (not the best business practice). That changed. I have a very good customer here on the forums. He already owns a couple of my pieces. He asked if I would make him a fighter. Not wanting to lose a good customer I agreed to work on a design. He knew how to push me out of my standard blade styles but let me stay in my overall style. This is what I came up with.

Now before anyone says it - yes, I am sure there are similar knives from tons of makers. This is mine, I am sure that other makers influenced this design. But I was not looking at any knives when I designed it.

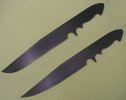
This is the "Kodiak", named for the customer who inspired it to be made. This is a one of a kind custom and is already sold.

It is 14.5" OAL and 1/4" thick. Blades material is ATS-34 and will be heat treated by Paul Bos to Rc58. This is just the finished profile and no bevels have been ground as of yet. It will have a false back edge.
<img src=http://albums.photopoint.com/j/View?u=1663783&a=13142472&p=51907053&Sequence=0&res=high>
Tools used - Ryobi 14" cutoff saw, Bader BIII 2hpVS, 10" contact wheel, 3/4" contact wheel.
Materials used - one 50grt Regal Ceramic belt, Blue layout dye, 1/4"X2"X14.5" ATS-34
<A HREF="http://www.imagestation.com/album/?id=4292475489"><IMG SRC="http://www.imagestation.com/images/album/link/this_album_button.gif" BORDER="0"></A>
 
:cool: ron, looks like a great camp/fighter. how are you going to grind the edge? flat? hollow?
 
It will be flat ground. I don't think that a hollow grind would hold up to the impacts the might recieve.
 
Personally, I love it, but I might just be prejudiced in that direction as far as the knife, because of the maker and the customer :D.
 
I would like one that has less belly near the tip as rendered in the pix below. What kind of finish is planned for the blade? Other than that, it looks good. Please post a pix when its' finished.
 

Attachments

  • fighter profiles.jpg
    fighter profiles.jpg
    8.5 KB · Views: 1,033
For a fighter, I like a pointier blade, but I like this style. Whichever blade style it ends up with, make sure there are no sharp and pointy edges on the handle and subhilt. Looks good!
 
it LOOKS cool, although I'm curious how it will feel & handle in the hand once finished. PLEASE post a pic once it's done!!
 
If it is OK with Gus, I plan on posting photos through the knives making. So you guys will see it evole from steel to finished knife.

Fire Horse,
That is the biggest meanest X-Acto knife I have ever seen:D. Check your mail.

As far as feel goes. It is a little on the heavy side right now:D. But I think I will have to go "MAYO" (hey new catch phrase) on the handle since it will not be tapered. My natural habit is to pick it up in a finger forward grip, that my change after beveling though. In both normal grips it fits very well. I do need to round the finger groove near the butt a little. In a reverse grip, holding it with your pinky in the subhilt section seems best. If I put my pinky in the choil area, it is just not a comfy. But once again that may change once I shape the handles. You can forget about holding it reversed with the blade facing in. That subhilt digs right into the palm. I could also be knocked away pretty easily.

Oh, I plan on putting on my normal satin finish.
 
Save the template/drawings for that one :)
I'm sure it will be a hit when it is done!
Ebbtide out.
 
R.W., That would be fantastic and it is great of you to make the offer!

I am sure there are a lot of folks who whould enjoy it even more if you have the time to talk about the steps you have to make and the work involved. It will be an educational experience. Every once in a while a maker sends me pictures as things are progressing on a knife and I have enjoyed it.

I am bothered a little that folks might be thinking that I do not want that type of thing going on here. First of all it is not my forum it is all of ours. I honestly try to keep that in mind and try to listen to folks that have opinions that might differ from mine. I learn more when I do that. The only problem I have is when the sole purpose of a post is to sell knives or if a business gets done here. From the bottom of my heart I want to support every knife maker that feels comfortable here. (I do not care if it is their first knife or 10,000th knife.)

Sorry for the tangent and thanks again! It would be great to have several threads by folks as they are building something special. This one will have even more meaning since it is pushing you some. Greg is a great person to work with. Have fun.
 
Nope, Sorry but the pattern will be destoryed after this one. Not saying I won't do other fighters, but this is a special custom order. I will not make two of them. However, I am finding big knives to be a bit of fun and a break from the same ol same ol. So I am sure there will be more of similar design.

Gus,
Cool. Just wanted to be sure before I started sucking up band space.

Thanks all. Now it is time to layout the pin and wieght holes.

Look out Mayo here I come :D.
 
Kodiak is one fortunate guy! :D
I'm lookin' forward to the 'progress reports'
Ebbtide out.
 
Finished drilling the handle holes. The only real chalage at this point is getting the 1/8th" pin holes properly lined up. The handle slabs will be held on by ten nickle silver pins. And 1/4" NS thong hole liner.

<img src=http://albums.photopoint.com/j/View?u=1663783&a=13142472&p=51976319&Sequence=1&res=high>
Tools used - Steel ruler, circle compass, Craftsman prick punch, General Tools angle finder, General Tools automatic center punch, cobalt bits 3/8th" 5/16" 1/4" and 1/8th", Delta 3/4 hp VS drill press, Vise Grip brand large clamp
Materials used - Gunk dark cutting fluid
 
Beveling was next on the list. After all the layout lines were scribed, it was time to head over to the BIII. As is sits now it is rough beveled at 50grt. I am over joyed with how the grinds turned out. They are nice and even and perfectly straight. I credit this to the VS feature of my BIII. Once I got within about a 1/16th" of the grind lines, I slowed the belt down to about 20% of max speed. I was able to have full control while still being able to remove as much steel as I wanted.

I stopped short of taking the false edge all the way to the scribed lines. If I had stuck to the design plan the back bevel would have gone into the handle area. The tip still retains a great deal of strenght. I will have to see what happens with the tip on the next one which is much pointier.

The feel is much better now. I don't have to hold it with a finger in the choil to get a good balance. I thought that I might have to hollow grind the tang, but now I think that doing so would cause it to be too tip heavy.

<img src=http://albums.photopoint.com/j/View?u=1663783&a=13142472&p=51976321&Sequence=1&res=high>
<img src=http://albums.photopoint.com/j/View?u=1663783&a=13142472&p=51976323&Sequence=1&res=high>
Tools used - Knife makers scribe from K+G, BIII with platen
Materials Used - Regal Ceramic 50grt belt

Next is to bring up the entire blade to 600grt and then off to heat treating.
 
I agree with Gus about these progress reports. They are illuminating, educational and informative.

Thanks, Clark.
 
I am adding something extra to the posts, so you might want to go back and look at them again. I figured it might be fun to list the tools and materials used in each step.


ALSO - come on guys VOTE. I want some input on this knife. I know that more than 21 people have read this thread.
 
If it was mine i'd want far less of a choil, if any choil at all. If i'm carrying a knife that big, i have at least 2 smaller ones, so why choke up on the big one?

But that's just personal preference.

Nice design, and the grinds look wicked!

James
 
Well here it is, only took it up to 400grt. Figured that there was no reason to go to 600grt when I will just start over at 220 when I get it back from Heat treating. I left the last coat of layout blue on the flats so that the grinds would be more visible.

Started the clean up grinding at 120grt, then proceeded to 220 and 400. I recoat the blade in layout blue between each grit. In this way I am sure that I have removed all the previous scratches and that the blade is still flat and true.

When I finished with the 220, I went into the house proud as could be. Showed it to my wife. She was kind enough to point out that my grinds did not match from one side to the other. I went back out to the shop and checked them with calipers. Sure enough she was right! There was a 0.05" differance in their hights. Must have had the scribe tilted on one side. Well, the problem is fixed and my ego properly deflated. This is the first knife that I have ever used calipers to check all grinds. I can officialy say that this knife is true to 0.005"! Think I will be using calipers on all my knives from here on out.
<img src=http://albums.photopoint.com/j/View?u=1663783&a=13142472&p=52076261&Sequence=1&res=high>
<img src=http://albums.photopoint.com/j/View?u=1663783&a=13142472&p=52076259&Sequence=1&res=high>
Tools used - BIII, dail calipers
Materials used - Regal ceramic 120grt, Regal ceramic 220grt, Hermes blue flex 400, Dyechem blue layout fluid

Now it just has to wait for its 19 little brothers to be ready and it will be making a trip to visit Paul Bos.

<A HREF="http://www.imagestation.com/album/?id=4292475489"><IMG SRC="http://www.imagestation.com/images/album/link/this_album_button.gif" BORDER="0"></A>
 
Back
Top