First WIP thread. Two Knives ( Pic Intensive)

Joined
May 19, 2013
Messages
185
I want to begin by thanking all other contributors to these forums! I'm always learning something new here. :thumbup::thumbup:
This is one of the best online communities I've found anywhere, knife-devoted or not.

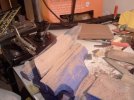
I can count the knives I've made to date on both hands. I was apprenticed to a blacksmith for three years in Missouri back in high school, but now I'm on my own, fresh out of college, (employed-thank god), tinkering out of the spare room in my apartment. :worked_till_5am: I can't wait to get a space I can forge in (house hunted today with my new fiance- it will have a shop)

I'm going to put together a recap of my progress thus far on two knives that I'm building. I'll keep posting as I go.

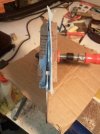
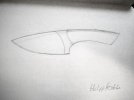
Here are my preliminary sketches
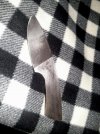
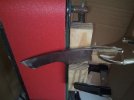
Knife 1


Knife 2


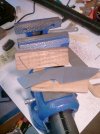
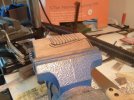
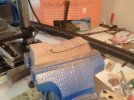
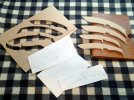
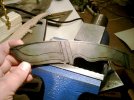
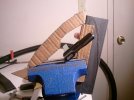
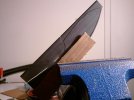
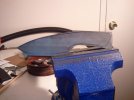
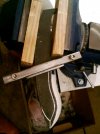
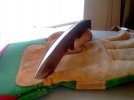
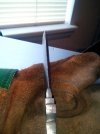
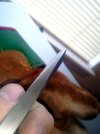
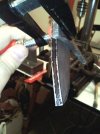
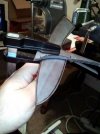
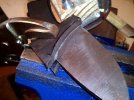
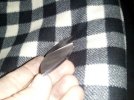
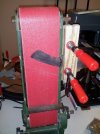
These knives are being constructed through stock removal (hacksaw and file) out of 5160 from Jantz knife supply. Once I've gotten comfortable with this steel I might try some 52100 for the next set, but I'm going to use up the bar I have.

I want to take on a trademark now so if these go to sale they'll be marked M1P1 and M2P1 (Model 1 Protype 1).

Thanks for looking guys!
 

Attachments

  • WP_000993.jpg
    WP_000993.jpg
    31.6 KB · Views: 55
  • WP_001002.jpg
    WP_001002.jpg
    34.3 KB · Views: 44
Last edited:
Here are my knives going from sketch to cardboard to metal blank:

Knife 1


Knife 2


Attachments

  • WP_000999SML.jpg
    WP_000999SML.jpg
    76.3 KB · Views: 41
  • WP_000925SML.jpg
    WP_000925SML.jpg
    68.7 KB · Views: 44
  • WP_000938.jpg
    WP_000938.jpg
    48.3 KB · Views: 45
  • WP_000939.jpg
    WP_000939.jpg
    48 KB · Views: 43
  • WP_000941.jpg
    WP_000941.jpg
    44.3 KB · Views: 42
Last edited:
Some more pics of Knife 1


At this point I've cut the bevels and cleaned up the outline.
I didn't have a good scribing tool handy, so I used my dremel to cut a shallow (and ugly) line over my sharpie guide lines. I need to get some dykem layout fluid for my next round because the sharpie marks tend to rub off after a while. Maybe I'll get a refillable felt tip marker and fill it with dykem.
 

Attachments

  • WP_000927.jpg
    WP_000927.jpg
    36.8 KB · Views: 44
  • WP_000974.jpg
    WP_000974.jpg
    60.1 KB · Views: 60
  • WP_000975.jpg
    WP_000975.jpg
    51.7 KB · Views: 42
  • WP_000977.jpg
    WP_000977.jpg
    34 KB · Views: 43
  • WP_000979.jpg
    WP_000979.jpg
    28.9 KB · Views: 36
Last edited:
Pics from knife 2


You can see the scribe lines from a drill bit (tip from bladsmth on another thread). I also attempted to curve the plunge lines using a piece of scrap as a file guide. Using a half-round file (modified with safe edges) I tried nibbling at the plunge. Sadly, the tiny amount of file surface area the I could wrangle in there was small and though it worked I wasn't getting anywhere fast. So, knife 2 will have straight plunges now. I will try to bring the curved plunges back later down the road when I have the right tools.

I think I will also remove any mill scale before cutting bevels in the future. That dark top layer seems pretty hard because my file would skate for a few strokes before biting in- probably no good for file longevity.
 

Attachments

  • WP_000943.jpg
    WP_000943.jpg
    35.6 KB · Views: 39
  • WP_000944.jpg
    WP_000944.jpg
    38.3 KB · Views: 39
  • WP_000952.jpg
    WP_000952.jpg
    76.2 KB · Views: 42
  • WP_000953.jpg
    WP_000953.jpg
    59.1 KB · Views: 46
  • WP_000955.jpg
    WP_000955.jpg
    76.2 KB · Views: 38
Last edited:
Looking pretty good man.
It seems like you're taking your time and being methodical, which is a good thing.
Yeah, that scale can be rough on files.
Keep posting, wips are some of my favorite threads.
 
Thanks! Yeah, hand filing really forces you to take your time and it's helping me watch surface changes that would have happened in the blink of an eye on a high-powered belt sander. I have an el cheapo 4x36 sander but it'll probably only see action when I go for the distal taper on knife 2.

Btw, I'm not sure how to classify knife 2. It's roughly a 3-finger grip, compact so it'll fit in it's sheath below the rim of your jeans pocket. It feels like a primitive outline to me.
I love knives (duh) but I'm still no expert on all the terminology. I'm going to bill knife 1 as a recurve hunter.
 
I added the tang taper on knife 2 last night and I think it looks pretty good!


I started out with a silly wood clamping jig that I bolted to my belt sander. I would clamp in the knife and then apply pressure on the tang. I was using the flat ricasso as the fulcrum point, but the results were uneven. So, I converted the clamping jig to a shelf extension and clamped the knife blade in visegrips for leverage, still using the ricasso as my fulcrum point. That fixed her right up!

There's also a bit of a compound taper leading from the tip of the butt that I really like- it adds to the asymmetrical aesthetic, I think.

p.s. Sorry, my photos suck. I need more indirect lighting and something besides a camera phone. I'll be picking up an older model canon with my next round of purchases. Hang with me till then ;)
 

Attachments

  • WP_000957.jpg
    WP_000957.jpg
    43.5 KB · Views: 36
  • WP_001018.jpg
    WP_001018.jpg
    44.5 KB · Views: 47
  • WP_001016.jpg
    WP_001016.jpg
    36.2 KB · Views: 35
  • WP_001013.jpg
    WP_001013.jpg
    37.4 KB · Views: 40
  • WP_001010.jpg
    WP_001010.jpg
    46.5 KB · Views: 38
Last edited:
I like #2 much more than #1 personally. They both look really good though.
I'd say that #2 looks a lot like a skinning knife. The flow of the curve from tip to butt makes that knife. Very pleasing to the eye.
 
I like #2 much more than #1 personally. They both look really good though.
I'd say that #2 looks a lot like a skinning knife. The flow of the curve from tip to butt makes that knife. Very pleasing to the eye.

Thank you! I'm enjoying #2 better, as well. I haven't touched #1 in a little while. To be honest the blade on #1 is a little stunted. I was going to make several of #1, but when I realized that the bar I ordered would only make 3 1/2 of #1, I shortened the blade a bit. Now I think the handle is a little oversized for that blade and it doesn't flow as well as my original drawing. I guess greed will bite you in the end. I'm having more fun experimenting, anyhow. I think "skinner" fits well to #2. Thanks for the input!
 
Use steel that fits the knife, not fit the knife to the steel. :) I learned that building bicycle frames. (use tubing to make the frame, not make the frame based on your tubing.)
 
Use steel that fits the knife, not fit the knife to the steel. :) I learned that building bicycle frames. (use tubing to make the frame, not make the frame based on your tubing.)
Quite right. I trend a bit toward the impulsive. I may shrink the handle on #1 to fit the blade better and build a full size version next week. That should leave me enough steel to make #2 again. I really can't wait to get a forging space, then I can move metal as well as removing it.
 
Last edited:
Blade and tang tapers for #2 are finished now. Blade is at 400 grit finish. Now to shape a handle and drill pin holes.


I don't have the money on hand for a really nice handle, but I do have some black walnut, so I'll figure out the shape I want in that and change later if I score some nice material. If I get some really nice handle material, I'll probable add some shiny bolsters, as well.

I nibbled off the big portions with a hand saw and chisel, then cleaned up the profile with sand paper and a little belt sanding. I'll drill the holes while the scales are still flat before giving the handle its ovoid cross section.

The scales are attached with a temporary bond (shop towel soaked in wood glue - cleans up with water) so they'll come off with a tap before I take the blade to temper. One only needs light clamping or hand pressure to keep the wood from dislodging during shaping.
 

Attachments

  • WP_001022.jpg
    WP_001022.jpg
    40.6 KB · Views: 28
  • WP_001025.jpg
    WP_001025.jpg
    67.2 KB · Views: 23
  • WP_001026.jpg
    WP_001026.jpg
    59.8 KB · Views: 23
  • WP_001029.jpg
    WP_001029.jpg
    34.8 KB · Views: 28
  • WP_001032.jpg
    WP_001032.jpg
    63.6 KB · Views: 25
Last edited:
So, this is probably old hat to you guys, but I had a go at laying denim micarta yesterday. Here we go!

Roughly 4" x 24" strips of blue jeans material.


Strips stacked, clamped and skewered into my new micarta jig. The strips are going to be held down at one end while the jig is open and I am introducing the resin.


I laid a wax paper liner underneath the stack with enough hanging out to fold over the top before the clamp is set. I added a stick of 3/4" wood to either side of the jig to spread the force from the clamps, creating an I-beam like effect


The end result. The micarta plank is very rigid while the runners coming off the edge are flexible, so I think I got the resin/hardener ratio about right.


That's all for now :) My next post will cover either wood stabilizing or making of mosaic pins.

Thanks for looking!
 
Last edited:
When I do my jeancarta, I wrap the jean/epoxy in wax paper, and lay it on a piece of 14x14x3/4" steel, and place 2 plates on top of it, then let it sit overnight. Works great, and I find gravity provides really even clamping pressure. :)
 
Last edited:
When I do my jeancarta, I wrap the jean/epoxy in wax paper, and lay it on a piece of 14x14x3/4" steel, and plave 2 plates on top of it, then let it sit overnight. Works great, and I find gravity provides really even clamping pressure. :)
I would imagine! That's some heavy stuff. If you center everything it should come out nice, I bet. I was really surprised how little the micarta seemed to compress, although it was starting to gel
up when I compressed it.
 
Last edited:
I got back into knife #1. The blade was playing second-fiddle to the handle, so I updated the layout. The original handle design is more appropriate for a longer blade, IMO.


Here is the new handle shape. Btw, I'm loving my 12" Simmonds MultiKut right now. This would have taken forever to hog down with my Nicholson file.


I'm also adding a hidden lanyard hole, but I'll cut that after I have the tang tapered and the scales shaped.


Drilled the pin hole before starting the tang taper


I'm going to put in a single mosaic pin - 1/4" copper tube around a 1/16" copper rod centered in a field of red-dyed epoxy. This will combine with the denim micarta that I made earlier in the thread. Cheers!
 
Last edited:
Thanks, leifjl. What do you think about the hidden lanyard hole? It just occurred to me that trying to hide the lanyard hole under the scales at that narrow point I've marked may create a difficult threading situation. I could bull through it, but my customer might be a little frustrated with replacement lanyards down the road. Not to mention, the remaining thin tabs of handle material would probably chip away at that spot.

Should I clip the scales and reveal the lanyard hole or maybe move the hidden hole up to the apex of the hump on the back end of the handle? Thanks for the input.:)
 
Back
Top