Folder WIP

Joined
Dec 4, 2001
Messages
3,824
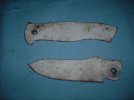
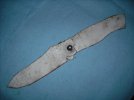
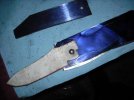
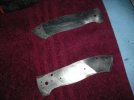
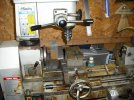
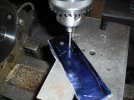
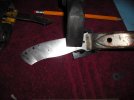
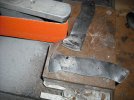
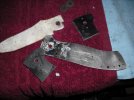
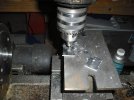
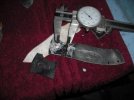
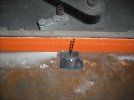
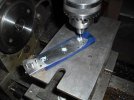
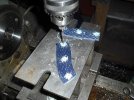
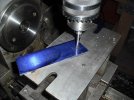
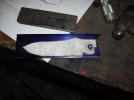
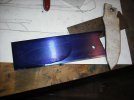
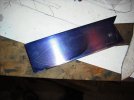
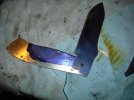
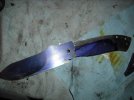
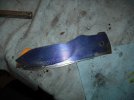
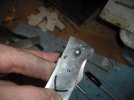
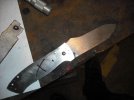
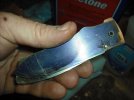
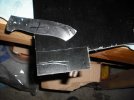
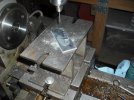
Here's a liner lock I'm working on rite now. I took my camera with me as I am going through the steps. I'm not finished yet though, so it'll be a couple days before I'm done.

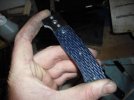
It's a pattern I drew up after seeing an Allen Elishewitz knife a few years ago. I didn't copy per say, but it's definitely influenced by him.

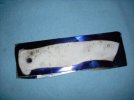
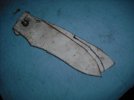
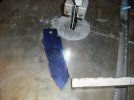
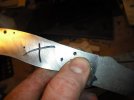
I'm not going to go too much into the design, except to say that I went through several pieces of paper and stick pins and thumb tacks to get the pattern. And again Ray Rogers has a good design tutural on his website that really helped it "click" for me.

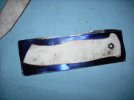
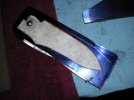
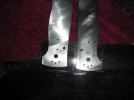
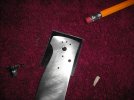
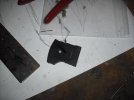
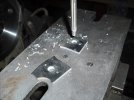
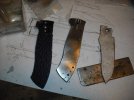
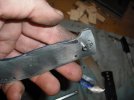
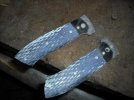
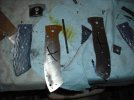
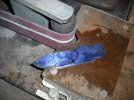
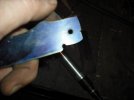
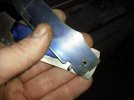
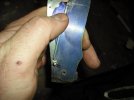
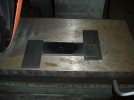
Here's the pattern, it's still a little rough, but that will be cleaned up and in all probability it will be discarded and a new pattern made directly from the finished knife will be made. It's basically typing paper glued to scrap sheet metal I had laying around.
 

Attachments

  • DSCF0019.jpg
    DSCF0019.jpg
    35.1 KB · Views: 129
  • DSCF0026.jpg
    DSCF0026.jpg
    40.8 KB · Views: 131
OK, got the pattern, now it's time to start on the liners. It works a lot better for me to super glue the ti pieces together so I drill both sides at once. Less chance of me screwing up that way.

I use the pattern and mark and cut the ti a little bigger than the liners, clean up the burs from the cut on a disk sander, super glue the titanium together and clamp. Spring clamps work great for this.

Don't worry about getting them a loose, if your not carefull with heat build up they will pop loose when you least want them too. And when it's time to take them apart it's easy to warm them with a torch and they pop rite apart.

Anyway, after there glued together and set up clean both sides and paint one with dychem. Lay the handle pattern on and scribe the pivot hole. This is the only hole were marking rite now.
 

Attachments

  • DSCF0024.jpg
    DSCF0024.jpg
    44 KB · Views: 54
  • DSCF0025.jpg
    DSCF0025.jpg
    36.6 KB · Views: 62
A note on working titanium, make sure your bits and cutting tools are sharp. Good quality bits makes a world of difference.

OK, we've got the pivot hole drilled and reamed, now lay the handle pattern on the ti blank and scribe the rest of your holes and outline. You'll notice that this pattern doesn't have any other holes. There marked, but not drilled. That's mostly due to this not being a final pattern. Trouble with folders for me is you have to make the knife before the pattern!

In any event there is a pic of where I thought the stop pin should go. Just remember that you don't want to go too far back with the stop pin. This is where a compass comes in handy. You've got to clear the bolster with the thumb bob, the lower part of the blade has to clear the stop pin and the blade has to stop at the rite point on the pin and the back of the blade has to be in the rite profile to the handle when it's against the stop pin. Sounds more complicated than it is.

And a pic of the pattern with where I think the back spacer should go. I'll add holes for the alignment pins and screws later.
 

Attachments

  • DSCF0029.jpg
    DSCF0029.jpg
    40.1 KB · Views: 51
  • DSCF0033.jpg
    DSCF0033.jpg
    50.1 KB · Views: 67
  • DSCF0030.jpg
    DSCF0030.jpg
    31.1 KB · Views: 59
OK, after scribing the outline, drill and ream the stop pin. I like 1/8" stop pins and use them for alignment pins as well. Put the blade pattern and a pivot pin and stop pin in and close the blade. Scribe along the blade edge and this gives you the maximum space for your back spacer.

Here's a shot of the blade all marked out and all the holes drilled. I am going to use G10 bolsters on this one, so I added screw holes for it. Keep in mind the back spacer holes need to be well clear of the back edge of the knife. Your going to have to counter sink for the screw heads so leave yourself plenty of room. I like to put at least two alignment pins in the back spacer for strength.

After all this it's time to cut the blank out on the bandsaw. Here's the liners cleaned up. I have a mason jar I keep with enough Acetone in it to submerge the liners and such to help soften any left over super glue.
 

Attachments

  • DSCF0034.jpg
    DSCF0034.jpg
    51 KB · Views: 51
  • DSCF0038.jpg
    DSCF0038.jpg
    26.9 KB · Views: 58
  • DSCF0072.jpg
    DSCF0072.jpg
    71.1 KB · Views: 58
Guess I should have mentioned earlier that it's extremely important to be able to drill holes at 90 deg. I use a Smithy 3-1 with a home build drill table as my drill press for folder work. I've had the mill for several years and have used the lathe and mill capacity, but it gets used as a precision drill press more than anything.

And yes I do occasionally clean it.
 

Attachments

  • DSCF0025.jpg
    DSCF0025.jpg
    89.3 KB · Views: 95
  • DSCF0031.jpg
    DSCF0031.jpg
    68.6 KB · Views: 66
OK, time to get the bolsters made. I'm using 1/8" black G10 for these. Basically I lay the liners on the stock about where I want them and mark a little over size. Mark the pivot hole and drill and ream. Using a couple pivots I super glue the bolsters to the liners. Make sure you don't forget which side of the liner is the outside. I've screwed up a couple times doing that. After the glue is set drill the screw holes through the bolsters and grind them to the edge of the ti liners leaving a little oversized. If you noticed that there are three holes at the top, that's for the pocket clip. Both liners get all three holes, but the bolster that doesn't get the pocket clip only gets the middle hole. I keep an old pocket clip to mark the holes.
 

Attachments

  • DSCF0075.jpg
    DSCF0075.jpg
    66.3 KB · Views: 46
  • DSCF0076.jpg
    DSCF0076.jpg
    74.7 KB · Views: 51
  • DSCF0077.jpg
    DSCF0077.jpg
    50 KB · Views: 52
I've seen your folders, don't look like you need any help.:cool:

Any way, decided to call it a night after setting the blade down on the mill and couldn't find it for 30 minits.

Here's where were at now.

Ground to the edge of the ti, popped the bolsters off, notice the glue residue on the liners. I put the liners in the mason jar with the acetone to soften the super glue while working on the bolsters. Also note the sharpie X on the outside of the bolster. I put this on both so I know which side goes out!

Now to drill through the existing holes for screw clearance, since I'm using 1-72 screws throughout I use a 1/16" bit for the tap, and drill all the screw holes to 1/16". For clearance I drill back through the bolsters with a 5/64" bit. Then I use a 1/4" reamer on the pivot hole to countersink the so the pivot pin and screw will sit nearly flush. This is where I really like using the mill.

I mark where I want the bolster and handle to butt on the liner. Measure from the pivot hole with a set of calipers and transfer to the bolsters. I put a pivot pin and a 5/64" drill bit through both bolsters to tie them together and grind to the mark on the horizontal edge grinder. I have done it on the disk sander and using the platen and rest on the belt grinder in the past. The thing is to grind them both the same and at 90 deg.
 

Attachments

  • DSCF002012345.jpg
    DSCF002012345.jpg
    86.8 KB · Views: 61
  • abdfghh.jpg
    abdfghh.jpg
    78.8 KB · Views: 62
  • adfghsfgh.jpg
    adfghsfgh.jpg
    72.2 KB · Views: 79
  • asdghdrg4.jpg
    asdghdrg4.jpg
    54.9 KB · Views: 81
Last edited:
Here's shot of me trimming the bolsters and countersinking for the pivot and screw.

In case your wondering why it's taking so long and what all the other stuff is floating on the bench I'm working on a couple other folders at the same time. I can really see why some dedicated folder makers have multiple drill presses lined up or a turret drill press. I use 8 different bits and reamers and go back and forth between them. Boy a turret press would be nice.
 

Attachments

  • DSCF0033aa.jpg
    DSCF0033aa.jpg
    42.8 KB · Views: 47
  • DSCF0034aa.jpg
    DSCF0034aa.jpg
    72.7 KB · Views: 57
  • DSCF0035aa.jpg
    DSCF0035aa.jpg
    63.5 KB · Views: 59
Ok, so far I haven't tapped any of the holes in the liners. I start by tapping the bolster screws. I'll wait on the scales and back spacer holes till further in as I will be using them as a drill guide. I can't remember who posted this suggestion, but a battery drill works great to tap with. Just use slow speed and have your clutch set real low, and try to get as square as possible. It's surprisingly easy to tap straight holes with the screw gun. I don't tap all three holes on the side that isn't getting a pocket clip, just mark the liner with a sharpie so you know which is which.

I then attach the bolsters, pivot pins first as there is a bit of play in the screw holes and both holes for the pivots were reamed to size. I decided on blue dyed and jigged bone. Grind the end square and straight, same as the bolsters. BTW, I grind with a 80 grit belt, then lightly grind with a fresh 220 belt to smooth the joints up. Just be careful as the finer belt can burn the bone or G10. Check fit and look for any light between the bolster and handle scale while clamped. Drop a little supper glue around the outside, be careful not to get any near the bolster.

While the glue is drying I started on the blade. I'm using CPM 154 and am surface grinding it down to 1/8" The other bar on the magnet is mill rolled 1/8" 1084, it gives me a good guide to go by. After finishing the blade should be just a little under an 1/8". An easy alternative is to buy precision ground stock, but I've used a belt grinder and a disc grinder and a set of calipers and a lot of patience to do the same thing. I take it too a 220 grit finish and cote it with blue dychem. While that's drying back to the scales.
 

Attachments

  • DSCF0036bb.jpg
    DSCF0036bb.jpg
    60.9 KB · Views: 48
  • DSCF0038bb.jpg
    DSCF0038bb.jpg
    47.1 KB · Views: 50
  • DSCF0039bb.jpg
    DSCF0039bb.jpg
    87.1 KB · Views: 52
  • DSCF0022bb.jpg
    DSCF0022bb.jpg
    66.5 KB · Views: 77
Ok, now I drill through the liners and handle scales. This being bone good sharp bits and going slow and clearing the bit are a must. Keep in mind any chipping out will be taken care of when I counter sink for the screw heads. Also I hold the pieces firmly in my hand, the scale is not flat, though it's flat enough and all the scale holes are centered and in line. And with a 1/16" bit the bit will break if it binds without cutting my fingers off. Still this is most definatly not a practice I recommend. For full tang knives and larger or more rounded handle material I clamp the flat to the underside and drill from the top side. Again I only do this with small bits and my UNDER POWERED mini mill and on pieces I can firmly grasp. You couldn't pay me enough to try it with my floor drill press.

Then I grind close to the edge of the ti and pop the scales off. If there a bit stubborn you can carefully use the edge of a knife to pop them apart.

I then use the disk sander and a fairly worn/clogged disk and polish the glue residue off. Then drill through the 1/16" holes with a 5/64" bit for clearance.

Now it's time to counter sink for the screw heads. I use the dial setting and screw feed on my mill to get repeatability, but most drill presses have a stop that you can set up. The scrap piece of G10 with the holes in it is where I'm setting up my counter sink depth. I counter sink the scales to the same depth even though they are slightly thicker as I will take some of that thickness down when conturing. On the bolsters I do not countersink the three holes that will be used for the pocket clip. The counter sink I use has a 5/64"pilot that works perfect with the 5/64" clearance hole.
 

Attachments

  • DSCF00491.jpg
    DSCF00491.jpg
    66.9 KB · Views: 47
  • DSCF0050.jpg
    DSCF0050.jpg
    47.9 KB · Views: 50
  • DSCF0052.jpg
    DSCF0052.jpg
    73.8 KB · Views: 44
  • DSCF0056.jpg
    DSCF0056.jpg
    72.1 KB · Views: 47
  • DSCF0055.jpg
    DSCF0055.jpg
    78.2 KB · Views: 49
OK, all the holes are countersunk to the same depth, and I've tapped the holes for the scales. Now lets put the scales and bolsters on to check for fit. I always put the pivot pin and bolster on first as the holes are reamed and the most accurate. Tighten down the screws then put the scales on. A trick to take up any slack is to just start the screws in the scales then use thumb and fore finger to lightly press the scale into the bolster then tighten the screws in the scale while holding pressure. Don't over tighten, the screws are easy to strip the head out, even with torx drivers and being bone scales you could crack them, just snug them down good.

If everything looks good and there's no daylight or gap at the bolster/scale joint I take them to the belt sander and rough in the scales. It looks like I really got into the ends of the bolsters, but I just barely touched them. The rest of the shaping will be done later and most will be by hand. Since the side that is getting the pocket clip isn't countersunk on those screws here's a trick to keep from eating the head off. Take the screw out and put it in from the back side, the lower screw is tight and the pivot pin is in to hold the bolster in position. I will get into the top of the pivot pin, but it's a spare and like the screws will be used on the next folder as a temporary fastener. All screws and pivots will be replaced with new upon final assembly.

Once that's done take everything back apart and mark the liners.
 

Attachments

  • DSCF0058.jpg
    DSCF0058.jpg
    48.7 KB · Views: 85
  • DSCF0059.jpg
    DSCF0059.jpg
    47 KB · Views: 53
  • DSCF0063.jpg
    DSCF0063.jpg
    76.5 KB · Views: 88
  • DSCF0064.jpg
    DSCF0064.jpg
    58.7 KB · Views: 75
Last edited:
On to the blade. I use the pattern to scribe the pivot hole, drill and ream the hole, then use the pattern with a pivot pin in place to scribe the outside of the blade. Since this is still a work in progress on the pattern I leave a little extra for the lock and stops. Since I've yet to perfect grinding I'll leave a little extra on the belly and point. Cut everything out on the bandsaw and grind to the marks. I do a finish grinding on the outline with a 220 grit belt, even though I will have to make some adjustments.

Here's the tricky part for me, where the blade rest against the stop pin when closed. I left a little extra but want to get the basic shape started. I use a 1/8" chain saw stone in my flex shaft to grind it in being careful to leave extra. I normally go through 2-3 stones per folder. I wish I had a way to get a small wheel attachment that would go down to 1/8 so I could use grinding belts. I have a dremel shaper table on order along with some carbide cutter bits, we'll see how that works out. I know some people use small wheels and cut the notch over sized as it's not under any real stress in the closed position, but I want the notch small and tucked under the liner when the blade is open, choils or notches that are exposed and can hang up in use is one of my pet peeves.
 

Attachments

  • DSCF0041a.jpg
    DSCF0041a.jpg
    68.7 KB · Views: 43
  • DSCF0042a.jpg
    DSCF0042a.jpg
    44.9 KB · Views: 44
  • DSCF0043a.jpg
    DSCF0043a.jpg
    51.4 KB · Views: 44
  • DSCF0044a.jpg
    DSCF0044a.jpg
    50 KB · Views: 44
  • DSCF0045a.jpg
    DSCF0045a.jpg
    64.5 KB · Views: 52
Last edited:
The rest of the pics
 

Attachments

  • DSCF0046a.jpg
    DSCF0046a.jpg
    91.7 KB · Views: 54
  • DSCF0047a.jpg
    DSCF0047a.jpg
    31.3 KB · Views: 49
  • DSCF0048a.jpg
    DSCF0048a.jpg
    30.9 KB · Views: 53
Alright, now were getting into a bit of the fitting. Take the liner that will become your lock, paint it with dyechem and check the fit of the blade with a washer and stop pin in place. You can see where there is interference, which is a good thing as you want to take it down to just where it will clear.

Take the stop pin out and mark the other side of the blade, this time I used a sharpie, and rotate the blade through it's full arc and mark the area's that need to be taken down. Keep in mind the blade edge and point are somewhat oversized, you will need to take that into account when dry fitting.
 

Attachments

  • DSCF0069a.jpg
    DSCF0069a.jpg
    63.5 KB · Views: 48
  • DSCF0070a.jpg
    DSCF0070a.jpg
    53.2 KB · Views: 48
  • DSCF0071a.jpg
    DSCF0071a.jpg
    65.7 KB · Views: 52
  • DSCF0072a.jpg
    DSCF0072a.jpg
    40.4 KB · Views: 49
  • DSCF0073a.jpg
    DSCF0073a.jpg
    35.5 KB · Views: 51
And here you see the areas that need to be relieved. I like to leave just a hair extra here as I like to "sneak up on" the final position.

I'll finish up on the blade tomorrow, I'm getting fuzzy and it's time for bed.
 

Attachments

  • DSCF0076a.jpg
    DSCF0076a.jpg
    58.3 KB · Views: 55
Thanks.

Well got some more done, but had to quite early, got a couple others that need hand finishing and that takes me forever.

Anyway, I started getting the blade fit to the stop pin. First the back of the blade to adjust the open profile. The more you take off the higher the blade will point, the less the lower the blade will point. Grind it close to your mark, but leave a little and check the fit often. The trick is to go almost far enough, but leave a few thousandths for clean up after heat treat.

Now on to the closed position. Here you can see the interference. Same as the back of the stop on the blade, a little at a time and check it. You can see where I used a sharpie to indicate interference so I don't take off where it isn't binding. Last shot is just about rite, remember that the blade is slightly oversized length and width wise to account for grinding. Also it's easy to take more off after heat treat.
 

Attachments

  • DSCF0019aaa.jpg
    DSCF0019aaa.jpg
    71.6 KB · Views: 43
  • DSCF0021aaa.jpg
    DSCF0021aaa.jpg
    41.6 KB · Views: 41
  • DSCF0022aaa.jpg
    DSCF0022aaa.jpg
    43.6 KB · Views: 45
  • DSCF0023aaa.jpg
    DSCF0023aaa.jpg
    43.6 KB · Views: 45
  • DSCF0024aaa.jpg
    DSCF0024aaa.jpg
    52.4 KB · Views: 57
OK, here it's about rite.

Now to start getting the back spacer ready. I use 15 thou thick washers so you have to add 30 thou to the thickness of the blade.
 

Attachments

  • DSCF0026aaa.jpg
    DSCF0026aaa.jpg
    50.6 KB · Views: 36
  • DSCF0051aaa.jpg
    DSCF0051aaa.jpg
    35.7 KB · Views: 41
I normally need about a .155 spacer for the back, but haven't found anything close to it. I normally use mycarta for the backspacer, it's strong and light weight and stabile. Since I don't have the rite size I have to grind it down from 3/8" sheet. You can see where I've cut a hunk out. I like to use larger pieces to grind because it's easier to keep from taking too much off and I can get several back spacers at the same time. I get it close with the surface grinder, the extra piece of metal is there to keep me from going too deep. I rough grind it to about .170, then finish up on the disk sander. A light touch and a foot control really help there, along with checking all four corners and middle with the calipers.

OK, now I clamp it on the liner and put a couple drops of super glue on the edges to hold it. Let it set up and drill through the liner with a 1/16" bit and with the bit and ream the alignment pin holes. This is another reason I like mycarta for the back spacer, it's way softer than ti and when you drill and ream the alignment holes they will self center.

This time I put a bit too much super glue and had to soak the liner and spacer in acetone for a little while before it'd pop loose. Clean up the liner and the spacer.

Got it loose and drill through the 1/16" screw holes with the 5/64" clearance bit.
 

Attachments

  • DSCF0029aaa.jpg
    DSCF0029aaa.jpg
    57.2 KB · Views: 41
  • DSCF0030aaa.jpg
    DSCF0030aaa.jpg
    55.9 KB · Views: 42
  • DSCF0031aaa.jpg
    DSCF0031aaa.jpg
    30.8 KB · Views: 40
  • DSCF0033aaa.jpg
    DSCF0033aaa.jpg
    58 KB · Views: 46
  • DSCF0043aaa.jpg
    DSCF0043aaa.jpg
    81.4 KB · Views: 51
Back
Top