Folder WIP

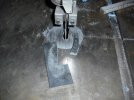
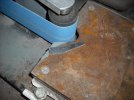
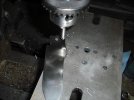
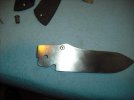
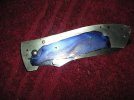
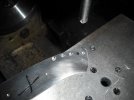
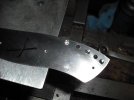
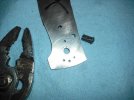
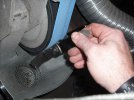
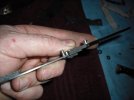
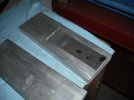
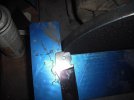
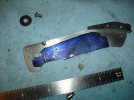
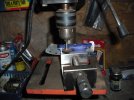
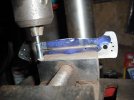
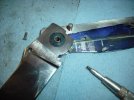
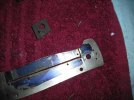
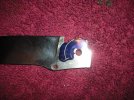
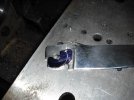
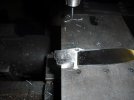
Mark as close as you can the inside of the spacer and cut out on the band saw. Over to the horizontal edge grinder and trim and polish the inside curve, don't worry about the back of the spacer at this time. The closer to the holes you get without getting them so thin they break out or show through the better. It gives you more room for blade.

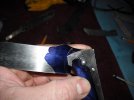
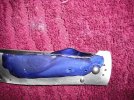
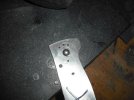
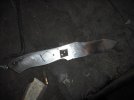
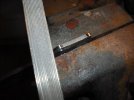
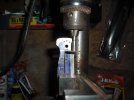
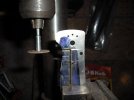
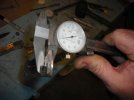
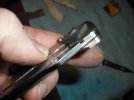
A note, to get rid of the bulls eye from drilling lightly hand sand on 400 grit and a flat surface, I use a granite surface plate. You don't want to take any thickness off the spacers, just get rid of the raised area from drilling and the slight bur from grinding and polishing the inner surface.

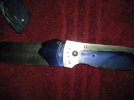
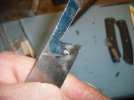
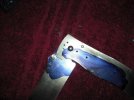
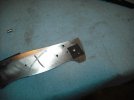
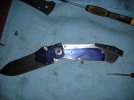
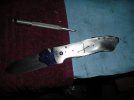
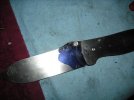
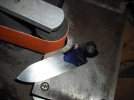
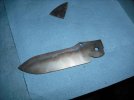
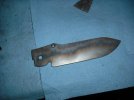
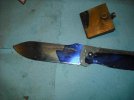
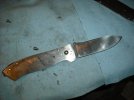
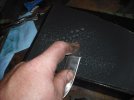
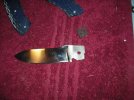
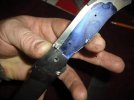
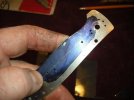
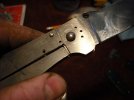
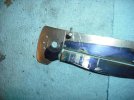
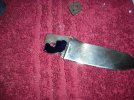
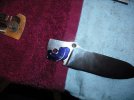
This is all I've got for tonight, I did go over the blade by hand and took it to a rough 400 grit finish, but still need to drill for the thumb bob and put the checkering in the back of it. Rite now I'm heat treating a test blade of CPM-154 and if it works rite this will be the first blade I've done with my oven. So far the test blade has hardned just fine, now it's tempering and waiting on me to grind and test it. If it works I'll heat treat the blade tomorrow.
 

Attachments

  • DSCF0044aaa.jpg
    DSCF0044aaa.jpg
    70.3 KB · Views: 37
  • DSCF0045aaa.jpg
    DSCF0045aaa.jpg
    78.2 KB · Views: 46
The photos weren't hard, just had to stop instead of running to the next step, or forgetting to take a pic while in the middle of doing something.
 
Great thread, I have enjoyed following it and gettin smarter as I do. I would like to give liner locks a try one of these days after I get the button lock down. Thanks for taking time to photograph as you go. I don't seem to have the discipline to stop and take pics while I'm deep in the makin. looking forward to the finished product!
Jim
 
OK, test blade came out like I wanted it. Helps I was able to purchase some liquid nitrogen in a thermos. I'll post some pics of that set up when I get done heat treating the blade.

Now where were we? Time to finish up the blade. Paint the blade near the pivot and a little past where you think the thumb bob will go with dyechem. Take one of the liners and put the stop pin and pivot pin in and put the blade on. Work the blade through the full range of motion and use a scribe to mark the outer most point of the bolster on the blade. You can see the arc here, this is as close as the pivot can go back with out grinding off the bolster. With the blade in the closed position mark the line of the handle. Scribe about where the thumb bob goes using your marks for reference. Run the knife through a couple open and close cycles while watching your scribe mark to be sure that's where you want the thumb bob to go.

Take the blade off and center punch where you want the thumb bob to go and drill. Since I'm using a fancy thumb bob (not really) that has a shoulder on it I had to drill a little larger hole than I normally do. Since this will not be an ambidextrous thumb bob I use a 82 deg. counter sink on the back side of the blade so the flat head screw will be slightly below the level of the blade.
 

Attachments

  • DSCF0026cc.jpg
    DSCF0026cc.jpg
    37.7 KB · Views: 37
  • DSCF0027cc.jpg
    DSCF0027cc.jpg
    100.7 KB · Views: 50
  • DSCF0028cc.jpg
    DSCF0028cc.jpg
    72.5 KB · Views: 50
  • DSCF0033cc.jpg
    DSCF0033cc.jpg
    56.6 KB · Views: 45
  • DSCF0034cc.jpg
    DSCF0034cc.jpg
    50.7 KB · Views: 37
The thumb bob uses a 1-72 screw, and I didn't have any quite short enough. The way I trim screws is a scrap piece of titanium with a taped hole. Run the screw in through the hole and grind the back side off. When you back the screw out it will clean the end of the screw.

Here's the blade with the thumb bob in place and you can see the relation ship with the handle. It actually lightly rubs the front edge of the bolster but I will round that corner slightly. It also interfere's with the liner in the closed position slightly, but we'll take care of that later.
 

Attachments

  • DSCF0039cc.jpg
    DSCF0039cc.jpg
    36.5 KB · Views: 34
  • DSCF0040cc.jpg
    DSCF0040cc.jpg
    37.4 KB · Views: 33
  • DSCF0042cc.jpg
    DSCF0042cc.jpg
    68.1 KB · Views: 38
  • DSCF0043cc.jpg
    DSCF0043cc.jpg
    68.8 KB · Views: 37
  • DSCF0044cc.jpg
    DSCF0044cc.jpg
    76.1 KB · Views: 38
I'm afraid I'm doing this a little out of order, I try to maximize the use of my drill press without changing bits, but with several going on and taking pics I hope everybody will understand some disorganization.

Here I'm drilling the clearance holes for the 1-72 screws. I chose the opposite liner from the one that gets the tip down pocket clip. It makes things easier during final assembly, but I've done it both ways.

After clearance I use a 82 degree counter sink to get the flat head screw heads below the liner surface. I just eye ball these and try to get them the same depth and check with the screws I'm going to use. Once everything is assembled and I grind the extra thread sticking past the liner I make sure the same screws go back in the same hole. Oh, and this is another reason to mark the outside of the liner, I have had to make a new liner because I got mixed up and countersunk the wrong side.

At this time I also do the anti rotation mod to the pivot hole. I do this on the side that the pocket clip goes on and the pivot pin has a fixed head. There are pivot pins out there with a flat already ground in them, and press fit, ect. I prefer to grind my own with a slight taper. I use a polished and rounded punch and smack it with a hammer, I use the anvil on my bench vise as a back up. Doesn't look like much upset, but it is. I have hit too hard and hit it multiple times and caused the ti to break out there. Some times I have to take a needle file and dress the flat up in the hole, but this time got it just rite. The pivot will not quite go all the way and I use a rubber mallet to smack it lightly a couple times over a hole to seat it. Now when the pivot is installed and you tighten or loosen the screw, or open and close the blade the pivot won't move.
 

Attachments

  • DSCF0045cc.jpg
    DSCF0045cc.jpg
    74.5 KB · Views: 32
  • DSCF0047cc.jpg
    DSCF0047cc.jpg
    49.2 KB · Views: 29
  • DSCF0048cc.jpg
    DSCF0048cc.jpg
    40.5 KB · Views: 28
  • DSCF0053cc.jpg
    DSCF0053cc.jpg
    61.8 KB · Views: 32
  • DSCF0054cc.jpg
    DSCF0054cc.jpg
    55.7 KB · Views: 34
OK, time to test fit and put everything together.

I use a thin piece of scrap mycarta as a spacer for the pivot pin so I can tighten it down and check play.

Put all the alignment pins in and screw everything together. I haven't cut the lock bar yet, that will be done after heat treat of the blade and I still have to grind the lock on the blade. For now were just checking overall profile and to see if I got everything straight and all the holes line up rite.

The liner is sticking out past the blade a bit so I dressed the profile up on the belt grinder.

Here you can see the profile, looks pretty good, but the hump looks a little off with the pivot set back like it is.
 

Attachments

  • DSCF0055ccc.jpg
    DSCF0055ccc.jpg
    43.1 KB · Views: 24
  • DSCF0057ccc.jpg
    DSCF0057ccc.jpg
    57.2 KB · Views: 36
  • DSCF0058ccc.jpg
    DSCF0058ccc.jpg
    49.6 KB · Views: 28
  • DSCF0060ccc.jpg
    DSCF0060ccc.jpg
    67 KB · Views: 33
  • DSCF0062ccc.jpg
    DSCF0062ccc.jpg
    48.1 KB · Views: 36
Since I didn't like the way the hump looked with the thumb bob I scribed where I wanted to move it back to. Again the horizontal belt grinder makes short work of it and I take it too a smooth 400 grit finish.

Here's where I need to decide where to put the thumb serrations and I lay it out in the liner with a sharpie.

This is my favorite file, it's a checkering file I got from Sheffield's supply years ago. I can't remember what the lines per inch are, but it works good. And finished with the serrations. I don't cut as deep as the file will go, I want a little extra traction and something to feel where my thumb is, not to eat the hide off my thumb up. While getting the blade ready to heat treat I lightly rub the serrations with a 600 grit paper to take the sharp edges off. Once the blade is finished and while doing the final finish on the completed knife I'll lightly buff them with green chrome on the buffer.
 

Attachments

  • DSCF0063ccc.jpg
    DSCF0063ccc.jpg
    58.8 KB · Views: 36
  • DSCF0064ccc.jpg
    DSCF0064ccc.jpg
    70 KB · Views: 36
  • DSCF0065ccc.jpg
    DSCF0065ccc.jpg
    38.6 KB · Views: 41
  • DSCF0066ccc.jpg
    DSCF0066ccc.jpg
    58.8 KB · Views: 38
  • DSCF0069ccc.jpg
    DSCF0069ccc.jpg
    32.6 KB · Views: 42
Blade is ready for heat treat. It's literally in the oven rite now.

I take the blade and rub and scrub with acetone and lightly sand any discoloration off. I also use the 82 deg countersink and lightly break the sharp edges of the holes by hand. Here it is sealed up in SS foil, I don't have a roller, but I use a light ball peen hammer to crease the folds and my hands to get the foil as tight as possible on the blade.

I'll soak in liquid nitrogen overnight and tomorrow we'll see if I got it rite. If so I'll grind the blade and try to finish everything up.

Well, here goes nothing, wish me luck!
 

Attachments

  • DSCF0070ccc.jpg
    DSCF0070ccc.jpg
    39.4 KB · Views: 23
  • DSCF0071ccc.jpg
    DSCF0071ccc.jpg
    49.1 KB · Views: 28
Ok, blade is out of the oven and in the liquid nitrogen. The blade came out exceptionaly clean, only a little discoloration at the top where the foil was folded over. I don't know if you can see a couple shinny spots, but that's from me checking with a file, all the file did was knock a little color off, and not much of that. Nice and hard.

I really need to get some better set up for the quench plates, but they work like a charm and I'm sure the compressed air doesn't hurt. It really amazed me how fast the plates bring the temp down.

Any way here's a couple shots of my hi tech cryo dewar, it's a Stanley thermos I got as a give away/advertisement from my last company. It's sitting in a 5 gallon bucket wrapped with towels to keep it from spilling during transport and use. I had the bucket tied in the corner of my pick up bed. I stuck the cap back on, the blade has a piece of tie wire through the pivot hole, but I will be surprised if there is any nitrogen left in the morning. The thermos did a good job, it was nearly full when I filled it and a 45 mile drive and 4 1/2 hours later there was over half remaining.

A caution on liquid nitrogen, it's -320 degrees below 0. It's cold and considered a hazmat. The gas it vents is inert, but it will displace oxygen, like say in the cabin of a car or truck. Every year there are a couple people who die from transporting a dewar in there car and get in an accident and spill just enough liquid nitrogen that it suffocates them. Also don't even think of not letting it vent unless you have a pressure vessel rated for nitrogen or want an icy explosion. When I filled my thermos I took the seal off the cap and lightly screwed it on, it's go two big cut outs on the side (for venting steam from coffee I guess), but I made sure the cap was loose and could hear nitrogen slowly venting. Also when you take the cap off be very careful and wear gloves and eye protection, I've seen a drop of sweat make it spit at you.

In any event, I'm going to work on some other knives that need hand finishing and try to make it an early night tonight.
 

Attachments

  • DSCF0019dd.jpg
    DSCF0019dd.jpg
    46.5 KB · Views: 35
  • DSCF0020dd.jpg
    DSCF0020dd.jpg
    49.1 KB · Views: 40
  • DSCF0021dd.jpg
    DSCF0021dd.jpg
    49.9 KB · Views: 43
  • DSCF0022dd.jpg
    DSCF0022dd.jpg
    62.5 KB · Views: 52
  • DSCF0023dd.jpg
    DSCF0023dd.jpg
    60.2 KB · Views: 38
Blade's out of the liquid nitrogen and warming up to room temp. I'll give it an hour to warm up then to the tempering in the oven.
 
OK, finally getting back to this. I managed to screw up the handle on a knife that already had a buyer and basically stopped everything to fix it.

Anyway, back on track now.

Blade's out of cryo and been tempered. I put lay out dye on the edge of the blade and the side to mark where I want the plunge line to start and to mark the center of the blade. Rough grind the blade, I can't give advise there, except something Wayne Godard once wrote that stuck with me, "with your own two hands you will put the blade against the grinder and remove what you didn't want to remove". At least I think that's what he said, and boy if it ain't the truth with me!

Any way, since I don't have a hardness tester I have to do it the old fashioned way, sharpen and test. Blade passed the brass rod test and cut a little rope and hickory, ect. Seems I got the heat treat close on this.

Now the the blade is rough ground I put in the liner and see just where I'm at. Remember the blade is slightly oversized. A little dyechem and mark where the blade needs to be taken down.

Here's the blade final ground and profiled. In both open and closed position to check for proper alignment.
 

Attachments

  • DSCF00201.jpg
    DSCF00201.jpg
    49.9 KB · Views: 27
  • DSCF00211.jpg
    DSCF00211.jpg
    54.3 KB · Views: 39
  • DSCF00231.jpg
    DSCF00231.jpg
    64.6 KB · Views: 32
  • DSCF00251.jpg
    DSCF00251.jpg
    53.7 KB · Views: 29
  • DSCF00241.jpg
    DSCF00241.jpg
    52.3 KB · Views: 31
Last edited:
Ok, blade is looking fair, so I go to hand sanding from here on out. I know some people who came go from the belt grinder straight to a buffer and have a perfect mirror finish. Not me, got to correct some of the grinding flaws!

Here I work on the tang, I use my granite surface plate and hand sand the flats. After both sides are finished I go to my handy dandy sanding jig. Basicly a piece of aluminum channel iron that I clamp in a vise and use a pair of vise grips and a piece of mycarta to clamp the blade down. I will fold and put a paper towel under the point if it's got enough distal taper to make the point unsupported, but not a problem with most folder blades.

The blade is taken to aprox. 90% finish, I could take it all the way, but would have to go back over it anyway. Also the blade is semi sharp, I use hand sanding and a stick sanding stick with a strip of leather glued to it to give the blade a slight convex edge. If you hollow grind or want a straight flat grind you could probably save yourself some hand sanding, but this is the way I like to do mine. Also I tend to take it too the buffer and polish it up, then go back to sand paper to put the hand rubbed finish on, the polish lets me see scratches I wouldn't normally see.

It's time to cut the lock. I like a 7.5%-8% angle, most often I use a 8% angle. The reason I like the 8% angle is it cause a slightly "sticky" feel to the lock, it's less likely to slide off in use. Go too far angle wise one way or the other and the lock will either wedge itself off or jam so tight you'll never release it. I use a disk sander and set the platen up with this little tool, I got it at Lowes for cheap, and it's pretty accurate, though I may need a magnifying glass to read the hash marks. Set the platen up and grind the lock, a foot control really helps here. And be careful of heat, don't want to remove the heat treat from the lock face. I try to get 90 deg. from the pivot and parallel to the back stop. Just remember everything has to work together, and the reason the liner lock works so well is that it's a triangle. You have to set the lock far enough back that it wedges the lock bar on the liner properly, but not so far back that it interferes with the stop pin. You want close to the same length on each of the triangle legs, using the pivot as the starting point, I hope I'm explaining this rite. This can take a little practice and some destroyed patterns to get a feel for it.
 

Attachments

  • DSCF00261.jpg
    DSCF00261.jpg
    45.8 KB · Views: 31
  • DSCF00291.jpg
    DSCF00291.jpg
    42 KB · Views: 29
  • DSCF00311.jpg
    DSCF00311.jpg
    61.2 KB · Views: 31
  • DSCF00331.jpg
    DSCF00331.jpg
    66.6 KB · Views: 36
  • DSCF00351.jpg
    DSCF00351.jpg
    49.6 KB · Views: 35
Last edited:
Here's a shot of the blade with the lock cut. I should mention to make sure your cutting on the rite side, it would suck to get it all ready and notice you ground the lock face at the opposite angle. I haven't managed to make that mistake yet, but I'm sure I will eventually.

Also you want to break the leading edge of the lock so it doesn't try to shave metal off the lock bar every time you open the folder. I hit it lightly at an angle on a scotchbrite belt. Just want to put a tiny rounded edge to the leading edge of the lock, not take any off the face.

Put the blade and stop pin in the liner that your going to use for the lock and using a sharp scribe mark the lock face on the liner, and where it stops. Use a straight edge mark the width of the lock and the length. You want it wide enough to be strong, but not so thick that you can't easily unlock it with your thumb. Also you want to clear the screw holes for the handles. I like about a 2 1/2" long lock bar, give enough spring without being too hard to unlock. Shorter tends to be too stout a spring, longer tends to be a little flimsy and could unlock under hard use. At the corners where you lines intersect drill a 1/16", and at the end of the cut for the lock bar.

I've tried slitting saws in my mill, fiber cut off wheels, holding a dremel by hand and harsh language, but the best way I've found to cut the lock bar is with a machinist vise and a cheap harborfrieght drill press. I set the vise up so the mark where I want the cut is level and set the drill up for the highest speed. I use a dremel cut off wheel, number 420 is the thinest I've found. and slowly feed the liner into the cut off wheel. This normally takes 4-6 disk, this liner took 6, counting the two I busted. I would use my mill but I don't like the idea of having the fine abrasive all over my mill.
 

Attachments

  • DSCF00371.jpg
    DSCF00371.jpg
    100.8 KB · Views: 31
  • DSCF00391.jpg
    DSCF00391.jpg
    48.1 KB · Views: 34
  • DSCF00401.jpg
    DSCF00401.jpg
    69.6 KB · Views: 32
  • DSCF00411.jpg
    DSCF00411.jpg
    45.1 KB · Views: 36
  • DSCF00421.jpg
    DSCF00421.jpg
    60.4 KB · Views: 49
Here's some shots of me cutting the lock bar. The wheels do wear down quick, and if your not care full they break easy. The way I've got the drill press and table set up I can unscrew the mandrel set screw from underneath through the table and put a new disk on without disturbing the height set up on the press. I like to grind about half way through on one side then work it from the other side. Just be careful not to go too far forward or back and you'll wind up with a fairly neat slot. When doing the lock bar face be very careful to get the same angle as your scribe mark, and leave your line after cutting or you will cut too much off. If you get it just rite the lock bar should just start to engage the blade.

Here is how I bend my liners. I used to try curving the lock bar, but I got this suggestion from another maker and it works great. Clamp the liner in a vise and use a square punch to bend the lock bar over. Here I'm using a brass bar stock. You want the lock to go all the way to the opposite liner, but no further, if you go too far it can lock the blade up too tight and possibly warp the liner, if not far enough you'll never get a good lock up.
 

Attachments

  • DSCF00441.jpg
    DSCF00441.jpg
    54 KB · Views: 53
  • DSCF00451.jpg
    DSCF00451.jpg
    35.3 KB · Views: 53
  • DSCF00461.jpg
    DSCF00461.jpg
    46.5 KB · Views: 53
  • DSCF00471.jpg
    DSCF00471.jpg
    34.3 KB · Views: 53
  • DSCF00481.jpg
    DSCF00481.jpg
    41.7 KB · Views: 60
Ok, time to test fit and put the detent ball in.

The lock bar was lacking just a thousand or two from engaging the lock, which is what I was after. I use a needle file and lightly file the face of the lock bar till it just engages the lock on the blade. You can also see the back of the bar is rounded, you only want the lower 1/3 or so of the lock engaging the blade. The rounded area also give room for expansion when you drive the detent ball in.

Using a scribe mark the arc of the blade. You must keep the detent ball in contact with the tang of the blade, if it slips off it can make for a rough action at the least. Here I've marked the arc and drilled for the detent ball. I use a 3/64" drill bit for the 1/16" detent ball, I remember a manufacture suggesting a larger size but it never worked rite for me and 3/64" works for 0-80 taps.
 

Attachments

  • DSCF00521.jpg
    DSCF00521.jpg
    31 KB · Views: 44
  • DSCF00531.jpg
    DSCF00531.jpg
    38 KB · Views: 47
  • DSCF00551.jpg
    DSCF00551.jpg
    66.5 KB · Views: 45
  • DSCF00571.jpg
    DSCF00571.jpg
    71.7 KB · Views: 43
  • DSCF00591.jpg
    DSCF00591.jpg
    83.5 KB · Views: 48
Here's a little tool that makes my life easier when trying to install the little 1/16" balls that like to fly to the farthest corners of the shop. I took an old punch and drilled a divot in it and magnetized it with one of those hand held magnetizer/demagnetizer tools. Use the punch to pick up a ball and drive it into the hole in the lock bar. It takes a bit of force, but don't drive it too deep. Check it with the calipers, you need the ball to stick out no further than the thickness of your washer, in this case .015. You don't want it under the thickness either, or it won't hold the blade closed as firmly as you want.

Mark the blade tang with lay out dye and put it in the liner with the stop bar. Open and close a few times to mark the track of the ball.

This is where I'm going to stop for now, I will finish up the blade tomorrow. Basicly I like to drill about .020 past the end of the mark the ball left. This is probably the hardest part for me to get rite.
 

Attachments

  • DSCF00621.jpg
    DSCF00621.jpg
    37.5 KB · Views: 35
  • DSCF00661.jpg
    DSCF00661.jpg
    37.2 KB · Views: 30
  • DSCF00671.jpg
    DSCF00671.jpg
    35.5 KB · Views: 32
  • DSCF00701.jpg
    DSCF00701.jpg
    101.9 KB · Views: 32
  • DSCF00721.jpg
    DSCF00721.jpg
    70.5 KB · Views: 38
Ok, time to hold my breath and hope I don't screw it up. I scribe a line about .020 past the end of the ball track and drill with a carbide spade bit. The spade bits are only good depth wise for the diameter of the bit. So, a 1/16" bit only goes about 1/16" deep.

This is the part that gives me the most trouble. I have a set of carbide spade bits from 1/16" up to 1/8". I start with the smallest and work my way up till the ball slips into the hole. You want the ball to just engage the edge of the hole, not go all the way in. That gives you a slight spring holding the blade closed.

I start with a 1/16". Put the stop pin and pivot and blade together and see what I've got. Not quite there. I up to a 3/32" spade bit and drill again check again. Feels like it's there. I put the knife together and tighten everything down and check. Yep, that's it. Wipe my brow and take a deep breath, I didn't go too far.
 

Attachments

  • DSCF00202.jpg
    DSCF00202.jpg
    101 KB · Views: 33
  • DSCF00222.jpg
    DSCF00222.jpg
    58.4 KB · Views: 32
  • DSCF00252.jpg
    DSCF00252.jpg
    44.7 KB · Views: 36
  • DSCF00272.jpg
    DSCF00272.jpg
    46.5 KB · Views: 35
  • DSCF00302.jpg
    DSCF00302.jpg
    35.5 KB · Views: 39
Back
Top