Future first framelock. Design look ok?

Joined
May 7, 2015
Messages
58
In the middle of making some friction folders for some friends (and working out all the kinks) and when i finish these next couple jobs I want to try my hand at making a framelock.

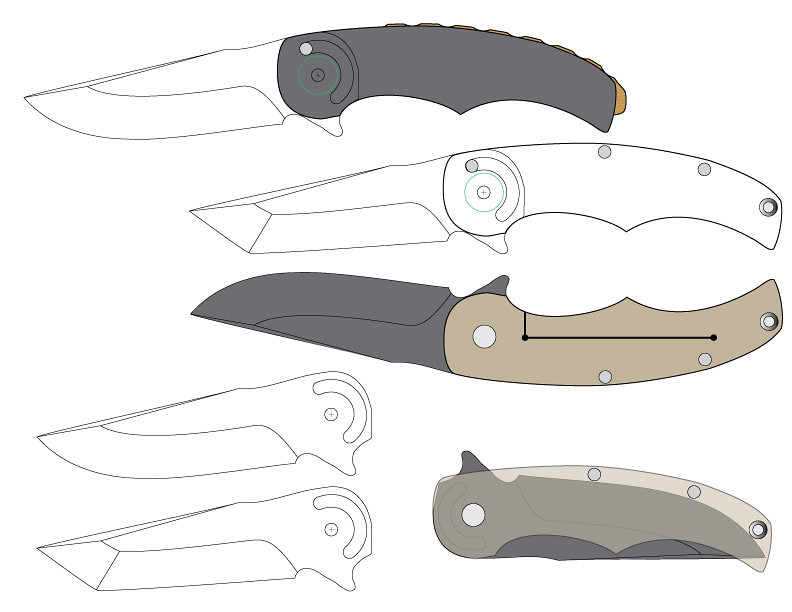
Here's my initial design, took me a LONG time to get the stop pin figured out and have the scales the right shape so it wouldn't be ugly when closed. I'd love some feedback or criticism on this design. I want to make it a flipper because I like the look and the idea of it but I have no idea if there are any special considerations to making a flipper as opposed to something with a thumb stud.

Anyway, here it is:
2j5lwcm.jpg


The entire knife is 7 inches long. Will have brass scale and titanium lock side. Pivot will be 3/16", stop pin 1/8" ; lanyard hole will be some 1/4" titanium tubing i have. I'm thinking of making a lignum vitae spacer or some other wood so I can shave it down to the exact width of the 1/8" o1 blade + two .015 bronze washers.

Detent ball will be 1/16", I have a 1/16" drill bit but I'm assuming that's not going to work and theres some numbered drill bit that will work better.

Edited to add another draft of a different design that would have all the same specs:
16gehpw.png


am I missing anything?
 
Last edited:
The only part I feel comfortable helping with is detent ball question. I use 1/16 balls and #54 drill bit. You just want the hole to be a few thousands smaller than the ball. I press the ball in the hole. Hope that helps. P. S. They are good looking knives, pm me if you have any questions. I'll try to help any way I can.
 
Read Bob Terzuala's book which can be downloaded for free. A picture in the closed position will help and then make a mock up. I like to use a acrylic.

Something important about the lockup is that you want to have the bottom of the lockbar contact the tang as far down from the pivot as possble. Your pic shows you missing some potential here. Search through Brian Fellhoelter's comments on the subject for more info.

Your stop pin, pivot and lock contact are a straight line who is not ideal. Should be a triangle.

Mark
 
Thanks guys! very much appreciated. I'm looking at the book right now on google books and will start getting into it.

Re: the stop pin, that's probably been my biggest pain. I initially thought that I could just make them in the same spot as my friction folders and just add a lockbar but if I put it there then the pin is hitting after the "flipper" part of the blade and that placement was the only spot i could think of that has it out of the way. I'm trying to avoid doing an internally cut stop pin since I don't have a mill to cut that section out of the middle of the tang.

Anyway, thanks for the drill # and the book recommendation, I'm going to get to reading it now!
 
Internal would free up the design by a great margin and you don't need a mill. Make a fixture out of aluminum plate with a 3/16" hole (your pivot size). Put your pivot through your blade and into the hole. Now offset that to the center of the drill and clamp the plate down. The offset will be the radius of arc (center to center). Drill holes the diameter of the stop pin, or rather slightly bigger, as close together as you can. Careful when doing the ends of the arc because that will obviously determine the open and closed position. Use a dremel or file to connect the holes.

Mark
 
Here is another design with the consideration of keeping the "triangle".
2cdtk4x.png

34gomtk.png


that's a good idea about the internal stop pin. I'm going to try a design with that in mind as well.
 
This is why flippers are especially a PITA. Everytime you change one thing it compromises something else! You need to also keep in mind that the flipper tab in the closed position should be as far forward as possible to give leverage when flipped. At least to the pivot and even more forward if possibe.

Mark
 
+1 on getting the lock contact point as low as possible, this will help prevent lock rock.

I wouldn't worry about the triangle thing too much. It is the only thing in Bob T's book that didn't make any sense to me. Just get the stop pin and lock point as far away from the pivot as possible.
 
Here is another design with the consideration of keeping the "triangle".
2cdtk4x.png

34gomtk.png


that's a good idea about the internal stop pin. I'm going to try a design with that in mind as well.

Liked your second design, first was okay but didn't stand out quite as much to me, however THIS design seems very unique and looks awesome. Really like it, If you go through with this one I would suggest rounding the spine much like CRK does the sebenza's, that and an option to add a glass breaker on the end in a backspacer and I'd buy one.

-Nick
 
Just one thought from a non-knife maker: I love the second design, but I would like to see the curve of the flipper continue on into the handle. You'd end up with a usable choil and I've always liked knives where the blade flows into the handle when open. Good work so far sir and good luck. If you need some field testing done let me know:thumbup:
 
Just one thought from a non-knife maker: I love the second design, but I would like to see the curve of the flipper continue on into the handle. You'd end up with a usable choil and I've always liked knives where the blade flows into the handle when open. Good work so far sir and good luck. If you need some field testing done let me know:thumbup:

I was thinking the same thing.
It drops off at the top which really stands out. Are you opposed to curving the handle more near the choil?
And if you do change it, as Varga mentioned, it's probably going to change the profile and final look of the knife.
 
Hi,

Have you designed your actually templates yet? You are going to find that you have to add the tolerances for the lockbar cutout and blade lockface thickness. Right now everything is line to line and you are going to have problems actually making this.

Since this is your first knife, I just wanted you to be aware that line to line is not good for actually making the knife. Design wise, I like it, it is similar to the burnley kwaiken and rogers sharpie.

I use 2 sets of templates, the first is line to line with what you have, the 2nd set is the ones I use to cut and profile.

7A7B4673-DEBF-42FD-918D-D6D4AFEC41A2_zpshwhvdxic.jpg
[/URL][/IMG]
 
Pitt,
Good call on the tolerances. I've definitely ruined more than one friction folder by not giving myself enough room for tolerance.

I planned to cut the lockbar first and then slowly reduce the tang of the blade until it fit, then adjust the stop pin area...does that sound right? Or should I do stop pin first ?

Looks like the kwaiken and the sheep foot-ish blade are the winners over the drop point.

To Varga's point about the flipper tab, I thought about the momentum issue as well. Is my flipper tab too far back on the sheepsfoot one to be functional?
 
Last edited:
Functional? Probably, but why design in such a big compromise? It won't work well. I spent a year going from my first drawing to functional knife. Not full time of course but a great deal of time nonetheless. Most, if not all, of the issues were due to the stop pin. Best advice I could give would be to go internal and and let the flood of design ideas open up.

I agree with what others have said about having your flipper act as a guard and flow into the handle. Also this should be fairly far forward to give you as much grip area as possible. I tried to stay away on commenting on this because it's a matter of opinion. I know what I like and that what I design for. Your priorities might be completely different and an that's a good thing. Functionality, however, is pretty straight forward. Does it flip well? Close well? Solid lockup? To me those questions are black and white and shouldn't be compromised.


You can see that the front of the grip able area is right up to the pivot. Something I wanted to do but not necessary. Also, 80% of the handle length is the blade length which is another goal to shot for. Good luck!

Mark

ETA: Bob's post beat mine and I know he designs some very nice knives. Take as much as you can from that gift he just gave.
 
Last edited:
Hmm ok I think I'm going to try to redesign both the kwaiken and that third one with an internal stop pin as well as making the flipper flow with the handle better and then bring the designs back and see what you guys think. Definitely want this thing to work correctly.

Ps, thanks for everyone's amazing advice thus far, it's saving me a lot of headaches.
 
Last edited:
First off, I want to say I am a long way from being able to even consider making my first folder. having said that, I am a pretty good buyer of knives :) I have a ZT Sinkovich flipper in my hand right now, and it's stop bar is a pin used to hold the scales separate--like a standoff, but a pin on the very corner of the scales. Perhaps this gives another way to think of doing it....


PS, I like the drop point--I guess that's why there is Chocolate and Vanilla.
 
Last edited:
Here is a rework of one, still no internal stop pin, was able to solve the problem without it although i am sacrificing the triangle.

4rcmjk.png

2gvkn4h.png


Edited to add kwaiken with fixed choil area and some work on the lockface so it hits lower on the tang.

nq2wrl.png

5dnyoi.png
 
Last edited:
Your lock face and the bar cut should be 90° to each other. I place my lockbar cutout on center with the pivot, more or less. The lockbar does not need to be that long and too long will induce flex under pressure. As a very firm rule, I maintain a minimum of the radius of any hole as tearout. That means a 1/8" pin hole needs to have at least 1/16" of base material between it and the nearest edge.

Bob

Bob,
thanks for the clarification. i wasn't sure exactly where to set the lock bar cut as a sweet spot. going to adjust that in the design and make the bar a little shorter.

edit:
boom
15hbu4i.png
 
Back
Top