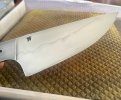
How To Hamons

Joined
Aug 17, 2020
Messages
260
Hello again everyone! I have a few hamon related questions that I was curious about that I hope might be able to be answered by you guys.

So, I've been looking at a lot of different makers hamons and trying to understand their technique, specifically on thin kitchen knives. How do you go about creating a hamon on large thin kitchen knives without getting warps? From what I understand in order to bring out a hamon like on shallow hardening steels like 1095 or W2 you need to grind your bevels to about 70% complete and then go about applying your clay to the bevel in the pattern that you wish to see. Correct me if I am wrong here but is it possible to grind through your hamon if you don't grind your bevels before applying your clay? For example, if one was using 0.100 stock or thinner wouldn't the chance of warpage be fairly high if you had your bevel 70% ground?

Since I don't have the temp control to use 1095, W2, or preferable hamon compatible steels do any heat treating services provide the option to add a hamon? If so, do they just create a random hamon or do you have to draw out your hamon on your blade or something before sending it off to ht? This brings me back to my first question but should I grind my bevels before sending them off to ht to have a hamon added?

This is a metalurgy question I guess but why do steels like 1084 with higher manganese content don't provide a hamon like W2? What's the deal with the manganese?
 
Correct me if I am wrong here but is it possible to grind through your hamon if you don't grind your bevels before applying your clay?
I don't think so. The way I understand it is that the hamon line is the demarcation between the hard and soft portions of the steel, and you want this through the entire blade, not just on the surface.
I can imagine that the deeper you grind into the blade after quenching, the less dramatic the pattern could get, so perhaps this is the reason why experienced makers recommend grinding the bevels mostly complete before quenching.
 
Yes, you can grind away most of the hamon details. Best to grind the bevels with a very thick edge and then do the yaki-ire.

The most important thing is the steel choice. Very low manganese is prime need. Also, you want no other alloying (if possible) The perfect hamon steel is around 1.00% C and 99% Fe and virtually nothing else. That is called tamahagane, but you can't buy it. Making it is a whole 'nother art!!!
The next best steels are low alloy W2, and 1070/1075 with low Mn.

The clay is the another key element. Start with too little clay and you will probably never use more. Most new folks put on four times the amount needed. Satanite is the best easily sources clay. The NuClayer system of two clays is superb, but pricey.

Finally, the quenchant is where the magic happens. Brine is wonderful for an active hamon, but you will break a lot of blades. Parks #50 is the best overall quenchant for a hamon.

Regardless of how much advice you get and how much you read online, the only way to learn the art of hamons is to do a bunch of blades. Make simple 6" blade tantos to start. Make dozens of them. Use 1.25" X.100" W2 steel. Do them one at a time. Clean-up, etch, and examine each blade (even if it breaks or cracks) to see the results. Make necessary changes on the next one.
You will break and warp blades, you will get no hamons and ones that run off the edge. But eventually, you will learn what causes these effects and learn to control them ... somewhat.

Simple warps can be corrected in the 10 or so seconds after quench, or in tempering. You will learn the hard way when to stop straightening :cool: .
 
Last edited:
Hello again everyone! I have a few hamon related questions that I was curious about that I hope might be able to be answered by you guys.

So, I've been looking at a lot of different makers hamons and trying to understand their technique, specifically on thin kitchen knives. How do you go about creating a hamon on large thin kitchen knives without getting warps? From what I understand in order to bring out a hamon like on shallow hardening steels like 1095 or W2 you need to grind your bevels to about 70% complete and then go about applying your clay to the bevel in the pattern that you wish to see. Correct me if I am wrong here but is it possible to grind through your hamon if you don't grind your bevels before applying your clay? For example, if one was using 0.100 stock or thinner wouldn't the chance of warpage be fairly high if you had your bevel 70% ground?

Since I don't have the temp control to use 1095, W2, or preferable hamon compatible steels do any heat treating services provide the option to add a hamon? If so, do they just create a random hamon or do you have to draw out your hamon on your blade or something before sending it off to ht? This brings me back to my first question but should I grind my bevels before sending them off to ht to have a hamon added?

This is a metalurgy question I guess but why do steels like 1084 with higher manganese content don't provide a hamon like W2? What's the deal with the manganese?
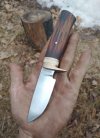
The thinner you grind your blade pre ht the more precise the hamon (potentially not always). It allows you to really control what hardens and what doesn't. As stated above use less clay than you think you should. Grinding thin will cause warp and it's a tradeoff of detail vs warp but honestly with shimmed tempers it's no big deal, you can fix warps. I personally use .125-.144" W2 and distal taper to .06-.07 at the tip spine. I'll grind bevels about halfway up the blade and bring the edge to .04" or so. I find the hamon really follows the clay at those dimensions. But I also get warp most of the time, 2 shimmed tempers solve that. I'll echo Stacy's advice above. Practice as much as possible on simple/smaller knives
 
Thank you for the tips everybody! Does anyone have any experience sending blades to HT and adding a hamon to them?
 
This photo doesn't show the hamon very well but it was done by Peters. I didn't specify where I wanted the clay so Brad made a plain hamon. He had told me to draw where I wanted the clay but I forgot! This is w-2 from maker material supply.1641911596546.jpg
 
This photo doesn't show the hamon very well but it was done by Peters. I didn't specify where I wanted the clay so Brad made a plain hamon. He had told me to draw where I wanted the clay but I forgot! This is w-2 from maker material supply.View attachment 1718873
Nice. I sent 5 razors and a large Bowie to Peters. They are also W2 from the same source. I actually got them back on Saturday, but after a couple cleanup passes on the Bowie I decided to finish the razors first. No flaws on the Bowie yet so I want to do it when I'm focused and ready. I did sketch where I want the line, but I can't see anything yet. I expect I might see it at a higher grit, but perhaps not until the etch...
 
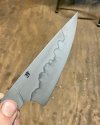
So a couple things, you should be able to see the hamon at 120-220 grit on the grinder, so makers will often make one or two clean up passes after quenching to see what kind of activity they got before tempering in case they want to redo the heat treat, personally I like to get W2 blades in the temper as soon as possible so I prefer to check after tempering. I mostly use .100” stock and will make 9.5” chef knives and 12” carving knives and I grind them 80% before heat treating leaving the edge between .040-.060 and bringing the grind all the way to the spine unless I want a bevel line like on a yanagiba. Like others have said the more you grind after heat treating the less activity you may have, I’ve done blades that I ground entirely post heat treat and you still get a hamon but not nearly as active. Here is an example, the first blade I did more grinding post heat treating and it’s a fairly simple line, the second blade was closer to finish and has a lot more activity both clayed the same but geometry plays a important role in hamon development. You can heat treat W2 in a forge but you have to learn to hold the temp by passing the knife in and out of the forge. That’s how I started and would hold the blade at temp for 5 minutes then quench, the down side is it’s much harder to make minor corrections like you can in a oven if I want my hamon line to go down closer to the edge and get more activity I can lower my austenizing temp 5-10 degrees, or I want it to go up closer to my clay I do the opposite or let it soak longer. Warps in my opinion are part of it since you are purposely putting stress into the structure of the steel, I use a carbide hammer and straight as I finish grind after the blade is fully tempered.
4922A7CA-EFE5-4880-B6AE-6E34505CDB0B.jpeg2CFCCCB1-9BFD-419D-B839-A2AB60EDE8EE.jpeg
 
So a couple things, you should be able to see the hamon at 120-220 grit on the grinder, so makers will often make one or two clean up passes after quenching to see what kind of activity they got before tempering in case they want to redo the heat treat, personally I like to get W2 blades in the temper as soon as possible so I prefer to check after tempering. I mostly use .100” stock and will make 9.5” chef knives and 12” carving knives and I grind them 80% before heat treating leaving the edge between .040-.060 and bringing the grind all the way to the spine unless I want a bevel line like on a yanagiba. Like others have said the more you grind after heat treating the less activity you may have, I’ve done blades that I ground entirely post heat treat and you still get a hamon but not nearly as active. Here is an example, the first blade I did more grinding post heat treating and it’s a fairly simple line, the second blade was closer to finish and has a lot more activity both clayed the same but geometry plays a important role in hamon development. You can heat treat W2 in a forge but you have to learn to hold the temp by passing the knife in and out of the forge. That’s how I started and would hold the blade at temp for 5 minutes then quench, the down side is it’s much harder to make minor corrections like you can in a oven if I want my hamon line to go down closer to the edge and get more activity I can lower my austenizing temp 5-10 degrees, or I want it to go up closer to my clay I do the opposite or let it soak longer. Warps in my opinion are part of it since you are purposely putting stress into the structure of the steel, I use a carbide hammer and straight as I finish grind after the blade is fully tempered.
View attachment 1718898View attachment 1718899
That's a big difference. If mine comes out like your second one I'll be thrilled. If it's like the first one I'll be disappointed.
I did FFG leaving the edge at 0.05", so fingers crossed.
 
I'm very disappointed in the hamons I requested from Peters.
I cleaned up the large Bowie and lightly etched. It is utterly uniform, no transition anywhere. There is a spot on the tang where they ground it off and did a couple hardness test points. Those are listed on the paper as right at my requested 60 HRC. However, if they actually clayed the spine and did the differential treatment, then that part should be soft. I had optimistically drawn my desired hamon with sharpie and spoke to Brad on the phone, so there shouldn't have been a miscommunication.
I don't know if it could be annealed and done again? I don't want to finish the knife with just a plain blade.

The 5 razors have a faint transition line, but it is way up along the spine, not across the bevels as I was hoping. I etched those to a light grey, they look OK, so I will finish them.
 
Draw the line where you want the clay ... not where you want the hamon. YOU have to decide how far the hamon will be from the clay.
 
I'm very disappointed in the hamons I requested from Peters.
I cleaned up the large Bowie and lightly etched. It is utterly uniform, no transition anywhere. There is a spot on the tang where they ground it off and did a couple hardness test points. Those are listed on the paper as right at my requested 60 HRC. However, if they actually clayed the spine and did the differential treatment, then that part should be soft. I had optimistically drawn my desired hamon with sharpie and spoke to Brad on the phone, so there shouldn't have been a miscommunication.
I don't know if it could be annealed and done again? I don't want to finish the knife with just a plain blade.

The 5 razors have a faint transition line, but it is way up along the spine, not across the bevels as I was hoping. I etched those to a light grey, they look OK, so I will finish them.
As long as the edge still has enough thickness to it you can heat treat the blade again, I hope they didn’t charge you extra for the “hamon”. Placement of clay can definitely be tricky to get the hamon where you want but you should definitely see something if clay was used. If you want to send the Bowie to me I can re heat treat if you think it’s got enough thickness, I can put it in my next batch of blades with hamons.
 
As long as the edge still has enough thickness to it you can heat treat the blade again, I hope they didn’t charge you extra for the “hamon”. Placement of clay can definitely be tricky to get the hamon where you want but you should definitely see something if clay was used. If you want to send the Bowie to me I can re heat treat if you think it’s got enough thickness, I can put it in my next batch of blades with hamons.
I appreciate it. I'll phone them on Monday to see what they say and then I'll PM you about shipping it your way.
 
Hamons are not some cut and dry , set in stone thing. You can't expect to do x,y ,and z , and get a specific result every time. There's quite a bit of magic involved. Brad is putting clay on your blades , he's not putting a "hamon" on there.
 
I agree with Eric. Getting a hamon is not something automatic. You have to make it show up. I had a friend over a good while back to make an EDC with a hamon. It was in W2, and after the quench we gave it a quick grind and saw the hamon. It looked fine. He took it home to finish and called me the next day saying he must have done something wrong because the hamon was gone. He brought it back over the next weekend and sure enough, he had a mirror polished blade with no hamon. I took the blade and re-ground it back to 400 grit and etched it. Lo-and-behold the hamon was back. He had buffed the blade so heavily he blended out the hamon.

Sometimes you have to do specific etches and rubbing the ji and ha with different polishes to get it to show the best.
 
I realize that getting an impressive and interesting looking hamon has a lot to do with polishing and etching. I have limited experience with this, but when I sent two tanto to another maker, I could see where the hamon was going to be before I did any further grinding and etching.
I'm not going to call to complain about the hamon, but just get clarification about what was done. I'm curious why the tang should have tested at 60 HRC if it was clayed as expected. If he assures me that there was no mix up and that there may be a hamon to be found, then I'll take another crack at grinding and etching. So far I did a quick clean up and light etch, and it seems completely uniform.
 
ZH3Pm0H.jpg
cJHeCbV.jpg


I sent a bunch of knives to Peter's, AEB-L, no preheat treat grinding. Every one of them cam back with these round discoloration on the spine. I got the first one handsanded to probably 800, when I started seeing a scratch in it. I kept sanding to try to get it out, but it got bigger. While I was looking at it, I tried to flex it a little, it snapped in half. Bummer, I did a couple more with the same results until I just started flexing them before I started grinding at all. All broke. I showed a couple of pics here, everyone said call Brad. Brad told me it was bad steel. Asked where I got it from, told me if the steel company said it was bad steel, he'd heat treat the new ones for me. Then JT replied, said it's where Peter's hit them with a torch to straighten them out, and ruined them all. I'm not a fan of Brad, or Peter's. Not trying to take over your post here, but I like to take every opportunity to share my experience with Brad.
 
Back
Top