Handle help please.......a couple more changes

Joined
Dec 7, 2008
Messages
7,187
Part of this is looking better but overall it just doesn't look right.

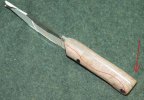
The knife I am attempting to handle is a small 5 inch long knife that will sit in a holder on my desk. The first photo shows my last one done with 1/8" thick scales on the bottom. On top is the one I am working on. I started with 1/4" scales on this one to allow for more room to shape. It is not looking right to me so I stopped so I could ask for help.
5-4.jpg


Following are photos showing how I got to this point. If anyone has any suggestions of how I should do things differently, please post your suggestions.

I glued on scales and drilled holes for pins.
1-11.jpg

1a-91.jpg


I used my disc and spindle sanders to remove excess around the edges.
2-10.jpg

2a-86.jpg

2b-80.jpg


Next I ground a 45 along the top and bottom.
3-5.jpg


My pin holes were sloppy so I cut the pins short and filled the part that would show with black CA glue.

After some hand sanding, here is how it is looking. Looking ok from the side but top and bottom views don't look right.
4-3.jpg

4a-57.jpg

4b-53.jpg


The knife is small and the handle is only about 2&1/2" long so I didn't try anything like a palm swell. The handle looks too chunky to me. Maybe taper the front graduating as it goes back?

Any ideas or suggestions for shape and/or how to go about it. I have read some of the tutorials for handles for larger knife handles but just am not sure what I should do here.
 
Last edited:
A common (mistake?) that some folks make is leaving the scales too thick. From your photos, they look a little thick to me. I may be wrong.

Another thing that may help is to narrow, or taper the scales upwards where your "pointing" finger goes (at the front of the handle). This can be done on a small wheel grinder attachment or by "shoe-shining" the scales with sandpaper.

Sand a little, then pick up the knife. You will know when it "feels" right. And when it "feels" right, it will probably look right.

Hope my $.02 helps.

Robert
 
The pins are in the wrong place, and filling mistakes with glue will never look right.
 
Sand a little, then pick up the knife. You will know when it "feels" right. And when it "feels" right, it will probably look right.


Very sound advice. Also, what I find helps me when performing similar chores is to relax...seriously. Just loosen up and enjoy yourself and before you know it you will be turning out a better product
 
A little too linear I think. Even my little knives from J. Largent have a fair bit of shaping top to bottom on the scales. Nothing dramatic, but in scale with the overall size. They're almost full width in back and at the front, but taper inward then a slight palm swell then back out, with the back being square to the tang (curved with it, but no taper forward).

They look and feel very nice on a similar size and style knife.
 
The pins are in the wrong place, and filling mistakes with glue will never look right.

Where should the pins be located?

My plan with this is to experiment and try to get better. Then I will strip off the scales and do it again. I will keep doing that till it looks just right.

You guys are changing how I am looking at all this. I appreciate the help.
 
I think the front of the scales where it meets the ricasso is still a little too 'square' all of the sides are nicely rounded and then it gets to the front and just cuts to that 45 degree angle.

I'd say that it also suffers becuase of a lack of contours. the top down view is just straight lines, which i dont think suits this style of blade
 
Where should the pins be located?

If you have one that far back it should be a thong hole not a pin.

excuse the crudeness of this pic but im at work and this computer only has paint :barf:
handle.jpg

i think thats the typical kinda pin layout
 
So from a beginners point of view this is how I did my last set

first I rough cut the scales to the shape of the tang, then I clamped one scale to the tang and drilled the holes for the pins using the tang as a template. Once I have on scale drilled I put temporary pins in two of the three hole and clamp the second scale to the tang. I drill through the unpinned hole in the first scale and out the second, then I take one of the temp pins out and stick it in that hole and drill the now empty hole then I pull the last temp pin stick it in the hole I just made and drill the last hole. That keep everything lined up for me.
Next I remove the scales from the tang and pin them together with the temp pins and shape the front of the scales to as near a final finish as possible. Once I am happy with the finish and look of the front of the scales I start to shape the sides and use a profile gauge to try and keep the scales as symmetrical as possible. Once I feel I am close to what I want I remount the scale to the tang and take a look to see if I need to take more material off or not. If all is good I glue and pin the scales on and then start the final shaping and blending the top and bottom into the sides, always checking the feel in each hand and the symmetry with the profile gauge and this is how it turned out

DSC01353.jpg


Not the best but I am getting there. I have picked things up that other people have wrote here like the finishing the front of the scales before putting them on the knife, That keeps the sandpaper and belts away from the finished blade, the pin drilling I got from the Green Pete video that is available on line as a free down load.

Don't know if that helped but it works for me.
 
I'd say that it also suffers becuase of a lack of contours. the top down view is just straight lines, which i dont think suits this style of blade
+1
Additionally when you lay the knife on its side as seen in the 1st photo it should not lay flat it should rock, in other words its too blocky remove more material. other than that the craftsman ship, and of course the wood look really good
 
When you're looking at the spine, you want the profile to look more like a "canoe". You need the front and back to be thinner. Make a palm swell at the thickest point, and remove material elsewhere. You can flare back out at the butt if you'd like.

This photo kinda shows what I'm talking about; thicker in the center than at the ends.
4772749783_18d0a6e2c4_b.jpg


Phillip
 
One thing that I do is shape the scales as close to finished as I can, then glue so all I have to do is clean up the area around the pins after I press em in. Cleaning up glue runoff? If you have a bunch of runoff then you are using too much. Can't get everything to line up when you put everything back together a second time? Make sure your pin holes in both blade and handle are tight (within reason, you still have to take it apart again and you do not want to split the handles at the holes). Talking about the handle shape, you can have a palm swell like what Phillip posted (mega clean knife BTW), or you can leave the front thinner with a constant taper for more delicate handling, as if you pinch the front of the handle between two fingers, I feel like I have more control.

Others have hit on thinner handle thickness and pin placement, only other thing I can see and this is personal preference is at the bottom of the very front of the handle, you have the handle material drop all the way to the bottom of the end of the ricasso. Sometimes if you drop the knife the material can chip there. Look at the very front of one of mine you see I have exposed steel at the bottom. MS paint is pretty awesome sometimes...

Steakknifecircled.jpg


Here is the top of my steak knife so you can see what I mean about the thickness.
steakknifetop.jpg
 
Last edited:
I think the thing that seems to be throwing it for me is the fact that everything is rounded except the butt. I think you need to round off the area near the arrow... Which means you'd have to round if off not only spine to edge but also tip to butt.

If you want to leave the butt squared I would go with something along what I did in red. And fwiw I find that an incredibly comfortable grip, but tricky to match exactly.. Then you can leave the back a bit more squared off like it is. Naturally my paint skills aren't an exact science but you probably get the idea.

Bear in mind I'm a noob so take it for what it's worth.
 

Attachments

  • Marks handle-53.jpg
    Marks handle-53.jpg
    51.4 KB · Views: 62
I stripped off the scales and will start over. I tried to drill new pin holes but my woodworking bits won't work on the steel. I think this time I will shape a handle without pins. The blank looks like it had been pre-drilled for this knife to have bolsters. I will be using the advice you guys gave for the shaping and see if this version looks better. The blade is getting a little beat up from my repeated changes but when it starts looking right I will do what I can to make things right with the blade.
kn003.jpg
 
The thing that catches my attention on that knife design is that the handle is opposite of what I would think it should be. By that I mean that the front of the handle is larger (top to bottom) than the rear. If you think about how the human hand is when closed around (holding) something, the smallest area is where the thumb/forefinger closes, and the largest area/opening is at area where the little finger/heel of the hand closes.

For a knife to "feel" good in the hand, it needs to mirror those dimensions (larger/thicker at the rear, and smaller/narrower at the front)

Overall thickness, which has already been mentioned, also plays a significant role....a knife handle should be slightly to somewhat thinner side to side than top to bottom. This allows for a more comfortable hold, as well as providing a measure of "index" when holding a knife. Narrower (is that word?:jerkit:) at the front, and wider at the rear (of the handle).
I think the pics that gixxer posted do a very good job of explaining it!
 
That blade is already hardened, you are gonna need those carbide spade bits, or find a 1/8" carbide tipped masonary bit. If you do not want to do that, chalk it up to a learning experience and finish it so when you get to your next one you can ensure pin placement where you want it.
 
I am going to do what Gixxer said and chalk a lot of this up to learning experience.

For the next steps I will be taking advice from a mixture of you guys.

Ed, your advice helped me get into the right mindset. For this blade I will be mixing Phillip's canoe shape and Ed's EBK. Those are the 2 most obvious comparisons. The advice from all you other guys is playing a part as well.

First I am shaping the scale to get rid of the point at the bottom front. I could only go so far with the shape because of pre drilled holes.
kn005.jpg


Holding it in my hand and going by feel I found it needs to taper inward at the front and top of the butt. A flatter surface at the underside felt comfortable at the moment, but that could change as I go along. As Robert said about when it feels right, it will probably look right.
kn006.jpg


I am getting something constructive from every one of you. So I wanted to be sure that you guys know that all of you are playing a part of my learning to do this right. I don't seem to have any natural aptitude for this, so if you guys are able to teach me it is quite an accomplishment.

Now I will glue the scales and go from there. I will post more photos even if I mess it up.

More input is welcome.
 
you got the right idea, try different things with the shape removing a little at a time. Like leaving more material at the butt, a constant taper, a palm swell. your profile does not necessarily need to be that pronounced.
 
I was thinking I would start by tapering the front more like your steak knife and Phillip's canoe shape. How much to taper the butt will depend on how it fits in my hand. Before any shaping of the scales it feels like the top corners of the butt need to be rounded or tapered for a comfortable fit. I will do this shortly and take a photo. Thanks to everyone.

After this one I will try a larger blade and a grip like Unky's
 
Back
Top