Help me with this knife design and build - Take 2

Thank you, Sir!

It wasn't intended as a thumb ramp. In that case I would have moved it lower down, on the spine. At least that's what my understanding of what a thumb ramp was, and thanks for the clarification.

In this case it was just part of the guard, more like a 1 1/2 guard style I guess.

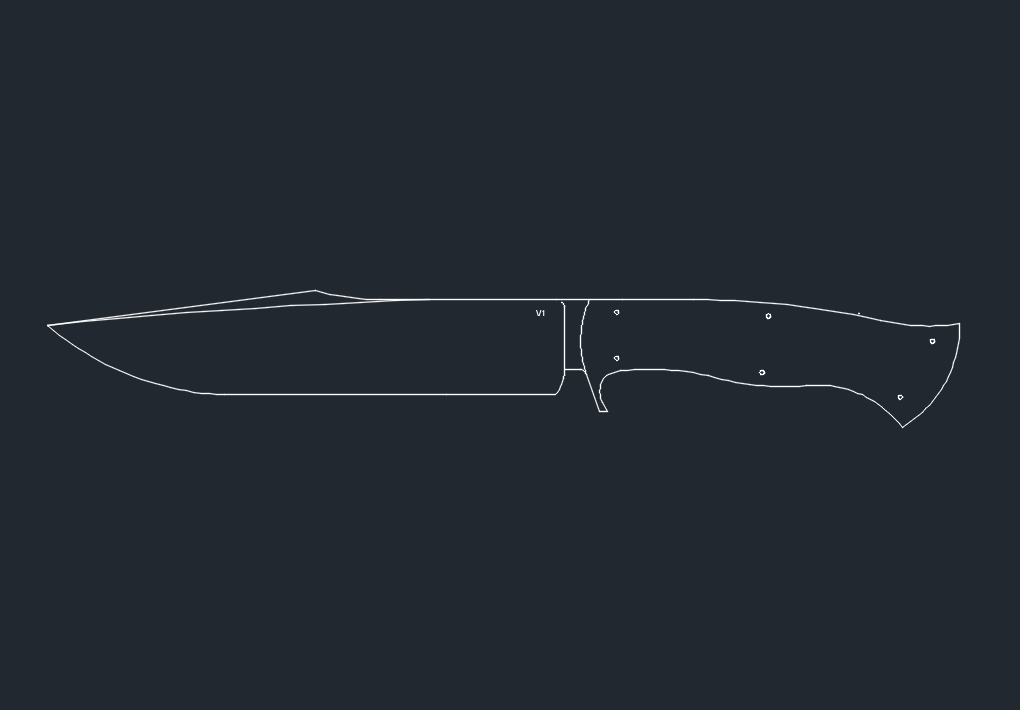
But I totally get and like your point, so here is the updated version.

Is this more in line with what you were thinking?

Full-Tang-Bowie-V3.png


Thanks again for your invaluable feedback! This is helping me so much and I'm very appreciative.

Constantin

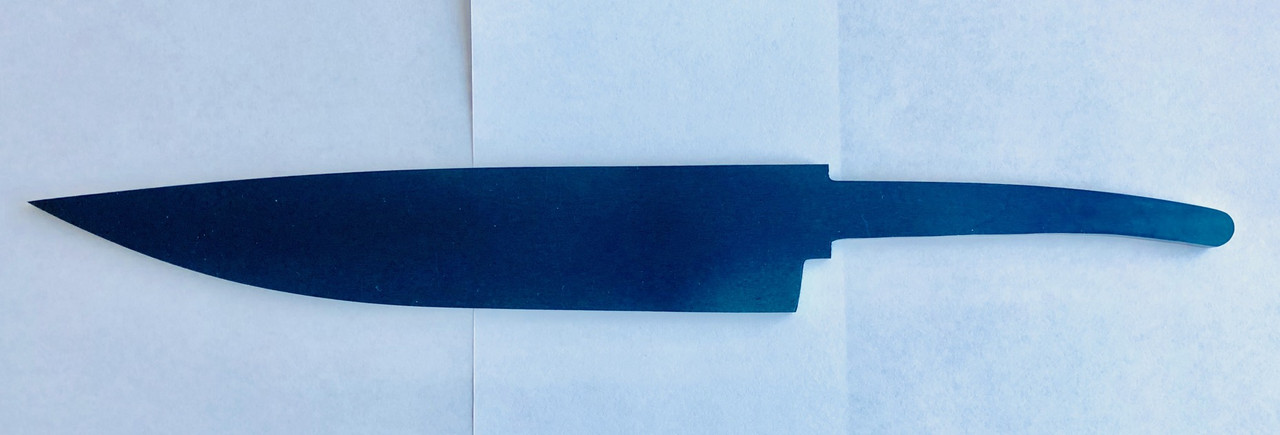
Using a separate guard will work. This is g-10 in front of walnut. The guard slides up from the bottom.

IMG_0522 by Wjkrywko, on Flickr
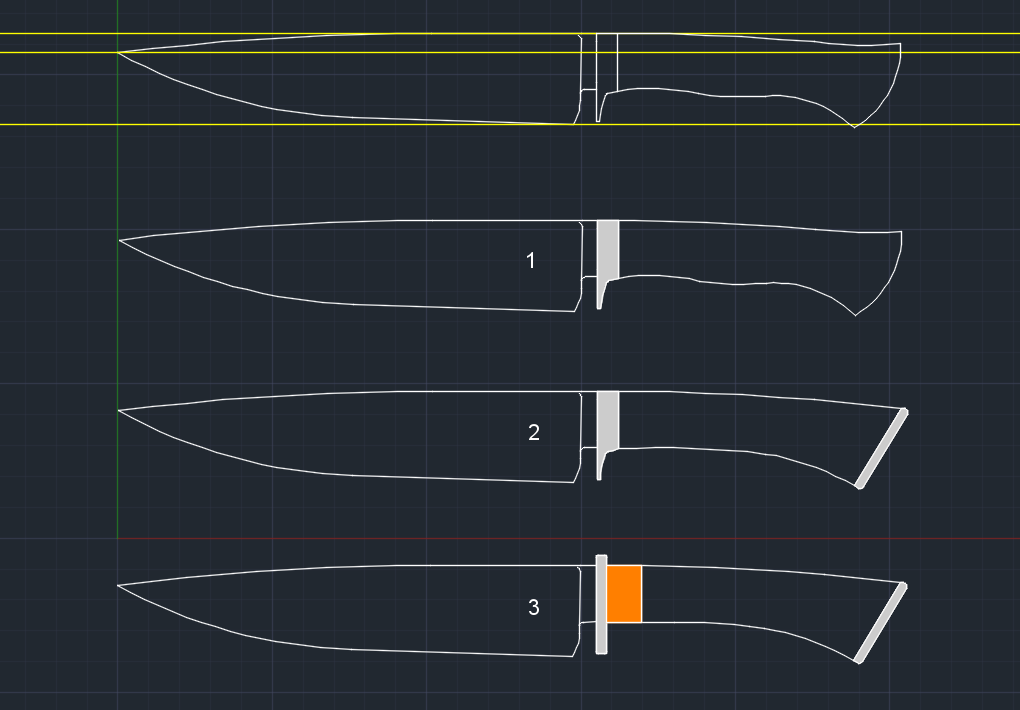
 
Lose the slight rise in the handle on #1 and #2. I’ve made them like that, and the rise stands out horribly to me when I see the pictures of them now.
 
That looks nice, but I would shorten the finger guard a tad. It looks too long. The curvature form handle to guard looks a bit angular. I like it an arc. If you leave it the length it is now, it may look good to have the guard tip curve back a bit.
Also, add the radius at the ricasso.

Thank you, great feedback!
 
Hi again,

Thanks again for all the feedback received, it has been great.

I believe I made my mind on the knife for this build. It will be the "kitchen knife blade” style with a Bowie influence, for a lack of better description.

This for me, will be the largest blade to date. It will provide me with a good challenge and a chance to get better through more practice.

I incorporated the feedback I received to date and please let me know if I’ve missed anything.

I’m now trying to decide between these variations. Regardless of the the pick, they will all be great learning experiences for me.

I kept the tang hidden in the drawings for now, until a decision is made.

Please let me know what you think about the below options and help me get started.

Please note, some of the curves in the pic below look jagged, this is because of the low res of the .bmp file, but once printed on paper they're smooth. So any kinks, will be smooth in the real world version.

Thanks again,
Constantin

Kitchen-V3.png
 
Looks good. Just keep in mind that there isn't a lot of belly towards the tip. So the height of the blade there is on the shallow side. To make sure you have adequate strength at the tip try to leave some thickness in the cross section.
 
Looks good. Just keep in mind that there isn't a lot of belly towards the tip. So the height of the blade there is on the shallow side. To make sure you have adequate strength at the tip try to leave some thickness in the cross section.

Such a great point again, thank you!
Constantin
 
i4Marc i4Marc , i’m working with 3/16” stock and planing to gring the distal taper before the bevels.
When gridding the distal taper, should I account at this point about the cross section thickness near the tip and leave enough meat, or does it apply more when grinding the bevels?

I’m also going with a full flat grind. When keeping more crossection at the tip, does this mean that the flat grind becomes a bit more convex near the tip?
Trying to get my mind around what happens.

Thanks again,
Constantin
 
Last edited:
I decided to go with a bolster handle combination. This should look nice I think and a great experience.

I have received great tips over here, https://www.bladeforums.com/threads...process-please-explain.1643336/#post-18791899 regarding this type of handle construction, really cool if you didn't know about it, as in my case.

As for the guard, I'm not sure at this point, either like in #1 or #3 above, will see, still a while to go to get there.

Thanks again,
Constantin
 
Last edited:
Heli00,

Yes and yes. You can grind in your distal taper before the bevels if you want. I usually end up with distal taper as a natural side effect of grinding in my bevels but either way is fine. But do leave extra meat there while doing your distal taper if that is your first step. Your understanding of what is happening at the tip is correct. To leave extra meat at the tip you would end up with at least an angle change but more likely a convex edge.
 
Heli00, you might want to merge the two threads, or close this one and post the new images and info in the new one you just opened.
 
Heli00, you might want to merge the two threads, or close this one and post the new images and info in the new one you just opened.

I would prefer to keep both open, but if this is an issue, I would like to keep this one and bring the other one into here, it this is what the merge function does or just close the other one.

This one is the main one, the other is just a specific task, bolster construction that i needed clarification with, in order to help me with this build, and possibly other people, as a stand alone post. So I definitely want to keep this one active.

I thought that by opening a different post on a specific aspect of a task, would keep this one cleaner and was the preferable approach.

If the cross reference between the posts is an issue, just let me know and I could remove the reference from the other post to this one, but I personally like the option to cross over from post to posts.

Thanks again,
Constantin
 
Last edited:
Heli00,

Yes and yes. You can grind in your distal taper before the bevels if you want. I usually end up with distal taper as a natural side effect of grinding in my bevels but either way is fine. But do leave extra meat there while doing your distal taper if that is your first step. Your understanding of what is happening at the tip is correct. To leave extra meat at the tip you would end up with at least an angle change but more likely a convex edge.

Excellent, thanks again,
Constantin
 
Merging the threads just makes it one thread and the posts are in the order posted. I keeps the forum cleaner, and allows people to see the whole project. Generally, if you start a new thread on a project you either merge the threads; stop posting in the old one; or close the old thread.
I will be glad to merge the threads for you if you wish.

Ok, sounds good. Please merge them by bringing the other post over here, i won’t be posting in the other one anymore.

Thanks for your help,
Constantin
 
Darn, I haven't looked since they redid the forums format. I guess merging threads was also done away with. Go ahead and keep them both going if you want to.
 
I’m second guessing myself if it would make sense to include a guard, since the blade is so much kitchen knife shaped.

What do you think, could I just go with a spacer and handle, without a guard? Would that go well with a blade that has a ricasso? Or maybe some sort of a tiny guard?

If you have any examples that would be great too.

I’ll post a pic of the blade before HT, not there yet.

Thanks again,
Constantin
 
You want a guard on any large fighting knife ... just ask Jim Bowie's dad.

Try drawing the guard tip with a little rearward curve. I'll try and post an image later.
 
Short question please.

Is it food safe to use a knife that was FC acid etched and has some forced patina on it? I guess it is just rust, but don’t know for sure.

Also, I’m almost done with the build, working on the handle. Made some mistakes, tried something new, learned some more, overall a good learning experience. It’s funny that regardless of the theoretical “I think I know” about some aspect of knife making, there is no replacement for the actual hands on experience, unfortunately no free lunch :)

I’ll tell you more in the next update once the build is completed, including pics.

Thanks again,
Constantin
 
Back
Top