Horse Hide for sheaths?

Thanks for the input Rayban, Hope you're right.
I got everything cut out yesterday. Gotta go to town tomorrow, so I'll glue it up this evening and then give it all day tomorrow to set up before going any further.
Got a couple more questions though if you don't mind humoring me.
(1) I moistened the leather a little (per the video on BeBee's site) before cutting. Made it allot easier to cut but the edges kinda curled up on the smooth side when it dried. I held it under warm (not hot) tap water for no more than fifteen seconds. Did I get it to wet.
(2) Now I gotta round the edges a little due to the "curling". A couple videos I've watched state that they round em on the belt sander, but when I experimented on a couple scraps I glued togeather I can't keep it from burning. Does that matter since the edges get dyed anyway? Or should I get one of the little edge rounding tools? How about a little sanding with a sanding block?

Any advice is appreciated.
Thanks
Charlie
 
I would say holding leather under running water for 15 seconds is beyond "moisten".....for cutting I like to spray the leather first....if i feel like moistening it at all.....with a discarded Windex bottle my wife threw out.......
I don't think I make anything any more without using the edging tool at some point...but sandpaper will work too. Go easy.
Nuff talk....let's see a sheath!! :-)
 
..those dogs will hunt!!.....

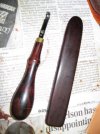
The Osborn tool is used to take the sharp corners off the edges....in the picture is the one I use, different style but does the same thing.
Hand sand the edges....use strokes in one direction...till they are dead nuts even....then take the sharp corners off......you can also use sandpaper if you don't have that Osborn....

The wheel is used to burnish the edges slick and smooth. I do this after I dye the edges...if you're gonna dye.....horsehide slicks up much faster than cow because it''s so dense.....for smaller jobs like your sheath I just use a hand tool like the one in the picture...made from Cocobolo. I have several of these in different shapes and sizes, made to get to holes, corners, etc.
Moisten the edges just a little and rub away with fast short strokes in both directions......any smooth surface can be used...some guys use deer antlers, glass, lipstick cases.....(oops, I just gave away Leatherman's secret)......
Anyway...rub it til it shines...don't make a career out of it,,,,just get it smooth......
 

Attachments

  • misc 018.jpg
    misc 018.jpg
    50.9 KB · Views: 45
Got it. Thanks (again) for the help.
The one thing I'm learning is that there are several paths to the same destination in the different phases of leather work.
Seems like every one has a different method (not right or wrong, just different) for a particular task so I end up with information overload. In other words, I'm pretty dence and tend to complicate simple things.
I was up at four today, so I went out and started sanding the edges. I'm using my little belt sander and I'm finding that if I go real slow and don't apply to much pressure it doesn't burn and seems to be cleaning up nicely. Feeling a little better about things now.
Oh and the curled up edges seem to be laying back down too. I must have gotten it WAY to wet, and it's finally starting to dry out.
Live and learn, eah? Sure did cut easy though. :o

I'll just have to use sand paper to break the edges on this one because I don't have one of those tools, but you can bet that I'll be getting one.

OT, but that sure is a pretty handle on yours. I've paid good money for some Cocobolo scales that weren't near that nice.
I'm a real tool junkie so I really appreciate that sort of stuff.

Anywhoo,,,, gotta go to town, but I'll do some more sanding this evening, and should be sewing tomorrow.
Charlie
 
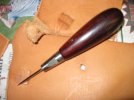
Since you mentioned tools, Cocobolo, and sewing, I'm forced to show you my Bob Douglas awl...I thought you would appreciate it.;)
 

Attachments

  • misc 019.jpg
    misc 019.jpg
    31.4 KB · Views: 40
Charlie, I've been hoping for some progress pics! The knife looks great by the way. Can't wait to see how this turns out.

CP
 
Well,,,,, here ya go guys. Errant stitching and all.
001-1-1.jpg

002-1-1.jpg

Had a heck of a time keeping the little stitch spacing wheel in the grove and even though I fudged the hole over with my awl that limp noodle little drill bit had a mind of it's own.
I made about every mistake imaginable on this project but surprisingly, the biggest doubt that I had, which were the edges, actually came out pretty nice IMO after I quit pussy-footing around with the 400grit on my little belt sander and chucked up a sanding drum on my drill press. Chamfered the corners with a piece of 400 backed up with a rubber eraser and they came out pretty nice. I'll still get a beveling tool eventually, but for my amaturish needs this method works fine for now.
Anyway,,, all I was looking for was a cover for the blade on my little camp knife while it's bouncing around in my camp box, and that's what I got.
Not real proud of the results, but I learned allot, and as you can clearly see I can only improve from here.

Thanks again for all the help guys.
It truly is appreciated, and I promise to do better on the next one.
Charlie

Oh yea,,, and even though I really like the way it looks after dying, I think I'll leave the horse hide in the drawer, and use the cow hide I bought for my next adventure.
 
Hey man, that looks great!
Every aspect of leather work takes practice, you don't just fall out of bed and make a perfect stitch line.
The horse hide looks consistent with the results I usually get...the distressed look which I happen to like in the right situation.
Only thing I see you could still do to improve is to take those sharp corners at the top down...like cut them off a little at 45 degrees then round em off on your belt sander.....avoid the stitching of course.
Again, you done good!
 
Thanks for the tip on the corners and the kind words.
Truth is though, after thinking about it and looking at it again this morning, I've decided to chit-can it and try again with some cow-hide.
I mean, there's less than five bucks worth of materials in the dang thing.
Like you, I really like the antique look of the horse-hide but that's the only thing I like.
Just to many mistakes for me to ever get over.
Plus,,,, I really had fun with the project and am anxious to see if I can do a little better. Cheap entertainment, if ya will. :o
Charlie
 
I don't think that your giving youself enough credit, (not that I'm trying to discourage you from making another sheath) but that looks great in my book.
 
Thanks CP, but if you could see it up close you'd agree that it's pretty bad.

The good news is, I started a new one with some Cow Hide and a little alteration in the pattern.
It's coming along pretty nicely, if I do say so myself.
That Cow Hide is ten,,, no one hundred,,, times easier to work with.
Got it cut out, groved, drilled, and glued up today. I'll sew it up in the morning and hopefully have a couple pix to post tomorrow afternoon.

I love the way the Horse Hide looked, and won't give up on it, but untill I have a little more experience, I'll stick with the Cow Hide.

Charlie
 
Here's #2.

As you can see, I changed my design to more of a pouch type.
Less edges, and less sewing.
I feel a little better about my stitch line this time, although me and that dang wheel still ain't getting along all that well.
Like I said earlier, "the Cow hides definatly easier to work with. Especially when you're as green as I am.
002-2.jpg

001-2.jpg

I still need to get one of the beveling tools and work on my burnishing, but the edges aren't to bad.
Can't seem to get em to darken up though, even after three more applications of dye.
Maybe I should get some of the edge dye that Fiebings offers, but my main concern for now is improving the burnishing. Baby steps, ya know.
003-1.jpg

Charlie
 
Looking more gooder.....get an adjustable groover.....with it you can very lightly scribe a line to stitch, or lean on it a little and cut a groove....then run the wheel along the grooved line....keep at it.

You've proven my point about working with cow b4 going to horse......you'll see later on that horse ain't that difficult, just that cow is better to learn on.
 
Thanks RB
I have a groving tool with the adjustable guide but I still tend to wander outside of the grove. :o
Maybe I need to "lean on it" a little more. A deeper grove might help.
Anyway, I'm learning and having fun so it's all good.
Gonna start one with a belt loop to fit the other blade with the Walnut scales next.
Then I'll try my hand at making a cover for an old Plumb DB axe I recently brought back to life. A member here gave me a great pattern for a DB cover that's simple but attractive. Should be a good project to use the Horse Hide on.

Thanks again for all of your help.
Charlie
 
Well, I put another one togeather.
Got brave and added a belt loop.
I changed the pattern a little as well as making it a tad bigger so I could use a wider welt.
Seems kinda big. I actually liked the first one (on the right) better, but it turned out to long IMO.
002-3.jpg

001-4.jpg

Eventually I'll make one that works out.
Learning allot though and getting more confident with the cutting and finishing.
Mostly though, I'm learning to take my time.

Charlie
 
Charlie, I've been watching this one. They look great. Horse hide can be tough. I done a couple out of buffalo. Awl kind off pops threw. I've done a lot of stitching and none ever come out the same. I always want to start over at the end.
Rayban, you're a hellofa teacher. Good job Gentlemen, impressive....Randy
 
Yes, I'm using a welt. Used horse hide. Seemed like a good place to use some of it up.
You can see the edge of the first one three posts back.
I'll get a pic of the edge of the one I finished yesterday and post it up shortly.

One thing I discovered was that rubbing the edges with a piece of the horse hide really fast so it creates a little heat does a great job of burnishing. Makes it smooth, shiney, and hard as a rock.

Stand by.
Charlie
 
Rayban, you're a hellofa teacher. Good job Gentlemen, impressive....Randy

Thanks Randy,,, I'd say that not only is RB a good teacher, but the fact that he's so willing to share his hard earned and valuable knowlege with a complete stranger shows that he's a pretty darn good person too.

OK,,, back on topic.
Here's the edge of the latest adventure.
011.jpg

Crappy pic, but I used a sanding drum on my dremel to grind the end of the welt into a wedge shape. Made it allot easier to match the two sides up.
013.jpg


Anyway,,, thanks again for the help.
Gotta go reread the demo stickey with the sewing awl in it.
I'm gonna try mine out on the axe sheath I'm starting.
Charlie
 
Back
Top