How I set up my Carothers C-Plate and Radius Platen/Chiller

The entire point of this configuration is that you can interchange platens. The large wheel radius platen that I show on it is one example, but any number of platens could be used, including flat.
 
Matthew, You have the coolest equipment; that's for sure. I remember seeing the flying eyeball on band posters in the late 1960's when I lived in SF and went to school at USF. It adds some groove to your beautiful platen setup. I hope you are well. Larry
 
I know several guys that have used leather behind a belt. Myself included. It works ok at low speed for final finish, but it burns and get s hard quickly. Also it wears out fast.
The chiller really makes this setup possible. I can't imagine trying it without it.

Actually I use mine with coolant being sprayed inside the rubber belt which keeps it cool - without ever running the chiller :) now if I want ultra cold I'll use the chiller too but no real need I've found!!
 
This set up works incredibly well the way Matt has shown us. I have ground many blades on it, and it works. More often than not I spend 6 hrs a day on one and the platen has never warmed above low to mid 80's. I could not imagine running it without the chiller.
The only gripe I have is that Nathan and I cannot find a "power transmission belt" that is plain rubber. They all have some fancy, kevlar bullet proof fibers etc running through them. This, for me, makes the belt less conforming to the blade I'm grinding. I'm somewhat used to it now but hated it at first. The original kmg rotary platen belt is/was rubber. The rubber ones are much softer while the super fancy ones are harder than woodpecker lips. If anyone has a part number for a regular "low tech" belt I'd love to have it. I'll mention we have ordered several that stated they were of the softer variety. They were not
 
Last edited:
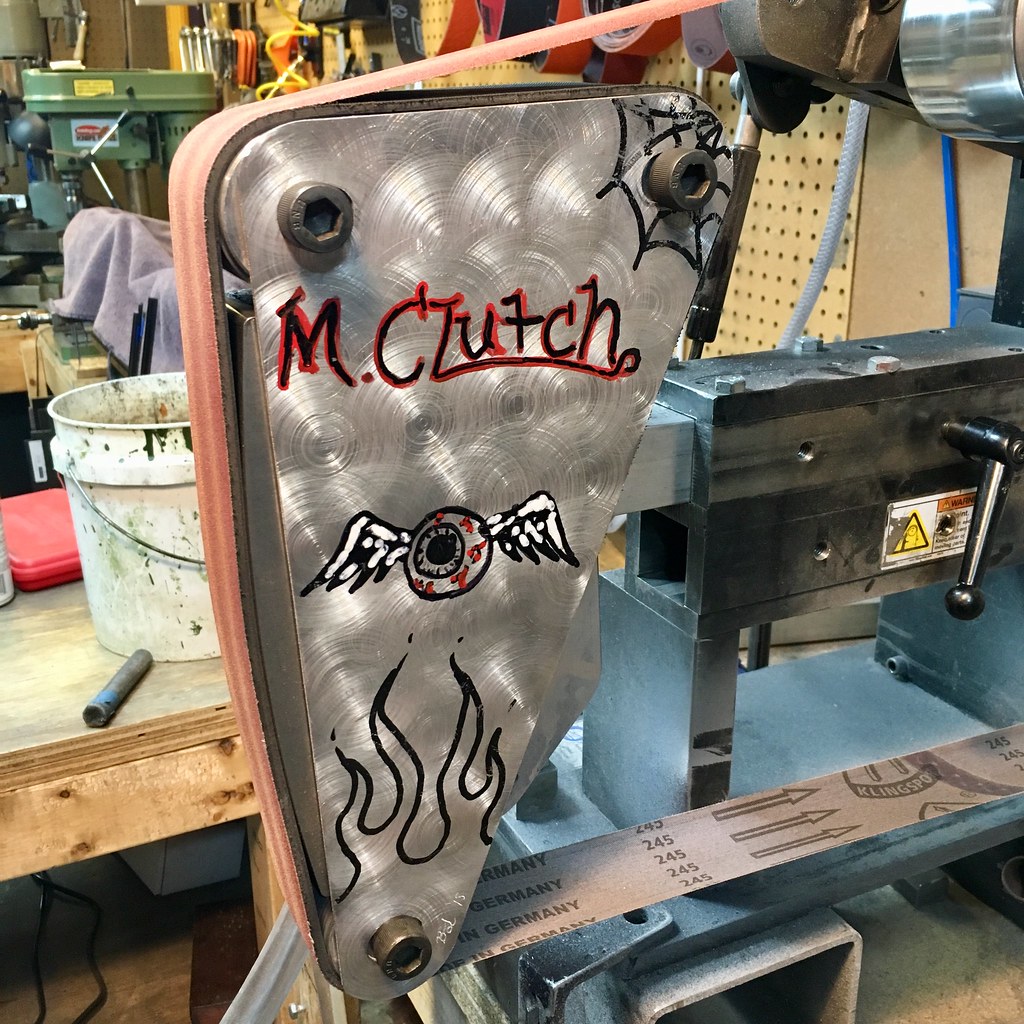
Dragging this back up, as I finally got a safety shield for mine. My buddy @BenR.T. made me one, and customized it for me before sending it. Now he'll forever be making fun of me for my use of the word 'clutch', which apparently isn't hip anymore.

Nor am I, I guess.


43922897564_070f8cac69_b.jpg


The engine turning and spiderwebs were a nice touch, I thought. And who doesn't love an eyeball with wings?


Hey Matthew , I really like your setup plus the safety enclosure plate. I hope you dont mind me trying to copy ! Im curious though with the safety plate , how do you tighten the bolts to the plate and the c plate withought seizing up the idler wheels on the safety plate? Thanks!!
 
This is hardly my original thinking - I’m merely standing on the shoulders of true innovators, that’s all. Feel free to make it, but I’d urge you to use Nathan’s hardware. For an application like this, precision is more important than you might think. AND BE SAFE ABOUT IT!

Ben designed the safety cover to be installed with washers between the cover and the wheel hubs - it’s just enough spacing to stand the cover off the wheels to eliminate interference. For all I know he might have made a few of these, so consider getting in touch with him and seeing if he’ll just sell you one.


Hey Matthew , I really like your setup plus the safety enclosure plate. I hope you dont mind me trying to copy ! Im curious though with the safety plate , how do you tighten the bolts to the plate and the c plate withought seizing up the idler wheels on the safety plate? Thanks!!
 
Larry, I sent you a PM months ago that went unanswered. Should I try again?

Matthew, You have the coolest equipment; that's for sure. I remember seeing the flying eyeball on band posters in the late 1960's when I lived in SF and went to school at USF. It adds some groove to your beautiful platen setup. I hope you are well. Larry
 
Matthew, I am sorry. I do not fully understand the messaging system at Blade forums. I will try and find your message and respond. Please keep my e-mail address. I check those every day. My address is lehmanlaurence@yahoo.com Thanks, Larry
 
This is hardly my original thinking - I’m merely standing on the shoulders of true innovators, that’s all. Feel free to make it, but I’d urge you to use Nathan’s hardware. For an application like this, precision is more important than you might think. AND BE SAFE ABOUT IT!

Ben designed the safety cover to be installed with washers between the cover and the wheel hubs - it’s just enough spacing to stand the cover off the wheels to eliminate interference. For all I know he might have made a few of these, so consider getting in touch with him and seeing if he’ll just sell you one.

Hey Matthew , Thanks for the response! I am indeed using all of Nathans hardware . I made myself a safety plate and will send you a pic once im done! You are right , thanks to everybody who contributed , this is an awesome concept! :-D
 
Back
Top