I'm Making My First Knife/WIP

I'm a beginner also, so take what I say here with a grain of salt.

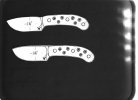
I agree that the bolts don't look good where they are. I think the design would look better if you moved both bolts a little bit more together, toward the center, maybe a 1/4 inch each or so. At least move the rear bolt forward a bit. It is crowding the lanyard hole throwing off the visual balance.

If you use a tube in the lanyard hole it will act sort of like a pin, especially if you use epoxy. And speaking of the lanyard hole, it looks a little close to the edge, but only just an itsy-bitsy, teeny-weeny bit.

Why such a wide blade? Is it because the steel you have is that wide? I think a narrower blade (not over 1" wide) would be less bulky and cumbersome and more apt to be used. Having said that, a narrower blade would probably use 1/8 - 3/16" steel or the balance will be way off with a large chunk of 1/4 steel in the handle.

To my eye the curve on the belly of the blade gives it a rather blunt appearance. It will certainly help to strengthen the point but does not give it a very graceful look.

Just my thoughts, and they of course reflect MY preferences, not yours. I'm anxious to see how it turns out.

LonePine
AKA Paul Meske, Wisconsin
 
Lonepine, I really liked your ideas. I think I will move the bolts and the tube hole.

I chose to have a 1.25" blade becuase to me that just looks right. 1" and less just made it look like a kitchen knife that I have. Plus by having it 1.25" it looks more like a bushcraft knife to me.

You also make a good point on the blade belly. I will have to change the design a little and post it again to see what you guys think.
 
If you want three bolts, then put one where the middle hole is. That is up to you.
No hard and fast rules apply to pins and rivets.

What I do on most knives this size is add a shallow indent where the thumb sits. This allows for a controlled grip much better than a small amount of jimping.

Looks good so far.
 
hey I am new to knifemaking as well, but have done tons of research and comparison of many different knife styles and I noticed one area you might have some issues with when you make this knife. I did a quick, crude sketch over yours....

Knifedesignfinal.jpg


The funky hard angles on the end of the finger guard will tear up a leather sheath, and the cutting edge drops down to the finger guard at the end. This will be difficult to sharpen and if you straighten the edge and add a small notch at the end of the edge you will have a much easier edge to maintain.


Just trying to help you avoid problems that you may not see until after heat treat.


-Xander
 
Fast, thanks for that tip I didn't think of that.

What about this guys, I got the 2nd bolt to where I like it and then where I would put a third I have the tube hole.

Knife_Handle2.jpg
 
Weatherman: It's looking better! From one green-horn to another, when you make the choil make it round, not "V" shaped, to minimize a stress riser.

I've never made swiss cheese of the tangs of my knives so I hope someone with more experience than I will jump in here, but it seems to me that a person could make more holes at the back of the tang than at the front. In my mind this would do two things, it would leave the front of the tang stronger where in my imagination there is more stress put on it from leverage, and second, like a teeter-totter, taking the same amount of weight off of the back should have a more pronounced effect on balancing the knife than taking the same amount of weight off the front part of the handle.

Enough talk already. We could tweak this till the cows come home. It's time to make some iron dust already.

LonePine
AKA Paul Meske, Wisconsin
 
Yeah, I couldn't let that weight reduction stay that way, and I just had to change the choil. I cut the prototype out and I just hated it.

This one is the keeper I think. Weight reduction is pretty symmetric if you don't count the tube hole.

Knife_Final1.jpg
 
I think it looks great... I was going to suggest changing your Lanyard from your original 1/8" to 1/4" tubing but you sorted that out. I also would just do two larger holes for weight reduction instead of the 6 holes (Colored in) but that is just my personal preference. I am looking forward to seeing how it goes. Get cutting :thumbup:
 
Isn't it fun getting the design just right:D you think you have thought of everything, post a picture and someone sees something you missed. I don't think I have designed a knife that hasn't gone through 5-6 touch ups because of things I didn't think of or see at first.

I am working on an EDC that has similar dimensions as yours and I agree that you may want to extend your jimping, I put 1" on mine and I just catch it with my thumb.

I really like the look of the knife and look forward to seeing the finished product.
 
I have received the PDF, and will get started cuting out the blade. More to come soon.
 
I had a few minutes before Church, so I printed out two of the profiles. I put the slight curve for the thumb in the top one to show what I am referring to. This dip can have jimping on it or be smooth. I like smooth. It would be placed after the handle shape is profiled, to allow exact placement where the thumb rests. Usually, I have the user mark the spot with a marker, and I grind it in with a 3" wheel before HT.
 

Attachments

  • Brian A. Knife 001.jpg
    Brian A. Knife 001.jpg
    31.6 KB · Views: 176
OK, I cut the blank yesterday, and had some time to fit the handle scales. The front of the scales will be placed by Brian.
I'll get the materials together and try and ship this by Saturday.
 

Attachments

  • Brian A. knife 002.jpg
    Brian A. knife 002.jpg
    40.5 KB · Views: 187
OK, now that you are getting ready to start, we need to discuss working space.

Find a place that you can work on the knife comfortably,safely, and without messing up the house. An end of the garage workbench, or a work table is good. A picnic table outside will suffice. I have even seen an old school desk used. Since you do some woodworking, you may already have a space set aside.
You should also have a vacuum to clean up the dust.
A good work light on a swing arm is a real benefit, as it is amazing the scratches you see when the light is good.
Set aside a shirt and jeans that you can sacrifice to the knifemaking Gods. It is surprising how soon they will have stains and holes in them.
Get a box with a lid (Clear plastic storage bins are super) to put all your supplies in. Have a smaller box ( Clear plastic shoe storage box is great) to put each knife project in. Put your drawings and notes in the box,too.

Other nice things to have are:
An Optivisor with a #4 lens
Micrometer ( a cheap HF one is fine)
12 pack of Guinness
Band Aids
Bar stool to sit on.It should allow you to work on the knife comfortably.
Simple respirator. Not required to do hand sanding and filing, but a good idea to get one before getting too far into knife making. When sanding and shaping the handle scales, a paint mask ( paper filter) is a minimum.
Tape player with good tunes.


Take a piece of 2X4 and clamp/screw/bolt it to the work surface so it projects about 12" off the side or corner. This is your work arm. If you want to ,taper the end to a rounded point. Some folks make an arm for each project, cutting the end to match the blade tip shape and the blade width. This is not necessary, but can be fun.
The knife blank is clamped or bolted to the arm for filing and sanding. You clamp/bolt it so the edge is just off the arm, and the tip is barely exposed beyond the end. 1/4" stove bolts and wing nuts make a strong and easy to move attachment system. Put the bolts through the rivet holes and the arm.

Work in sensible sessions. When you are tired, quit for the evening. Take breaks every now and then. Stop and take the blade off the arm from time to time and look it over real close......see anything that needs attention, or have an idea?.....then write it down on the pad that you keep on the bench. Taking notes, and writing down ideas is one of the best habits you can get into.

Do a little filing on one side, and then do some on the other. Don't try and do a whole side at a time or you will get the edge off center...guarenteed. Sand the same way. Do each grit, clean the blade off, and vacuum up the dust and grit before going on to the next finer grit. This can eliminate a lot of cussing later on. Look the surface over closely in direct and side light to see if all the old scratches are gone before you move to the next grit. This is where a good strong light and an Optivisor will pay for themselves.

When working on the blade or handle go slow and shape it a bit at a time. You can take more off, but it can't go back on. Leave dips and choils for last, as they may or may not end up where you first thought.

NEVER LEAVE A KNIFE ON THE ARM WHERE SOMEONE WILL BUMP INTO IT AND GET HURT. Ask most any maker about this and they will show you their scars. Either remove it or put a tin can or plastic tumbler over the arm and knife.

Try and work fairly undisturbed, as distractions and interruptions can cause errors.

Alcohol and precision work don't usually mix too well, so save that for later.

When done, dust yourself off, vacuum up, turn out the lights....and take one of those Guinness out of the fridge. I have found Guinness to produce a far better blade than Budweiser.

Take your time. It is a common thing for new makers to try and turn out a knife in a day or two. It usually shows,too. Do it over a period of time and you will be much happier with the results. If it takes weeks, or even months, that is OK. Speed comes with skill, not the other way around.
On the other side of that coin, is don't expect too much from yourself on a first knife. It may be a home run and worthy of great praise, but it may have a few things you would like better. Take those things in stride and learn from them. Make a note of things you would do differently or in a different order ( in the notebook on the bench).

Most of all - HAVE FUN!
 
Last edited:
Turns out I have been doing it all wrong!:D

The people around here never cease to amaze me. I will be keeping a close Eye on this thread!
 
Back
Top