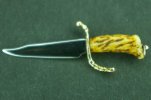
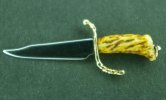
Stacy, I particularly like the use of the ring attached to the tang as a replacement for a pommel.
Nope, that is an acorn nut with a movable D-ring pommel assembly. The D-ring is .010 round 14 karat white gold wire, welded closed. It runs through the acorn nut.
Here is a mini "How To" on minis:
On some of these minis, I thread the tang and screw on the pommel nut, but I make many of them by turning the nut with a round stub tang.This is easier to work on, as it can be held in a pin vise. The finished look is nearly identical.
After shaping the blade and finishing it, make the guard and solder it to the blade. Use the same soft solder you use on a full size blade. Hammer a piece if the solder into a paper thin ribbon, and slice that into threads of solder. It only takes a very small amount to solder a mini guard. Clean up the joint, shape the guard, and sand/buff the blade and guard as desired to finish the blade and guard. I do all work on the blade and guard while holding it in a pin vise. You can stick the blade in the slot, or hold the tang in the hole, depending on which side of the guard you are working on. If the knife is very small, I leave it on the parent stock until ready to fit the guard. The bigger the piece you have to hold on to, the easier it is to do the small work. Look everything over closely with a magnifier. The joint should look as clean as it would on a full size blade. If not ,it will greatly detract from the minis scale look.
Take a piece of handle material. Nearly invisible grain is a must in wood. Ivories work well, but avoid any with schreger lines, as they throw off the scale. I use only the outer enamel area. Walrus enamel is especially good because of its density.
Drill the tang hole first, then roughly shape the handle a bit oversize. Fit the front end to the guard as perfectly as possible. A hair thin space will be the scale equivalent of an 1/8" gap in the joint, so get it down to a perfect fit. Don't glue up the handle yet if you are adding a pommel nut. If it is not getting one, then glue it up with a drop of CA or epoxy. Clamp tightly and let it cure.
For the pommel, take a piece of parent stock. In this case, it was a piece of 1.5mm round nickel wire. Next, either chuck it in a watchmaker's lathe, or in the flexshaft handpiece collet. A dremel will work,too. Using small files, micro lathe tools (made from broken carbide drills bits and burrs), and sandpaper - turn the nut to shape. If it will have a .010" ring, drill the #80 hole. Once done, turn down the stub tang to the size of the tang hole in the handle. Make the ring and install it, welding it closed if you have that capability. Cut the stub tang so it will insert about 1/4 of the way into the handle butt. Counterbore the butt a tiny bit as needed for the acorn nut to seat properly. Make sure before you glue up the knife that the blade tang leaves enough hole for the pommel tang. They should come just shy of touching each other when both are in the handle. The pommel assembly and the blade/guard are then glued in the hole through the handle. Clamp with tweezers and assure that there are no gaps. Let cure overnight.
Note - Just like blade and guard thickness, make sure the pommel nut is small enough to be in scale.
Start shaping the handle by reducing the thickness and slowly sneaking up on the desired shape. Just as in a full size knife, the amount of drop to the butt, palm swell, and overall alignment to the blade's spine and ricasso can make or break the look of a mini. Go slow and let it slide into perfection. Once it seems right, stop and take a break. Eat a snack or watch some TV. Then go back and look it over again......with a magnifier. It will probably look too fat still. Keep reducing it until it seems right. Pay close attention to the area at the guard and its size in relationship to the ricasso. Don't have the handle wider than the ricasso, or it will look terrible. Measure it with the micrometer and see how fat it really is by scale. Most likely you will end up taking some more off.
When all is done, check a few more times, and them give the blade a final clean up and buff. Use your Dremel/flexshaft and a soft bristle 1/2" wheel with matchless white polish to give all surfaces a final buff. Go slow and get every scratch and bit of glue removed.
A good way of thinking about making a mini is:
If the scale is 10:1, that means you have to be ten times more precise and anal about the details to get it right. I see a lot of minis where it looked like they spent 1/10 the attention to detail......and it showed badly.
Also, keep a small parts box or pill bottle for the many "spare" parts you will end up making when you realize that a handle is too large/small, or a nut is too big/long. Just make a new one and save the old ones for the next knives. I often make a complete handle and then fit the blade to it. It is sometimes easier to keep in scale that way. I put the handle on a piece of round stock hat I have turned down to make a tang. The mandrel and handle assembly can then be held in a pin vise, or by hand, as the handle is shaped.
Final note on this long post:
Mini knives sell from $5 to $500. The only difference is usually the attention to scale and detail. A 1" bowie that is well done will usually fetch $50-75. That may be half of what your full size knife could sell for. Even if you don't become a mini-millionaire, the addition of minis on your table will attract a lot of people to your wares. It will make a statement about your ability to follow detail. The potential customer will rightly assume that if you can get it right in 1/10 size, you have the skills to really make a quality full size knife.
It also will make you more aware of paying attention to detail on your full size knives.
")