Kind of a Persian fighter build, final pictures, for now

Status
Not open for further replies.
Mark that is sure a pretty piece of wood. KT

Yep, it's a nice one, it's spalted birch. This one is the biggest one I've ever done. I make them when I need a break from other stuff. They seem to sell pretty good in our store.

There's a writer that lives in ST. Cloud writing down some of my hunting and trapping stories in a book. He's going to call you just to say Hi. He's a nice guy, name is Bob.

Talk to you later.
 
DSCF1240_zps4b2d249f.jpg

With the shape pretty close to what I wanted I drew the piece out in width and length till it was close to finish thickness. Then I tuned up the profile one more time. There are guys, and gals, that can forge blades pretty close to the finished blade. I reach a point where I get diminishing returns with every blow and since I didn't clean up the billet between making the damascus and forging the blade, I left plenty of material all the way around. I don't want to find I have some hairy damascus on the profile of the knife somewhere.

DSCF1241_zps648486e3.jpg

The edge thickness here is about 3/16, the spine somewhere between 1/4 and 5/16.

DSCF1247_zps401584ee.jpg

The blade is straight and even in thickness with a little distal taper. I cut the tang almost off and using my foot vice (it has a petal that closes the jaws when stepped on) I wiggled the handle off of the piece.

DSCF1257_zps17f6f62c.jpg

Tuning up the tang a little...

DSCF1261_zps5c16998b.jpg

and a little more.

30c6a109-ca2d-4df0-b92e-8b5d10a8bb7f_zps02c0821f.jpg

Not a very flattering picture of the dude here, anyway, a final check of the profile and flatness, it gets heated up the critical temperature and into the vermiculite for annealing overnight.

Thanks for looking, more to come.
 
I'm enjoying this and I just wanted to say thank you for taking the time to do this, I'm sure I'm not the only person who appreciates it. Keep up the great work, I love the design.
 
Thanks everyone for the comments.

DSCF1275_zps903c9028.jpg

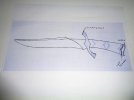
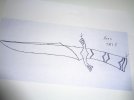
Here's the revised drawing, you can see the changes in the guard. Also, the lower part of the guard with parallel lines to the grind line on the lower ricasso looks a lot nicer. To me the upper and lower quillions look a little out of balance I may even them a little in size. I'm going to keep secret the center of the guard detail, I got to keep some things up my sleeve for a while.

DSCF1272_zps19a59c0f.jpg

The raw abalone shell is in. It takes a lot of shell to give a three dimensional appearance to this material on hidden tang knives. My objective is to have no visible edge grain 360 degrees around the handle. The method I developed involves laminating the relatively thin abalone shell into thick enough sections to make a handle that you can sculpt without the limitations of the thin material. Then I miter the edges and make a box so that the iridescent, pretty side, of the shell faces outward all the way around the handle.

DSCF1276_zps1a29383a.jpg

This is a simplified drawing of the end view of a handle section. Each side of the "box" has seven layers of shell laminated together as closely as possible, there are 28 pieces of shell in each handle section.

DSCF1273_zpsf3fa0d46.jpg

I start by cutting the shell on a diamond saw, this is actually my Shop Smith fitted with a diamond blade. The shell is cut into rectangles that will be laminated together.

DSCF1274_zpsd3ca1ca3.jpg

This is thirty shells all cut into pieces for laminating. There are 33 stacks of seven pieces each. It's enough for eight handle sections, six knives (there is one extra stack in case I need a back-up handle section for some reason). Four of the knives will have two abalone handle sections each while the remaining two have one section of abalone and another of some other material. Next we will be laminating, making one solid piece of each stack. After that, making the "boxes"

More to come.
 
Last edited:
Mark,
I can't wait to see this one come together! Cool shop.
Your work is always so good and unique!
Tad
 
Mark, is that "fresh" shell, as in right out of the water?

I've pulled up an armchair and am going to be watching this closer than a Patriots/Colts Playoff game.


-Peter
 
Thanks guys,

Peter, I'm not sure what "fresh" means in the shell world. I ordered these from a shell supplier. They were clean and polished when I got them. In my experience, shell is not as sensitive to moisture in the air as things like horn and ivory so it does not require the curing time that other materials do. It's pretty inert.
 
Mark,
I think the pictures of this Blade Smith, Artisan at work are very flattering! :cool::thumb up::thumb up::thumbup:.

Like Peter I am going to be glued to this build, I made some hippie type silver & Abalone in my teens so I am really interested in how you are doing this shell laminate. Do you wear a respirator when working the Abalone? I was told that shell dust is brutal and one time back then, I got some pieces really hot working them (No Respirator) and nearly passed out.

So Please, lots of pics and instructions on your lamination method.
 
Mark I really like your new drawing . I made a few small changes to your drawing that I would like. Widened one spot. Lengthened another and changed the arc in another spot. What do you think? I drew them in dark ink. Not big changes but I like it better. Terry KT
 

Attachments

  • DSC00169.jpg
    DSC00169.jpg
    28.6 KB · Views: 100
Last edited:
Mark,
I think the pictures of this Blade Smith, Artisan at work are very flattering! :cool::thumb up::thumb up::thumbup:.

Like Peter I am going to be glued to this build, I made some hippie type silver & Abalone in my teens so I am really interested in how you are doing this shell laminate. Do you wear a respirator when working the Abalone? I was told that shell dust is brutal and one time back then, I got some pieces really hot working them (No Respirator) and nearly passed out.

So Please, lots of pics and instructions on your lamination method.

Hi Laurence, Yes I use a respirator, for the dust, to prevent silicosis. I had not heard of the heating up thing. Yea, I will try to cover the method completely.
 
Last edited:
Mark I really like your new drawing . I made a few small changes to your drawing that I would like. Widened one spot. Lengthened another and changed the arc in another spot. What do you think? I drew them in dark ink. Not big changes but I like it better. Terry KT

I was leaning toward extending the upper quillion, so we are in agreement there. We have to be careful about lengthening the handle too much, it is at 5 inches right now. If we lengthen it too much it will be out of balance both aesthetically and physically, with that heavy of a guard we could probably get away with it. I will blow up the picture and give it some thought. I think the upturn at the toe of the butt cap is a (big) mistake. We can talk about it some. Give me a call when you get a chance.
 
Last edited:
Love where this is heading.

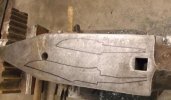
Sorry for my stupid sense of humor, but when I saw this I couldn't help thinking to myself: "Stock-removal from an anvil - how cool is that?!!!"

templates.jpg
 
I had the same stupid humor idea - that is a nice drawing but won't it waste a LOT of steel to cut it out of an anvil?

the techniques with the abalone are cool. This is a great thread, and I am eager to see how the knife comes out.

kc
 
I had the same stupid humor idea - that is a nice drawing but won't it waste a LOT of steel to cut it out of an anvil?

the techniques with the abalone are cool. This is a great thread, and I am eager to see how the knife comes out.

kc
 
Status
Not open for further replies.
Back
Top