Knife Display Box

Joined
Jan 2, 2009
Messages
309
Farmer Phil has requested that I spend a lot of time that could be devoted to sleep or some other worthwhile endeavor and put together a tutorial to make a knife display box.

Ok, here goes.

I'll be posting this in stages but first a few photos to give you an idea what you will end up with.

While this box is for a High Standard derringer the concept is the same for a knife.

Notice the depression where the derringer rests.

I no longer have the competed box; Sold it on ebay a couple of days ago. The other two boxes are obviously not yet complete.
 

Attachments

  • DSC00418.jpg
    DSC00418.jpg
    56.1 KB · Views: 62
  • zhs-01DSC00399.jpg
    zhs-01DSC00399.jpg
    53.5 KB · Views: 60
  • DSC00403.jpg
    DSC00403.jpg
    44.2 KB · Views: 110
  • DSC00425.jpg
    DSC00425.jpg
    43.8 KB · Views: 66
This is the jig for the derringer box. I don't have the jig for the knife box; I used the wood for another jig so I will have to make another. I'll post photos as work on this progresses.

Notice that the jig is not clamped to the table as it would be when making the box.

Also note that I used pocket screws so I can easily adjust the jig for use when making a longer box.
 

Attachments

  • DSC00430.jpg
    DSC00430.jpg
    41.6 KB · Views: 59
Here is my original prototype box.

It was not originally intended for this knife so it isn't fitted for the knife.


Is anyone interested to know how the knife sitting on the lid stays there without falling over?
 

Attachments

  • DSC00436.jpg
    DSC00436.jpg
    56.4 KB · Views: 41
  • DSC00381.jpg
    DSC00381.jpg
    49.5 KB · Views: 23
Last edited:
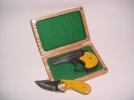
Instructions for making a box for your knife:

I’m not going to discuss safety rules for the use of power tools here. Everyone should already be aware of your power tool safety.

If you use a router regularly you could probably figure this out for yourself so I put this together assuming you don’t have any idea where to start. For those of you who could do this without my instructions please keep in mind I’ve only been using a router for a few of months and figured this out myself. I have no idea if I’m doing this the right way or not so please feel free to add comments.

You will need to be able to cut, route and sand wood stock.

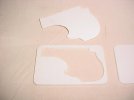
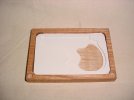
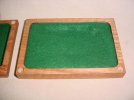
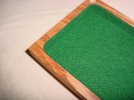
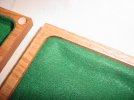
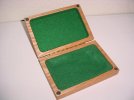
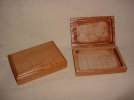
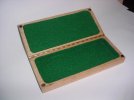
Determine the required size of the box for your knife. In this case I am using two pieces of oak 8.5”x3.5”x.75”.

Make sure that your working pieces are the same size and preferably from the same piece of wood. Keep the grain going in the same direction. Sand the ends so that they are flush and smooth when stacked one on top of the other. You are going to remove the material from the top of the bottom piece and the bottom of the top piece. You may wish to mark them as such with a pencil.

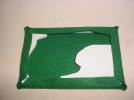
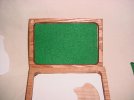
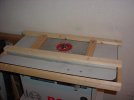
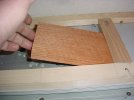
You will now build a jig to hold the piece.

I use a table router however, the table is not necessary, but you will still need a jig and be able to clamp the jig and the piece to be routed to a work table.

If you clamp to a table your jig should be able to hold the piece in place and have a fence as a guide for the router. Since I use a table with my router these instructions will be for that method.

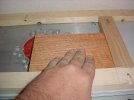
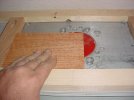
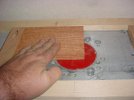
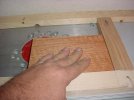
I made a jig that I can place it on the router table and remove it when done and be able to use it again at another time to ensure that each box is the same. I use 1”x2” wood for my jig. The inside track for the jig measures 15.45”x5.45”. This leaves .375” for the sides of the box.

You jig should allow you to move your working piece left and right, forward and backward (away from you and toward you) leaving .375” around the inside edges of the working piece.

Be sure that your jig is centered on the router table or you will have inconsistent edge dimensions. Also, the jig should be square. This is critical.
 
Wow Dave,

I was thinking of a work in progress thread of the next box you make. You know, like snap a few photos and make a few comments. This is WAY better! Thanks so much. Looks like I'll learn a lot. I hope others enjoy it too.

All the best, Phil
 
Well, I am a CAD instructor so I am kinda enjoying this. Thanks for the prompt.

Besides, you said you wanted a tutorial, or am I going overboard?
 
I use a ¾” x ¾” straight bit. If you use a different diameter bit the dimensions I have provided for the jig will have to be adjusted accordingly.

Adjust your router bit above the surface of the table .10"-.15”. You don’t want to plunge too deeply. This will require you to make several passes in order to remove the wood that is currently taking up space in your box. The final depth will be approximately .60” deep on both the top and bottom pieces of the box
 

Attachments

  • DSC00442.jpg
    DSC00442.jpg
    29.9 KB · Views: 13
  • DSC00443.jpg
    DSC00443.jpg
    54 KB · Views: 20
While holding one end of the piece firmly against the inside right corner of the jig lower the other end of the piece onto the turning, spinning, rotating very fast, very sharp router bit. Be aware that this is the time the bit can jerk the piece from your hands and turn it into a projectile or pull your hand toward the bit. Be extremely careful here and use both hands. And remember that I am not responsible for your injuries, ineptitude or stupidity.

If you have never done this keep in mind that basically what you are doing is drilling a piece of wood by moving the wood toward the drill bit rather than moving the drill toward the wood. Don’t put the wood into contact with the bit until the router is turned on.

Move the piece to the left while holding the piece firmly against the front rail of the jig. Once you have moved the piece to the left side of the jig move the piece toward the rear of the table until it contacts the jig. Keep the left end of the wood in contact with the jig. Now move the piece to the right while holding the piece firmly against the rear rail of the jig. Once the piece has come into contact with the right side of the jig move the piece to the front of the table.

Keep firm downward pressure on the piece as well as pressure against the inside of the jig.
 
Moving the piece across the router.

When you first lay the piece down on the bit, use both hands to hold the piece and ease it down slowly.

If the router is too high and you're trying to cut too much at one time you'll have a mess. Blood and stuff everyplace. Probably have a knot on your forehead or something. Be careful and don't rush this. Take your time.
 

Attachments

  • DSC00452.jpg
    DSC00452.jpg
    57.8 KB · Views: 15
  • DSC00453.jpg
    DSC00453.jpg
    57.6 KB · Views: 16
  • DSC00454.jpg
    DSC00454.jpg
    57.9 KB · Views: 18
Last edited:
.....
 

Attachments

  • DSC00455.jpg
    DSC00455.jpg
    55 KB · Views: 7
  • DSC00456.jpg
    DSC00456.jpg
    55.9 KB · Views: 10
  • DSC00457.jpg
    DSC00457.jpg
    57.5 KB · Views: 7
What, you don't hold the router and the workpiece in your hands?

sorry hellgap, but you're not gonna live that one down for a LONG time ;)
 
Once you have routed out the outer portion you can carefully move the piece backward and forward and ever so slightly to the left to remove the remainder of the excess wood from the inside of your box.

It is important that you keep pressure on the piece at all times. Do not lift the piece while the router is running. Also, if you don’t keep the piece moving or not moving fast enough you will burn the wood. You will probably burn the wood anyway but not to worry. You will cover all that up with the felt lining.

After making the first pass I raise the router bit up an additional .10”-.15”. You should check this with a scale rather than eyeballing the height of the bit.

Be sure that you route both the top and bottom pieces prior to raising the bit for the next pass.

You will need to repeat this step until you have obtained a cavity that is .60” deep. If your knife isn’t that thick, stop routing the top. For example, if your knife is .80” thick, route the bottom to .60 and the top .30. This will give you a cavity of .90”. The bottom should not be thinner than .15”.
 
Next, change your router bit so that you can create a decorative edge on the top of the lid. Remove the jig and replace the fence and all the neat protective safety stuff that you had to remove to place the jig on the table.

I use a roman ogee bit. Pay attention to which piece is the top and which is the bottom so you don’t inadvertently route the wrong piece.

You can also use a round over bit and round over only the lid or both the lid and the bottom. I think if you round over the top the completed box is more aesthetically pleasing if you round over the bottom edges as well. You can even round over the corners of the box however you should clamp the two pieces together to make rounded corners so the lid and bottom mate up.

You should decide if you are going to round over all the edges and corners prior to removing the material from the inside of the box. If you do this after routing the inside of the box you could crack the box when you clamp the two pieces together unless you place a block of wood inside the top and bottom pieces. Keep in mind that you will have a 1.2” space inside the box to support.

If you don’t know what a round over bit will do, go to my photo album and look at the gun display stand with the Single Action Colt revolver on it and look at the edges.
 
Next, with a 3/8” Forstner bit drill a hole into the two front corners of the lid and bottom of the box. The holes should be slightly deeper than the thickness of the magnets that you will use to keep your box closed. The holes should be as deep as the magnet is thick and maybe the thickness of a business card more.

This will prevent the magnets from hitting each other (which can cause rare earth magnets to shatter) and to ensure that there is no gap between the lid and the bottom of your box.

At this point you will sand the top and bottom of your box. If your router chipped out any wood now is the time to use a wood filler to fill in those chipped out areas.

Now you can stain or paint your box


We'll take a break here until I get the insert cut out. Stay tuned for part Vee Eye Eye
 
Last edited:
Yeah, and keep yer beard away from the damn thang.

I usually get paid for this kind of thing, pretty well, too. :)
 
Last edited:
Using a piece of foam core or pasteboard from a corrugated paper carton cut out an insert to fit into the bottom of the box. The insert should be slightly smaller than the inside of the box. You should have at least 0.0625” gap all around.

Trace your knife onto the insert adding about .125” more to the outline then cut that area out of the insert. Lay the insert into the box to make sure it fits.

Cover the insert with felt. I like green but any color will do. Wrap the felt over the insert and glue the edges down on the back side. Don’t apply glue to the front of the insert. Wait for the glue to dry.

Now cut out the second part of the insert. This part will only be for the handle and guard. Place this insert into the bottom of the box.

Place the felt covered insert into the bottom of the box. If the felt creeps up around the edges use a small screwdriver to push the felt back down between the insert and the box. If you did this correctly it should not be necessary to glue the insert into the box.

Next, cut a piece of felt that has an adhesive back the same size as the inside of the lid. Pull the paper backing away from the felt about an inch. Place the felt into the lid and press down on the felt where the adhesive is exposed. Gently remove the paper backing while pressing the felt into the lid. Be careful not to stretch the felt. If you do stretch the felt you will have to do this step again.

Cut strips of the adhesive backed felt and place it around the inner edge of the lid walls keeping the edge of the felt flush with the edge of the lid covering the exposed wood.
 

Attachments

  • DSC00465.jpg
    DSC00465.jpg
    35.9 KB · Views: 11
  • DSC00467.jpg
    DSC00467.jpg
    31.1 KB · Views: 14
  • DSC00470.jpg
    DSC00470.jpg
    41.1 KB · Views: 12
  • DSC00471.jpg
    DSC00471.jpg
    56.5 KB · Views: 16
Very cool and thorough tutorial, Dave. Thanks! Ironically my wife brought me home a felt covered box yesterday saying it would make a good presentation box for a knife. I remarked that I would have to make a new custom insert for it for a blade display, now I can! :D
 
Don't worry about it if the felt doesn't stay down when glued. When you press the insert into the box the the tight fit will hold the felt.
 

Attachments

  • DSC00479.jpg
    DSC00479.jpg
    75.4 KB · Views: 6
  • DSC00481.jpg
    DSC00481.jpg
    50.8 KB · Views: 6
  • DSC00487.jpg
    DSC00487.jpg
    72.6 KB · Views: 8
  • DSC00495.jpg
    DSC00495.jpg
    87.2 KB · Views: 5
Last edited:
Attach a hinge to the back of the box. I gently clamp the top and bottom together to ensure that the edges of the two pieces remain flush as I install the hinge. Center the hinge and tape one side to the box so it will stay in place when you drill holes. Try not to drill through the walls of the box. If you do the drill bit will grab the felt and ruin it.

Glue 3/8” diameter rare earth magnets into the lid and bottom of the box. DO NOT CLOSE THE BOX. Wait until the glue has set up before closing the box. Be sure you use glue that will hold the magnets firmly as the magnets are drawn to each other and will pull out of the holes. MAKE SURE YOU PLACE THE MAGNETS IN CORRECTLY SO THEY ATTRACT EACH OTHER. Otherwise, the lid will keep popping up and you will never get it closed.


Gently press your knife into the depression left in the insert and you have a custom fitted box for your knife. Notice that the felt will give slightly; that is why you didn’t glue the felt to the front of the insert.

You can obtain felt in a variety of colors from Wal-Mart or a craft store. I purchased a hinge from Lowe’s.

So now you don’t have to buy a box from me at exorbitant, confiscatory prices unless you don’t have time to make jigs and boxes and don’t want a bunch of trial and error boxes lying around. If you prefer I can make boxes for you but I can’t do it for free.

If you have used a router before this box is easy to make. If you haven’t it’s not that difficult

Depending on the strength of the magnets you use the box will stay closed. I mean if you use really strong magnets the box will really stay closed. I use fairly strong magnets so that the box will stay closed even if dropped. I should warn you to be careful about pinching your fingers when closing the box but I’m not going to. Some things you have to learn for yourself.

Also, you will have to adjust all the dimensions for your box and jig according the size of the knife.

I like this box because I can never get ten pieces of wood squared up and flush and because I don’t have a dovetail jig. Also, if done correctly the box looks like one piece of wood when closed. I also think it is a stronger box with a whole lot less work than cutting mortise and tenon joints.


I’ve been making boxes for firearms and selling them on that popular auction site. They have been well received.


For your entertainment:

Them clothes has got laundry numbers on 'em. You remember your number and always wear the ones that has your number. Any man forgets his number spends a night in the box.

This yere spoon you keep with you and any man loses his spoon spends a night in the box.

There is no playing grabass or fighting in the building. You got a grudge against another man you can fight him Saturday afternoon.

Any man playing grabass or fighting in the building spends a night in the box. First bell is at five minutes of eight when you will get in your bunk and last bell is at eight...

Any man not in his bunk at eight will spend a night in the box. There is no smoking in prone position in bed. To smoke you must have both legs over the side of your bunk. Anyone caught smoking in prone position will spend a night in the box.

You get two sheets. Every Saturday you put the clean sheet on the top, the top sheet on the bottom and the bottom sheet you turn in to the Laundry Boy. Any man who turns in the wrong sheet spends a night in the box. No one will sit on the bunks with dirty pants on. Any man sitting on a bunk with dirty pants will spend a night in the box. Any man who don't bring back his empty pop bottles spends a night in the box.
 
Last edited:
Back
Top