And now that it is done, Spyderco will now offer a LW Manix in M4 steel.
Well didn't happen but they recently released something even better- LW Manix 2 in Rex45.
The BladeForums.com 2024 Traditional Knife is available! Price is $250 ea (shipped within CONUS).
Order here: https://www.bladeforums.com/help/2024-traditional/
And now that it is done, Spyderco will now offer a LW Manix in M4 steel.
Well didn't happen but they recently released something even better- LW Manix 2 in Rex45.
Well didn't happen but they recently released something even better- LW Manix 2 in Rex45.
Well didn't happen but they recently released something even better- LW Manix 2 in Rex45.
I have one and I'm super tempted to do this! With tool steel blades I like the option to disassemble and check the innards.
Thanks for the write up uxo2.
Yours, along with some others that I read, motivated me to try this screw conversion. This vid was also helpful.

Nice to see someone is using their head by using a center punch.I actually used a hardened steel punch smaller than the rivet diameter and a bench block, and simply drove the rivet and all out in one stroke.Gosh darn it!
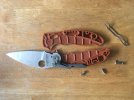
Look what you guys made me do:View attachment 1576587View attachment 1576588View attachment 1576590
I center punched each rivet on the clip side, and hand drilled it slowly with gentle pressure and a sharp bit until the rivet lost its tightness and started lightly spinning. I then used a carbide burr to get really close to the washer.Nice to see someone is using their head by using a center punch.I actually used a hardened steel punch smaller than the rivet diameter and a bench block, and simply drove the rivet and all out in one stroke.
So Did you use drill press to drill the rivets.