PoleMonkey13
Gold Member
- Joined
- Feb 1, 2021
- Messages
- 508
I need one, or both, of these recovered.

The BladeForums.com 2024 Traditional Knife is available! Price is $250 ea (shipped within CONUS).
Order here: https://www.bladeforums.com/help/2024-traditional/
I think the one on the left looks great.


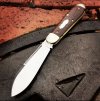
Here is my first attempt at a re-cover. I got this barlow that had broken plastic scales and the blade had some big dings in it. I did not have any steel pins to match the bolster so i kept that intact. There are scratches on the backspring and liners but i didnt want to get into the bolsters patina so i left the scratches to blend with time. All in all i think it was a success. A full dis-assembly would have been better and next time i will. Any input or critique is welcome. Thanks guys! Heres the pics. View attachment 1741810View attachment 1741809View attachment 1741808
That worked! Not perfect, but way better than it was. I think it may work in even better with time. I put a nice edge on it and it's good to go.If it opens ok and with snap you may have closed the blade well a little bit. It may work in ok with some use or you may want to wedge some metal in there to widen it a little. I usually try to put an extra spring or piece of metal in the blade well while piening to keep it from closing up.


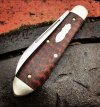
Torchy! Like a well toasted marshmallow. The lanyard is brilliant.View attachment 1744815View attachment 1744816View attachment 1744817View attachment 1744818
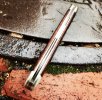
Here's some finished shots of the lanyard mod I did on my Opinel No.10. Heavy gauge copper wire inlet into the handle, filed flush and to the profile of the original bevels. Epoxied in place,so far holding great
ThanksI recently picked up an older GEC fixed blade off the big auction site. At some point in its life so far the bolster and end cap were very nicely engraved. I'm curious if anyone recognizes this work? The last pic shows what I think is the maker mark on the edge, but I have no idea how to identify it.
View attachment 1683640
View attachment 1683644
View attachment 1683641
View attachment 1683642
View attachment 1683643
No I would still love to know! If someone recognizes please share, thank youDid anyone answer this question about the engraver. I think I’ve seen this mark before and probably in this thread somewhere.
 I've skimmed this thread but at 150+ pages I could have easily missed.
That's why I like this forum.... I learn so much from other inquisitive and creative minds..... I really like this mod... opens up a realm of possibilities, and is something I wouldn't have thought of....View attachment 1744815View attachment 1744816View attachment 1744817View attachment 1744818
Here's some finished shots of the lanyard mod I did on my Opinel No.10. Heavy gauge copper wire inlet into the handle, filed flush and to the profile of the original bevels. Epoxied in place,so far holding great
I went back through and unfortunately it was not the one I thought it was.No I would still love to know! If someone recognizes please share, thank you
Appreciate you checking, thank you. I haven't been able to ID the maker mark but I figured this thread would be a good place to ask, maybe someone will recognize itI went back through and unfortunately it was not the one I thought it was.

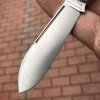
Acrylic, gone!
Lifter, gone!
Blade etch, gone!
Took a little meat off the bolsters before assembling, so it’s thin and ver pocket friendly.