- Joined
- Aug 28, 2000
- Messages
- 453
Photos posted!


I still haven't finished drilling out the bowl, but I wanted to get the photos up right away. Let me know what you think.
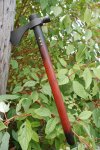
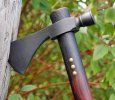
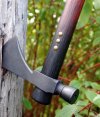
I refinished a Cold Steel Rifleman's hawk last year, but found it on the heavy side for what I wanted, so I just purchased a Cold Steel Pipe Hawk. It has no functional bowl...more of a faux hawk, a poll hawk dressed up to look like a pipe hawk. But I really wanted a user and love the looks of a pipe hawk, so this is perfect for me. Head size was what I was looking for, right length, right weight. I drilled out the bowl to make it look more like a real pipe hawk, not all the way through to the eye. I took out the set-screw and stuck in a cap screw M6-1.00x20, hack sawed off the extra so it is flush and staked it to fill the hole.
Haft is longer than I expected, 22 inches. I rounded the bottom, used a propane torch to scorch the top and bottom. Rubbed on some Solar Lux dye stain, Medium walnut over a light coat of blood red (could have left off the red). Then a coat of boiled linseed oil. I have a curly maple haft for it, but the trial haft turned out so nice I'm keeping it as is and saving the maple for later. Also impressed how the Solarlux dye made the plain Jane hickory look like it has some nice grain.
I have some Laurel Mountain Forge Rust Brown on order. I plan to do a rust blue with that. I have some antiqued brass tacks I will stick in the haft to finish it, three rows of three near the head based on some historical relics I've seen. Total investment of about $45 includes the Rust Brown. I had the stain, tacks and oil already.
-Brian
Last edited:


