My First Knife

RyanW

Moderator
Joined
Jul 17, 2009
Messages
3,327
After fixing many mistakes, making unplanned adjustments this is the result....
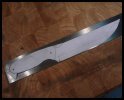
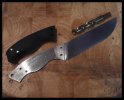
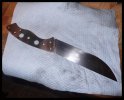
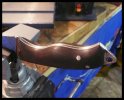
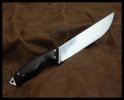
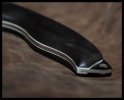
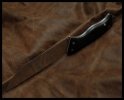
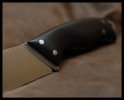
"Camp Chef"
OAL: 12"
Blade: O1 - 6.25"
Handle: Stabilized Ebony
Pins: 3/8" Nickel
Spacers: White
Weight: 8 oz.

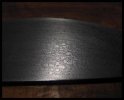
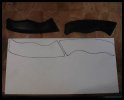
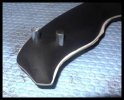
It started out as a Flat Ground Piece of 01 (1/8" x 2" x 12") Stock removal with a porta-band converted to a Band Saw (Stuck in Vice). Ground to shape with Angle grinder and Bench grinder Combination, Flat ground on a Cheap Ryobi 4x36 Belt grinder (Had it for years) Hand sanded to 400 Grit...

Heated to 1500F in my new forge, Plunged in Canola Oil and Triple Tempered at 400F in my Kitchen Oven...

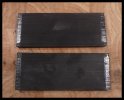
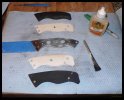
Cleaned up Blade, Shaped Scales, Cut Spacers to size. Epoxied with Gorilla White Glue.... 60 minutes later Sanded to 1000 Grit.
CampChef.jpg


I am looking for any Comments, recommended changes, Kudos for the future... thanks in advance! I am pretty happy with it, and cant put it down....:rolleyes:
 
I love the lines. That handle looks smooth and tactile, I don't see stabilized ebony that often.
 
Thanks for the Kind words. The time I spent on this thing is a little over the top, but I am hoping that will change as the mistakes decrease. I learned a ton on this and am starting my second tonight. I have about 10 designs drawn up guess I better pick one.

I did have one question, I used the Nickel pins cause that is what my local hardware store had, I was planning on Stainless Pins. Is there a problem that may arise in the future due to using Nickel (Discoloration Etc...)
 
They will patina just like the blade but a little polish or wax will usually bring back the shine.Acts sorta like brass.
OH and a Greaat First knife:thumbup:
Stan
 
Thanks again everyone for the nice comments, this place gave me the bug...

If anyone is interested I took Progress Photos as I went through the process, I was initially planning on posting this as a How to / Not to thread based on my experiences along the way as a beginer. I can still post it here, Just didn't want to bore everyone.
 
Great looking knife, you have a good eye for aesthetics.
And progress pics are never boring, fire away! :D

Patrice
 
This wanna be knife maker says....HELL YEAH we want to see the WIP:thumbup:

Looking forward to them.

Keep up the good work.

45

Thanks again everyone for the nice comments, this place gave me the bug...

If anyone is interested I took Progress Photos as I went through the process, I was initially planning on posting this as a How to / Not to thread based on my experiences along the way as a beginer. I can still post it here, Just didn't want to bore everyone.
 
Well here goes... :rolleyes:

Photo CC01 - Shows my template on the (1/8 x 2 x 12) Precision Ground "01" I got from Admiral Steel. I made a few changes during the process: Dumped the idea of a Bottle opener on the spine, mainly due to my lack of precision cutting tools (contemplated using a series of files to make it happen but glad I didn't). Also removed the small drop on the Pommel (Initially had it there until I shaped up the scales and decided the flow was completely off) Edit: (I almost forgot one of the most important steps) I flat ground the blade on an old Ryobi 4x36 belt sander (80 Grit belt) - Someday I will get my hands on a 2 x 72... I had a hard time keeping the grind straight (on the ricasso) I used a file to straighten it out and create some depth near the Bolster. I made a clamp device that made keeping the blade at the right level much easier...

Photo CC02 - These are the stabilized Ebony Scales (3/8 x 2 x 5) I was a bit worried about using such nic scales on my first knife. I just prefer working with wood compared to Micarta etc...

Photo CC03 - I temporarily attached the scales and didn't like the balance or weight in my hand, kinda felt heavy and dead. I threw it on my small scale and it came out at 9.1 oz. the only way to lower the weight (IMO) was to remove some of the steel under the Scales. So I drilled a few holes. End result was a weight of 8 oz. and felt perfect.
** I ran into some trouble drilling the holes, either I have terrible drill bits (A few I ruined) or I am doing it wrong. I have a drill press and used Oil to ease the work... but I think I am heating the metal too much and Heat Treating the steel making it impossible to drill the holes if my first attempt fails. (Any advice in this area would be greatly appreciated)

Photo CC04 - This is a photo of the blade after the Heat Treat in my new "Franco32" 3 burner Forge (thanks Franco32) to approx 1500F, Until Non-Magnetic. I plunged it into Canola Oil, the Flame up surprised me a bit, but I held my ground continuing the stirring motion. I also Heat Treated the Pommel due to the fact I plan on using it to open my bottles (since I removed the Bottle opener idea) I then Tempered it 3 times in my kitchen oven at 400F / 405F / 410F for 1 hr. each time. the entire blade came out a nice Golden Color (I don't know if that is good or bad).

Photo CC05 - I noticed a little activity on the surface of the blade during the Heat Treatment... and this shows what I call "Crackling" that was a HUGE pain in the ass to remove in the sanding process. I don't Know if I did something wrong any advice here would be appreciated also.

To be Continued....
 

Attachments

  • CC01-Template on 01 Blank.jpg
    CC01-Template on 01 Blank.jpg
    46.8 KB · Views: 88
  • CC02-Stabilized Ebony.jpg
    CC02-Stabilized Ebony.jpg
    54.2 KB · Views: 88
  • CC03-Pre Weight Loss.jpg
    CC03-Pre Weight Loss.jpg
    49.8 KB · Views: 99
  • CC04-Post HT & 3xTemper.jpg
    CC04-Post HT & 3xTemper.jpg
    48.2 KB · Views: 96
  • CC05-Blade Crackle.jpg
    CC05-Blade Crackle.jpg
    41.9 KB · Views: 112
Last edited:
Photo CC06 - I spent most of my time trying to get the Blade cleaned up starting with 100 Grit - 220 Grit - 400 Grit... I made the mistake more than once moving to a finer grit before I should have, then going back to get rid of some scratches I couldn't get off with the finer grain. I used some Remington Spray Gun Oil (Was within reach) to help the work along. I made sure to spend some time on the Pommel since it would not be covered by the Handle Material.

Photo CC07 - White Spacer Material, I love the clean look of spacers that I see on makers knives so I wanted to give it a shot. I cut them out with heavy duty scissors and Jig Saw and Drill press (for Pin Holes). I made sure to cut them oversize so I didn't run into the problem of it being lower than the Scale and Steel.

Photo CC08 - I then pinned the Scales and spacers together (without the Blade) and trimmed & Sanded the sections not accessible when the blade is in place (Pommel and Bolster? area)

Photo CC09 - After the blade was polished up (400 Grit) I covered it with Blue Tape. After scales and spacers were prepped adequately I sanded the sides of all surfaces to be glued with 100 grit sandpaper and wiped down with Acetone. I then Numbered/Lettered the parts accordingly: "1/1" Right Side - "B/B" Blade - "2/2" Left Side to avoid any confusion when Glue is applied. I used Gorilla White Glue, they recommend wetting surface slightly so I did that placed the glued knife in a padded vice and waited 60 min. The glue expands dramatically, so I wiped the excess glue off periodically during the initial 30 min.

Photo CC10 - after the Glue set, I carefully trimmed the excess Glue and Spacer Material with a small sharp knife. and started the sanding process again (220 / 400 / 600 / 1000 Grit) Unfortunately when I put the pins in a small chip in the ebony occurred on the right side bolster area. luckily it wasn't too deep and I was able to sand it down to good wood, I then sanded the left side down to match. I made the same mistakes in this sanding process that I made while sanding the blade (Moving on the the next grit too soon)

Needless to say my fingers and hands are extremely sore and tired from the sanding process. Still one more post of the final photos to come....
 

Attachments

  • CC06-Blade Polish.jpg
    CC06-Blade Polish.jpg
    63.5 KB · Views: 61
  • CC07-Spacers.jpg
    CC07-Spacers.jpg
    28.6 KB · Views: 50
  • CC08-Spacer Trim - Sand.jpg
    CC08-Spacer Trim - Sand.jpg
    61.8 KB · Views: 62
  • CC09-Epoxy Layout.jpg
    CC09-Epoxy Layout.jpg
    67 KB · Views: 59
  • CC10-Handle Finish.jpg
    CC10-Handle Finish.jpg
    48.3 KB · Views: 72
Finished Up.

These photos are just different angles of the finished "Camp Chef" knife. there are mistakes, scratches, bad file work (Mainly the Ricasso), the cutting edge is a little wavy when I run my finger lightly along it, and the spine is bowed a little (Which I Could / Should have fixed on the flat grinding) but I am super happy with it and will be using it excessively with pride.

I included a photo of what my hand looks like after washing it 10 times, guess I will be picking up some rubber gloves for the gluing process so my lady will not be repulsed by my grimy hands in the future!:D

Thanks for looking! and more thanks for comments....
 

Attachments

  • Camp Chef 01.jpg
    Camp Chef 01.jpg
    24.1 KB · Views: 61
  • Camp Chef 03.jpg
    Camp Chef 03.jpg
    24 KB · Views: 65
  • Camp Chef 04.jpg
    Camp Chef 04.jpg
    31.1 KB · Views: 59
  • Camp Chef 05.jpg
    Camp Chef 05.jpg
    18.1 KB · Views: 61
  • Glue Hand.jpg
    Glue Hand.jpg
    42.4 KB · Views: 65
Great looking knife FleshEater! Thanks for the forge mention. Hope it serves it's purpose for many runs to come....G
 
Back
Top