My knife grinding jig

PEU

Gaucho Knifemaker
Joined
Aug 6, 2006
Messages
1,160
All the way down where I started...

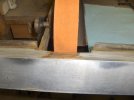
When I started making knives the mechanical head in me told me to make a jig so bevels would be easy, it wasn't if you didn't know a lot of things about making knives, so now, many years later, here is my new knife grinding jig, I only have to make the front threaded holes for it to be finished, but my work week ended so, they are going to be made next week, already traced with an height gauge their locations.

Planned it on the go with many ideas I saw online, since I used only stuff I had lying around I had to solve the varying angle of the platten with respect to the adjusting stand, other designs used rod ends or other mechanical solutions, I used a threaded rod with a hole and a spring pin, kludgy but works.
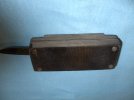
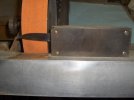
Hinges are regular small door ones, and the initial spring was the black metal piece of 1095 steel hardened and tempered to be springy, but later I tought to add the axial spring over the threaded rod.

The hole in the stand allows for some play of the threaded rod, and finally I used the lathe to make and knurl the main knob and the small one to keep it in place.
Total angle movement is around 10 degrees, more than enough for a flat grind. Finally added a piece of cutting board to the bottom to make it slide better.

Will see action pretty soon on some batches I need to make

wP0Kkg4.jpg

lSVvX46.jpg

8KluUvb.jpg

DLQA00K.jpg


Pablo
 
That looks pretty nice, how is the steel held to the face of that jig--with a couple of screws? I will say, that if I had my choice on jigs, I prefer a magnetic attachment whereby it's easy to place the edge of your steel flat against your tool rest, and then flip the steel to grind the other side, and you fix your steel to the jigs magnets, and again bottom it out against your tool rest--having the UHMW on the base for sliding your jig is a must do in my book.

Good work brother!
 
I still need to make the threaded holes, you put a screw or two to have repetability, align edge to top and then use the clamp of your choice to keep the blade in place

wCmSU4i.jpg


Pablo
 
A better set up in my opinion and in actual use is a tilting table with extended arms , and two blocks of thick micarta to hold the blade. No need to change the blade from one side to the other so you can go from one grit to another for each blade side.
Frank
 
I've simplified mine now. I now use a block of aluminum, which is drilled & tapped for the handle fasteners (3/16" or #10 fine thread). Still use the larger jig I made for bigger blades. It sits on the table of the tool rest & the platen is tipped to the proper angle. Very simple & easy to use, but I do flip the blade & use two positions for the block (left & right side of the blade with one screw).
 
A better set up in my opinion and in actual use is a tilting table with extended arms , and two blocks of thick micarta to hold the blade. No need to change the blade from one side to the other so you can go from one grit to another for each blade side.
Frank

This is how I do it, but instead of Micarta I use two 25-50-100 blocks.
 
Last edited:
First of all, hello to everyone (I'm new in the forum)

This jig looks very nice (it looks like you have made a very effective -and simpler- jig than me!!)

Knife Jig I Jose.jpg
 
Last edited:
For some of our members my comment about the jig might have sounded short and harsh, however when you've seen a little of Pablo's work it's with respect I offer him what I have found does work even for recurved blades. Sure there's more than way to do it !
Frank
 
Frank , no problem. I'm a old timer like you and would really appreciate a pic of what you describe! Maybe you have a grand kid (or a neighbor kid) that could post a pic of what you describe! I'd love to c it! I wish I lived closer to you as I KNOW you have forgot more than I'll ever know about knife making!
 
This is simplicity plus but I know that without a picture or two it just doesn't come together.
Can one of you send me your email to frankniro2@gmail.com please?
Here is a start.A holder for the blade is needed. Wood doesn't work because of the water dipping thing if you grind after heat treat. The wood with the water will cause the movement on the blocks to be uneven. Two blocks of micarta the same size about 3" X 7" X 1/2" or more thick must have bolts installed at each corner. The blade is installed so that the top of the grind line will be near center line of the holder. Having the blade pretty much at 90 degress to the table is important but any necessary change will show up on the first couple of passes against the blade A shim the thickness of the blade is placed in the other end. The blade is ground edge up as is very usual. The table is tilted to an angle favoring the cutting edge to avoid running above the desired top edge of the grind. Now the blocks and blade are drawn from the ricasso to the tip or the other way if prefered but with a nice even pull . The blade can now be given a tap to raise or lower the tip: the table angle is also adjusted if necessary. When moving the blocks or sled along it is necessary to draw the sled slowly towards you to maintain an even thickness. Yes, I use two grind lines on the blade. Go slow and find you angle then of course just turn your sled around to do the other side in the same grit. If you have bad a neck, arms or shoulders or just not all that strong. this "moma's aid" will give you a huge boost in grinding control.
The table needs to be as long as the blades you want to do plus the length of the sled for each side of course. It must sit at 90 degrees to the machine's grinding belt and secure from easy up and down movement at the ends. I recommend some heavy aluminum angle material about 3"-4" wide. I hope this helps some for now. Those plates? that are used by member Currenthill could be much better for the sled but I don't know how they are made up.
Got to get our car detailed but will be back later.
Always excited to try to help others.
Frank
 
Frank I always appreciate your insights, in no way I found your comment harsh!

Finished the holes and threaded them all !!! If you ever need to do all these threaded holes this little chuck with hexagonal arbor does wonders, using an electric screwdriver with torque control you can do all the threads (40 in my case) in less than 10 minutes!
Of course, a tapmatic is THE solution, but I don't have one.

B8GGJmV.jpg


Pablo
 
Thanks for those remarks, Pablo
That looks great! I had to go to a tapping machine a couple of years back my wrists just couldn't handle much. The one I have isn't a tapomatic but a some what no name brand I bought new for a super price and as long as you have quality taps it does a wonderful job. I saw they were being sold world wide and for some time. It has been a winner for me. Still that little set up you show I know will work well for most makers without a disability.
Frank
Frank
 
I will talk to a special friend in Louisiana. Perhaps he will post a few pictures that are mine to the forum. They will be under his name if he says okay since he cannot use my name to post.
Frank
 
kieth says he will be pleased to post what I have sent him, which isn't much and perhaps some he already has from several months back. They are simple and not very good even for pictures. Of course you can ask all the questions you want.
By the way, please don't think that I have all this piled up information in my head. Because of the desire I had to make I just kept at it to try to satisfy the end result to do better as I went along. A lot of satisfaction has come to me through helping others as I see many others doing as well.
Frank
 
okay guys as I told mr. Frank I will try and get his pictures posted. This actually to me seems the easiest way to do this however everyone has their own way maybe these pictures will help someone. I have not yet built mine but as soon as I have time and get the material I plan to do so. Different materials can be used however I plan to use the same material as mr. Frank. I am going to try and post these pictures and Hope that it works out if there are any questions Please refer to mr. Frank as he will be much more capable of answering them even if he is kinda harsh hahaha just kidding with you my friend
 

Attachments

  • HPIM0409.JPG
    HPIM0409.JPG
    36.5 KB · Views: 154
  • HPIM0411a-1.JPG
    HPIM0411a-1.JPG
    40.5 KB · Views: 138
  • HPIM0410.JPG
    HPIM0410.JPG
    39.2 KB · Views: 152
Back
Top