-
The BladeForums.com 2024 Traditional Knife is available! Price is $250 ea (shipped within CONUS).
Order here: https://www.bladeforums.com/help/2024-traditional/
You are using an out of date browser. It may not display this or other websites correctly.
You should upgrade or use an alternative browser.
You should upgrade or use an alternative browser.
New Knife- Hammon and figured Maple
- Thread starter Nic.
- Start date
Horsewright
Knifemaker / Craftsman / Service Provider
- Joined
- Oct 4, 2011
- Messages
- 14,141
I'll add some more in the morning. Been busy at the ranch riding fence and now in the shop.
- Joined
- Nov 28, 2014
- Messages
- 1,864
Very nice job on the knife! You've come a long way! The only angle I see that I would change is the front of the scales. I like that angle to match the plunge line. If they are different then it really catches my eye. Maybe that's a little of my OCD! If you want the angle to look like yours now you can lean the plunge line forward to match. I'm not saying to make it flat. You can still round it a little and I would recommend that but play around with matching the overall angle. Again, very nice job.
Horsewright
Knifemaker / Craftsman / Service Provider
- Joined
- Oct 4, 2011
- Messages
- 14,141
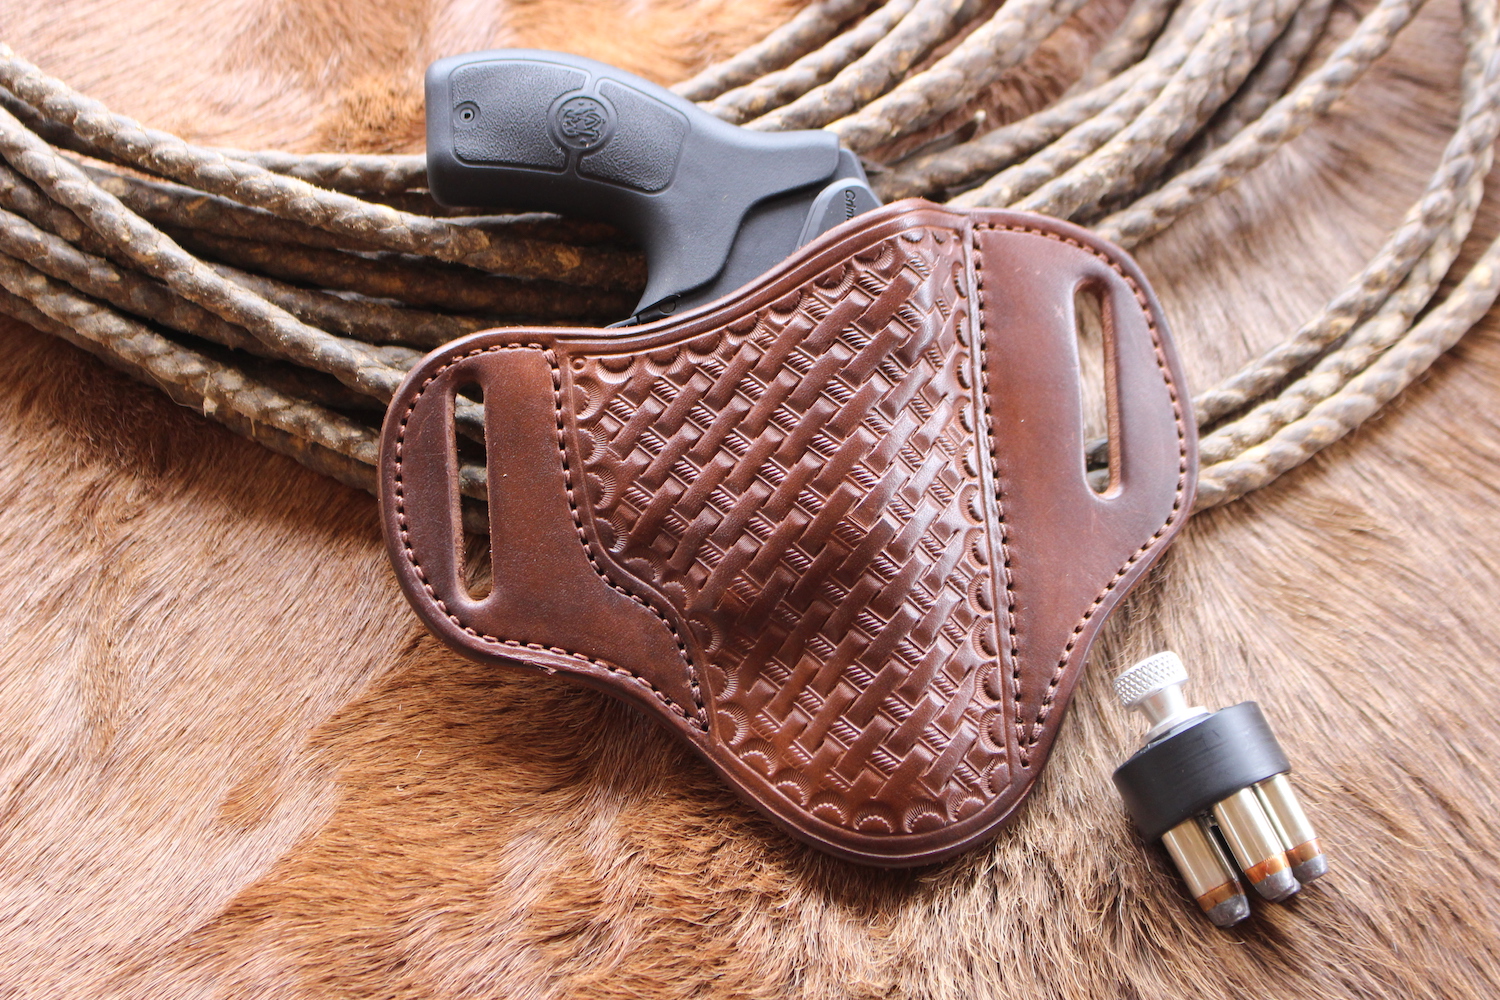
Lets look at the basket stamping this morning.
This is one area where a "quality" tool really will shine over a so so one. Its really surprising the difference a good stamp here can make. I'd recommend a Barry King. Interestingly they are kind of middle of the road price wise. I've got stamps that cost more but I prefer the BKs. A good stamp should make a uniform, crisp and burnished impression.
I think it is an error to stamp across a bend or fold as was done with this sheath that Nic made. Ya see it pretty often but its a bad idea. There are two reasons for this. One in the long run it weakens your leather in that area of the fold. Two it will distort all your good work. The stamping will distort and shallow out across the bend. So in this instance there should just be a tooling placket or plate or area whatever ya want to call it, just on the front of the sheath. This placket should include a small border say 3/16" of an inch between it and the stitch line too. Most folks will draw out this line all the way around. At the top, down the left side and back up the right side before where the bend will be. Then it is cut with a swivel knife and bevelled. The basket stamping is done inside this bevel. For long straight bevels like this, a push beveler works better for me than just using a stamp. Easier, quicker and a more uniform job. This is one area where the better tool is cheaper. I use an Osborne push beveler, I think it cost like $10. I also have a $100 one and I much prefer the $10 one. Then your camo border tool lines up against the bevel. Draw your line and start your basket stamp. Now that is the proper way of doing it but I don't cut the border. I make an awful lot of knives and sheaths for guys (working cowboys) that may not take the best care of things. I found over the years that the cut was another weak point. So I stopped doing it.
On this holster you can see a border cut and bevelled and then camo border stamped and basket stamped inside the border. You can also see the uniformity of the stamping and the depth achieved. Some of this is experience and a lot of it is good leather. My wife Nichole did the tooling on this holster.
However after chewing on her and explaining why I didn't like to cut and bevel the border she did this sheath:

The border has just been marked in but not cut.
I did this holster and I much prefer this. Again this is for strictly durability reasons. Above is not wrong. In fact it is the "correct" way, its just not how I do it. But my thoughts are based on thousands of sheaths and holsters:

I haven't mentioned the camo border tool yet. Here is another area where quality doesn't always equate $$. I use a Tandy Pro Crafter. Think it was $15. I REALLY like it an have many camo tools that cost many times that but its what I prefer.
One of the biggest parts about decent tooling is leather prep. We've already talked about quality leather. This is vital. Now take your quality leather and case it. Traditional casing involved dunking your leather in water until bubbles stopped coming out. Then you wrapped it in a wool blanket and came back the next day to do your work. About 10-12 years ago a friend convinced me to try a product called Pro Carv, (Jantz carries it). Mix it in with water at 1 part Pro Carv to 10 parts water and go to town. Literally I will wipe down the leather with a sponge and this solution. I will wait till the "color" starts returning back to normal and then go to work. The color change can be hastened with a blow dryer and most experienced leather toolers keep one by the bench. I can't recommend this stuff enough I do not have water on my bench that does not have Pro Carv in it.
Something I do first when the color starts coming back is slick all leather that is to be tooled. Slicking or Glassing involves rubbing the damp leather with a hard piece of wood or glass to compress the fibers and to make the leather that is to be stamped more uniform. I use a piece of Ligum Vitae that was a knife handle block I bought from one of our suppliers years ago. I rounded off all the corners and use this for slicking and also wet molding my sheaths. Just rub the damp leather when the color is coming back. Use firm pressure and I push away from me. The idea is to slick it a little and get it consistent, ya'll see a little gloss to it as well if you're getting it right. Got this nice and uniform go to work. Lay out your pattern and start tooling. There are tools made for this by many suppliers and usually they are made of glass with the corners rounded and a wooden handle attached. Nichole, my wife has one but I don't know where she got it.
Well thats about it on the stamping. We'll address edging in a future installment. Questions and comments are welcome of course.
This is one area where a "quality" tool really will shine over a so so one. Its really surprising the difference a good stamp here can make. I'd recommend a Barry King. Interestingly they are kind of middle of the road price wise. I've got stamps that cost more but I prefer the BKs. A good stamp should make a uniform, crisp and burnished impression.
I think it is an error to stamp across a bend or fold as was done with this sheath that Nic made. Ya see it pretty often but its a bad idea. There are two reasons for this. One in the long run it weakens your leather in that area of the fold. Two it will distort all your good work. The stamping will distort and shallow out across the bend. So in this instance there should just be a tooling placket or plate or area whatever ya want to call it, just on the front of the sheath. This placket should include a small border say 3/16" of an inch between it and the stitch line too. Most folks will draw out this line all the way around. At the top, down the left side and back up the right side before where the bend will be. Then it is cut with a swivel knife and bevelled. The basket stamping is done inside this bevel. For long straight bevels like this, a push beveler works better for me than just using a stamp. Easier, quicker and a more uniform job. This is one area where the better tool is cheaper. I use an Osborne push beveler, I think it cost like $10. I also have a $100 one and I much prefer the $10 one. Then your camo border tool lines up against the bevel. Draw your line and start your basket stamp. Now that is the proper way of doing it but I don't cut the border. I make an awful lot of knives and sheaths for guys (working cowboys) that may not take the best care of things. I found over the years that the cut was another weak point. So I stopped doing it.
On this holster you can see a border cut and bevelled and then camo border stamped and basket stamped inside the border. You can also see the uniformity of the stamping and the depth achieved. Some of this is experience and a lot of it is good leather. My wife Nichole did the tooling on this holster.
However after chewing on her and explaining why I didn't like to cut and bevel the border she did this sheath:
The border has just been marked in but not cut.
I did this holster and I much prefer this. Again this is for strictly durability reasons. Above is not wrong. In fact it is the "correct" way, its just not how I do it. But my thoughts are based on thousands of sheaths and holsters:
I haven't mentioned the camo border tool yet. Here is another area where quality doesn't always equate $$. I use a Tandy Pro Crafter. Think it was $15. I REALLY like it an have many camo tools that cost many times that but its what I prefer.
One of the biggest parts about decent tooling is leather prep. We've already talked about quality leather. This is vital. Now take your quality leather and case it. Traditional casing involved dunking your leather in water until bubbles stopped coming out. Then you wrapped it in a wool blanket and came back the next day to do your work. About 10-12 years ago a friend convinced me to try a product called Pro Carv, (Jantz carries it). Mix it in with water at 1 part Pro Carv to 10 parts water and go to town. Literally I will wipe down the leather with a sponge and this solution. I will wait till the "color" starts returning back to normal and then go to work. The color change can be hastened with a blow dryer and most experienced leather toolers keep one by the bench. I can't recommend this stuff enough I do not have water on my bench that does not have Pro Carv in it.
Something I do first when the color starts coming back is slick all leather that is to be tooled. Slicking or Glassing involves rubbing the damp leather with a hard piece of wood or glass to compress the fibers and to make the leather that is to be stamped more uniform. I use a piece of Ligum Vitae that was a knife handle block I bought from one of our suppliers years ago. I rounded off all the corners and use this for slicking and also wet molding my sheaths. Just rub the damp leather when the color is coming back. Use firm pressure and I push away from me. The idea is to slick it a little and get it consistent, ya'll see a little gloss to it as well if you're getting it right. Got this nice and uniform go to work. Lay out your pattern and start tooling. There are tools made for this by many suppliers and usually they are made of glass with the corners rounded and a wooden handle attached. Nichole, my wife has one but I don't know where she got it.
Well thats about it on the stamping. We'll address edging in a future installment. Questions and comments are welcome of course.
kuraki
Fimbulvetr Knifeworks
- Joined
- Jun 17, 2016
- Messages
- 4,679
Dave, I really appreciate your sharing. I've read some of your tutorials but I have a question that I just can't seem to get right.
Let's take a folded leather pouch that I want to tool. I make a paper pattern with the knife, I lay it out, trace and cut the leather. My problem begins here. Obviously paper doesn't fold around the knife exactly how the leather will, so I leave myself some wiggle room. I take my leather blank and try to mock fold it around the knife and really guess how it's going to lay and get the edges lined up so I can fix them. So I trim and slick them up so I can use them to lay out my stitching and tooling lines.
Inevitably when I'm done tooling and ready to fold and glue, the edges no longer match and need to be sanded in the best case, and often cut AND sanded to line up again. And now my layout lines no longer match the edges.
The only way I can seem to avoid this is to give up on tooling because I can blank, fold, form, glue in the welt, trim, sand, slick the now glued edge nice and square and uniform, THEN layout my stitching lines, but, obviously I can't tool because it's glued together.
Doing it that way I can make a much more professional looking sheath, and I don't mind doing it that way but they are awfully plain.
Horsewright
Knifemaker / Craftsman / Service Provider
- Joined
- Oct 4, 2011
- Messages
- 14,141
kuraki couple of things probably causing your problems and a couple of ways to fix it.
Causes: A) too much muscle while tooling and your distorting the leather. B)Too thin a leather and its distorting as your tooling. C) your leather is too wet while your tooling or D) probably a combo of all of the above.
Fixes: Causes A through C easy enough. Now some other ideas. I would build your sheath from the top down. This would involve extending the bottom part of the pattern out by about a 1/4". You prep and tool the top. Glue your welt to the top and then glue it to the bottom. Ya don't have to line up the edges cause you're now gonna trim, sand and sew. If you are machine stitching you'd probably trim and sand after sewing. Most machines like to have that little extra sticking out on the bottom when ya sew. Prevents the edge from rolling under the presser foot. This is how I build anything that has to fold like that, my Rangeflap holster or a rifle scabbard come to mind. The top becomes the primary, finished edge. The bottom has excess that is trimmed later.
Lots of folks when they are tooling something like that will put packing tape on the backside of the leather. This helps prevent the leather from distorting from the forces of the tooling, causes A-C. If that side is gonna be visible at all ya might want to use blue painters tape instead. It cleans up easier than packing tape and doesn't rip some of the fibers off. The old way was to rubber cement your leather to a piece of thin cardboard and this works too.
Craft stores sell a flexible foam material that approximates leather in thickness. This can be used for patterns to make sure that when ya bend around an object you are getting enough pattern in there just like with leather. I've heard of folks using padded mailing envelopes for the same deal. i've personally not tried either of these tricks but something to think on.
So lets talk about Nic's sheath here and edging. Good finished edges are a hallmark of good leatherwork. Get obsessive about them. If your work is to get used, good edges become even more important. Keeps things looking good for years.
Any edge where two or more layers of leather come together need to be sanded. I have a 120 grit ceramic belt dedicated just for sanding leather. I also have an A/O 400 grit belt. Ya keep these just for leather and ya won't be transferring gunk to your leather from steel or handle materials. Leather will burn quite easily though so be aware of that. Lite pressure and slow down. Also depending on the project (most of my sheaths are wet molded) I'll do the sanding while wet. Less chance of burning and no dust to speak of. With the 120 belt I'm trying to make a nice square edge. I want all the pieces to be sanded even. Pay attention of course to your stitching and your stitching groove. Ya don't want to be real close to your stitching in one area and farther away in another. This needs to stay even. Don't use the 400 grit at this time.
Here's where ya need to spend some money. You need a good edger. I use a #2 or #3 almost exclusively for 95% of all my leatherwork. I've got really expensive edgers, a drawer full of handmade ones and factory ones and different sizes and now after decades of playing with leather and accumulating good tools, darn near 10 out of 10 times when I open the drawer I grab the Osborne. These are relatively inexpensive ($40 to $45ish) and they just work. Easy to resharpen, I just touch the cutting edge to the edge of my buffing wheel with green scratch remover on it and I'm good for quite a few sheaths. They are a hc steel as they will rust. Grab your scrap leather and practice with this tool. You should be able to get one long string to cut off. If not keep practicing. When folks start playing with this tool they have a tendency of varying the cutting edge up or down as they proceed. Keep it even. The idea here is you are cutting off the top square corner that you just sanded at about a 45. Think about it this way. You just sanded that welt area square. Now we're gonna take that edger and take off the top corner and then flip the sheath over and take off the bottom corner. Now we've made our square edge roundish. The thicker the layer the larger size you would use. On Nic's sheath I would probably use a #3. I've got larger sizes I just don't use em very often.
Prior to sewing the sheath together any edges that can't be worked on after sewing (the belt loop and top or throat of the sheath) need to be edged before construction. If you're cutting out of your pattern is a little shaky you might need to sand these single layers of leather too. I will use a Dremel with one of their sanding drums for really tight spots by the way. Then proceed as described. On a single layer of leather I might use a #1 to edge, depends on how thick the leather is.
Now that you've edged, go back to your 400 grit belt. Use it to really round those edges and get em smooth You are looking for a nice smooth arc throughout the cross section of your edge. Be careful here as the 400 grit going to fast will burn easily. All sanding can be done by hand of course but we're knife makers we've probably got machines that'll save us some time.
Now that we've got nice uniform and smooth edges comes rubbing those edges. We'll hit that up tomorrow.
Horsewright
Knifemaker / Craftsman / Service Provider
- Joined
- Oct 4, 2011
- Messages
- 14,141
You bet kuraki. Glad ya like that Wyo Slik its great stuff.
Thanks Nic and thanks for you sharing with us!
Thought we'd speak a little today on rubbing our edges.
We've got them nice and smooth and rounded. As mentioned earlier I wet mold most of my sheaths. So once the edges are rounded I will rub them. This is done while the leather is damp but its the last step before actually molding the knife into the sheath. I have a wood lathe set up with a stick of rosewood in it with different size grooves cut in the rosewood. I will use a corresponding groove for the thickness of the leather being rubbed and let the lathe do all the work. Its a variable speed lathe and I keep it on warp drive to do this rounding. Again I like to think of the edge as a 3D thing. There is a top, middle and bottom side to the edge. My job here is to rub them round. Don't have a lathe handy? Use a piece of canvas, piece of an old pair of jeans (use the inside to avoid dye transfer) or a rounded hardwood piece and lots of elbow grease. Rub em hard with lots of friction.
If the project is not damp because its not being wet molded such as a belt or a pair of spur straps or something I skip the above. After a wet molded sheath is dried and oiled or a project isn't wet molded I proceed as follows. I will always dye or oil first. I do very little dyeing of leather. Almost everything I do is treated with warm neatsfoot oil only. That brown holster above and a couple other things really are the only things I've dyed in years. Once your oil or dye has evened out in color you are ready to rub your edges. The traditional preparation to rub edges with is known as Gum Traganath. There is also a preparation known as Wyoming Quick Slick. Gum is available lots of places Wyo Slik or Quik Slick or all kinds of different spellings comes from Barry King now. It was a proprietary mixture from Sheridan Leather Supply but when they went out of business Barry King bought the rights to this stuff. I much prefer it over gum. I use either like this: I use a disposable foamy brush and paint on a coat, (again top, middle and bottom). I try not to get it on anything other than the edge. Not too thick but I want everything wet. When its almost dry I will re apply lightly and then rub like heck. If you are doing it correctly you will get a slick, burnished, glass like surface. All the fibers of the leather get compressed into the edge and stay there. You should see a darkening too in color and that will show you where ya might be needing more rubbing. Even with my lathe I use a lot of pressure.
Don't have access to one of these compounds ya can still do a decent job with paraffin, beeswax or even saliva. However the compounds keep the edges nicer longer in my opinion. As you are rubbing try to remember to rub in both directions. If you are rubbing light leather I find it easier to sometimes do that on my tooling stone. so keeping the leather flat on the stone I'll do the top, then flip it over and do the bottom and then do the middle.
After I'm satisfied with how my edges look I will apply a finish to them to further protect them from life. I've used Fiebings Bag Kote as a leather finish for years now. To apply to an edge I stretch an old t shirt tight over two fingers and use that as an applicator. I will apply two coats of finish to the edges. If as you are applying the finish the edge feels a little prickly, apply in the other direction. Ya forgot to rub in both directions. Well thats about it. Following these steps will give ya long lasting professional looking edges.
- Joined
- Apr 11, 2014
- Messages
- 644
awesome!!!!
Jay
Jay