Pattern Welded Sword (WIP)

Joined
Mar 12, 2006
Messages
2,264
I hadn't sparked the forge in 6 years (been busy making folders).
I forgot how much I love (and hate) this kind of project!:o
Here are some pictures of the mayhem:

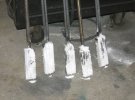
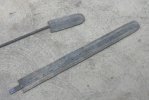
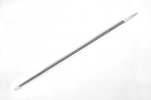
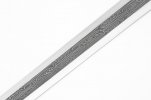
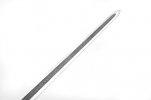
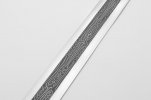
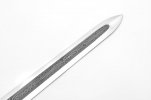
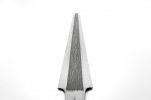
Here are some borax-charged bundles with rebar handles. 1086/15N20.
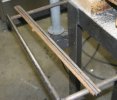
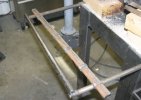
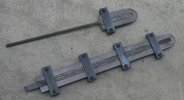
Also, the resulting bars with interrupted twists and those same bars bundled for welding to make the sword's "core."
 

Attachments

  • initialbilletsandborax.jpg
    initialbilletsandborax.jpg
    66.4 KB · Views: 247
  • interrupted-twist-bars.jpg
    interrupted-twist-bars.jpg
    50 KB · Views: 249
  • bundled-core.jpg
    bundled-core.jpg
    65.4 KB · Views: 242
Over the years, I've tried many different techniques to bundle the core with a continuous edge. Wire is the worst, IMO. This is something I do nowadays. This arrangement allows me to clamp the edge to the core, but semi-passively. This means that when I weld the tip (first thing), I can deliver blows to the butt of the sword and the core will tend to nestle into the corresponding curve of the continuous edge for that first all-important welding course. Also, I've tended toward using larger stock for edges because the added mass tends to help maintain temperature similarity between the edge and core while welding --- just preference I've developed.
 

Attachments

  • bundledwithedges.jpg
    bundledwithedges.jpg
    71.6 KB · Views: 237
  • welded,nopoint.jpg
    welded,nopoint.jpg
    80.4 KB · Views: 232
Finally finished (with the blade, anyway!)

After more forging, and HT (This is mar-quenched.) It exhibits excellent spring properties. Will bend 90-degrees without set).

Weight: 1 pound 2 ounces.
Lenght: 30 1/4 inches
Width at "hilt": 1 3/4

The plan is to hilt this sword in a Scottish Basket (Fraser) that will be made by Donnie Shearer. Naturally, this sword construction is more indicative of Migration and early Medieval blades, but those Scots hilted everything into baskets including pattern welded medieval swords ... Soooo, there it is. Should be fun!
 

Attachments

  • New-Sword1.jpg
    New-Sword1.jpg
    21.3 KB · Views: 176
  • NewSword2.jpg
    NewSword2.jpg
    12.4 KB · Views: 163
  • NewSword3.jpg
    NewSword3.jpg
    25.3 KB · Views: 189
  • NewSword4.jpg
    NewSword4.jpg
    15.4 KB · Views: 156
  • NewSword5.jpg
    NewSword5.jpg
    24.3 KB · Views: 218
... and some more ....
 

Attachments

  • NewSword6.jpg
    NewSword6.jpg
    19.2 KB · Views: 101
  • NewSword8.jpg
    NewSword8.jpg
    18.9 KB · Views: 146
  • NewSword9.jpg
    NewSword9.jpg
    13.1 KB · Views: 195
Last edited:
WOW! That is one gorgeous blade along with some very interesting technique pics.

Thanks a lot. Please keep us posted as this beauty is finished.
 
Holy **** that is nice! Six years away from forging???:eek:
 
Thanks guys! :)

jll346,
Yes, it's been 6 years since I last ran the forge. It will probably be a few more before I get around to lighting it again. I'm way behind on folders!:o
 
That is superb!!! Thanks so much for taking the extra time to snap photos and post them here. Did you use 1086 for your "laminated" edge or something else?
 
That is some awesome work. Love the way the pattern works and the way you bordered it. Great shape and grinding. Great example of extreme craftsmanship. What is the steel in the border. I ask because it is light and the high carbon in damascus is dark. Is it the alloy or did you sand and polish the edges after the etch. Now high did you temper to get the flexibility. Jim
 
Last edited:
That is superb!!! Thanks so much for taking the extra time to snap photos and post them here. Did you use 1086 for your "laminated" edge or something else?

Thanks!
There are only two steels at work in this sword; 1086 and 15N20. For this sword the edge is homogenous 1086.
 
Once you have those clean weld lines I can't imaging you used the hammer anymore and brought the profile down with a grinder. Is this correct? It seems like hitting with a hammer could distort that 1086 line.

One of the best designs I have seen!

Dean
 
That is some awesome work. Love the way the pattern works and the way you bordered it. Great shape and grinding. Great example of extreme craftsmanship. What is the steel in the border. I ask because it is light and the high carbon in damascus is dark. Is it the alloy or did you sand and polish the edges after the etch. Now high did you temper to get the flexibility. Jim

This is based on historic construction (pattern welded core of multiple bars surrounded by a "separate" edge.), The edge is homogenous 1086. The core is the same 1086 and 15N20. I 'worked' the edge after etching the center so it is bright.
In the past, I had done many of these with PW edges and, of course, the whole thing has the etched finish, but the sword turns out kinda dark. Knowing ahead of time that I was going for a bright edge, I took extra care that the weld 'seam' between the center and the edge was very straight and would coincide accurately with the transition from fuller to edge, if that makes sense. -- In other words, where the bright edge ends and attaches to the center REALLY reflects overall where the edge ends and joins to the center. In cross-section, the edge gets thicker as it approaches the center, and the fuller begins right at the transition.

The blade is mar-quenched (I have three sword-length salt pots which worked perfectly despite being dormant for 6 years.) According to the TTT chart, it's 54 RC.
It's a very musical blade, if you know what I mean. :)
 
Once you have those clean weld lines I can't imaging you used the hammer anymore and brought the profile down with a grinder. Is this correct? It seems like hitting with a hammer could distort that 1086 line.

One of the best designs I have seen!

Dean

It's a little of both, actually. As you can gather, there's a lot of forging between the the shot of the welded sword and the finished one. --A lot of forging!:o
You are right, though. I wanted those straight lines and crisp, clean look on the edge, so I avoided excessive forging of the fuller. I did some, however, with special care to avoid mashing the areas of transition between the edge and center.

Thanks for the kind words!:)
 
Hello Joe,

Fantastic work! It's great to see you back at the forge. Too much talent to keep bottled up... Looking forward to seeing progress pics. Thanks for sharing Joe!

Eric
 
Back
Top