Prep Work Prior to Heat Treating Tips And Tricks

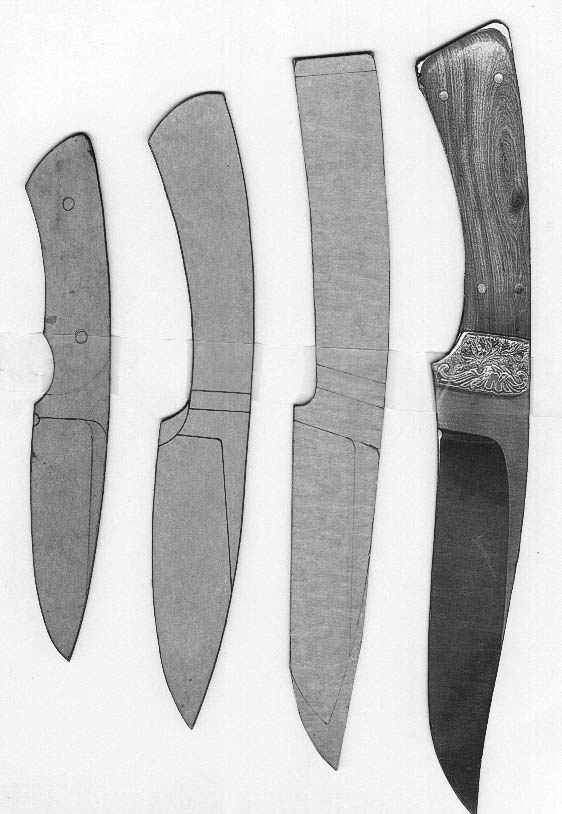
Here is a screen shot of one of the Lloyd Harner Knife Templates. Lloyd left them to knifemakers everywhere to use for free.
Lloyd harner knife templates - Bing

Stiff and straight spined knifes often come across with a "Sharpened bar of Steel" look. Notice the gentle curve of the spine and the easy to fit the hand shape of the handle. Every knife does not need to be shaped like this, but your first knives should try to incorporate these ideas. Also notice how he sketched in a possible change to one of the blade shapes. For first knives I always recommend a drop point hunter. 3.5" blade and 4" handle.

You can start by making a dozen strange knives that you designed yourself and you will proudly say, "I made these myself." ... or .... You can make one perfect simple drop point hunter and people will say, "Wow, you made that yourself?!"
Full%20tang%2008.jpg
 
Agree, 4 and 5 are close. 8 isn't bad, but would benefit from a gentle curve to the handle. I think #3 would look good just curving your existing handle shape so the butt matches where HubertS shows his version (which is also good)

The butt of number 6 still has that acute corner that will cause problems.

What is the intended purpose of each knife? They look like short chopping/prying shapes rather than skinning, slicing, carving shapes. Are you going going for a modern tanto look?

I know this isn't the case, but seen like this it appears that that all the patterns got pushed up to the top left corner of the stock, leaving the spines and the end of the butts straight. I know that cutting curves is harder than straights, but you don't need a lot of curving and blending to dramatically improve the lines and feel of a knife. The suggestion of getting a French Curve is excellent! I also use a circle guide (easier for small radiuses than using a compass and doesn't make holes in paper.) I don't try to create a shape using a continuous section of the French curve, I use bits of the curve and blend them to get the shape I want.

Here is a leuku blade with a straight spine that I rehandled. Note the depth of the handle, the drop at the butt, and the curve of the butt. This was a very comfortable handle and an effective tool, despite its fairly thin blade.
IMG_6449.jpg


The butt end of this one has some commonality with many of your designs, but all the corners are radiused, there isn't a straight line anywhere other than the first 2" of blade.
IMG_8927 by Last Scratch, on Flickr
This was a 4", 1/8th stock knife, not a chopper, so it didn't suffer from this handle shape, which if used on a larger knife for chopping tends to make the knife want to rotate forward out of the hand. Looking at it now, I think I may have over-done the drop at the butt a little.

For a bigger knife that you want to be able to chop with, its good to have the top of the butt shaped so that it provides a stop for rotation, against the heel of the hand or against the meat at the base of the thumb, depending on where you are holding. Like that leuku blade, or this.
IMG_4550 by Last Scratch, on Flickr
The thumb ramp idea wasn't a good one, and I would probably make the handle a little shorter and a little more round on the butt, that acute angle I mention on your #6, I didn't quite move away far enough for my liking.
 
Last edited:
My intended purpose is to learn a skill for a hobby, and be able to create all kinds of knives. Bushcraft, camp, hunters I tend to gravitate to I or desire might be a better word. I am not looking to sell, but definately gift as what means more than something that was made. I want quality from a point of functionality. Drop points are my favorite with straight coming in a very close second. It seems like I either curve the handle too much or not enough. I guess I am making everything too rigid as well. Not sure really as at first I thought they weren't half bad. I am gonna keep going. I will get it eventually SmartSelect_20210126-233825_Gallery.jpg SmartSelect_20210126-233825_Gallery.jpg SmartSelect_20210126-233825_Gallery.jpg
 
Oh, and by the way. I want to thank all of you for the help and input. The post prior to this one, I might have sounded ungrateful. I am extremely appreciative for all of the assistance. I really want a skill that adds to what I can teach me son in the future as well if he is interested
 
Too much, then too little...that's good, you have the thing bracketed! ;) Each set of your sketches have looked progressively better.

I don't know if this will help, but it might. When asked to draw a portrait based upon a photograph of someone, many beginner artist (students) have trouble. One trick is to turn the photo upside down, and draw that. When done, turn the drawing "upside down" to see the face the right way up. Sometimes the pre-existing idea of what you are drawing gets in the way of your eyes seeing and your hand doing. We all tend to look at and then draw knives with the edge down. Maybe try sketching based upon a photo, but spin the photo so the edge is up and draw the shape without thinking about it being a knife. You can use intersecting arcs centered on known points to give you points to pass through, say centre on where a blade meets a handle, and use arcs to match where the shape of the handle changes significantly

Another way is almost the opposite, you get a grid (tracing paper is good), put that over the photo on the screen so the grid over-lays the photo, some photo software can do this, create a matching grid on your sketch pad and transfer the profile so that your curves pass through the same intersections and points on the sides of each grid square. This is old-school how you can scale things up and down by hand. I would use a 1/4" grid on the screen and grid size as required to get correct blade/handle length on paper.

If you can get your hands to draw the curves used by other makers it might help you recognise them in your own designs. That doesn't mean you have to use them, they can be a reference so from which you can see if you are more or less. That is why I didn't say to just trace a shape off the screen. I think tracing uses different bits of the brain and you don't learn to draw a shape by painstakingly tracing it.
 
Last edited:
Bottom one is worlds better.

Things to ask yourself when sketching and designing a knife:
Does it need such a a wide blade? - Wide blades can be awkward to sue and tend to "torque" in your hand on hard cuts. This causes you to have to grip harder, which is tiring to the hand. Since only the edge cuts, excess bevel area does little in most cases.
Is the back of the handle smaller than the front? - A handle should fit the hand conformably and securely. Tapers in either direction make it want to slide forward or backward in your hand. This causes you to have to grip harder, making use uncomfortable.

I will add the most common error for new makers,
Does the knife need to be this thick? - Most knives fall between .060" and .100". A few heavy duty knives go .125" and even a big camp knife rarely needs to be more than .150" thick at the spine. For some reason most new makers order 3/16" and1/4" steel. Only a few of the swords I have made were .250" thick. Starting off with 1/8" stock will help you a lot.
 
I think that one is me favorite so far as well. Thank you. Setting the grid, and getting the first initial curve that is right and they expanding from that. Rather than working from the tip or the butt. Starting from the top line I think is helpful for me
 
Back
Top