Question on Bluing Processes

I put the calipers to that brake line I was trying to do. I wonder if the .0385 wall thickness is why I couldn' get it done. I tried annealing the end of one and it helped a little but still a no go.
That .0385 is thick wall and might spit the flare and even damage the flared scale hole after all the trouble of getting it dressed smooth to accept the tubing.
 
I put the calipers to that brake line I was trying to do. I wonder if the .0385 wall thickness is why I couldn' get it done. I tried annealing the end of one and it helped a little but still a no go.
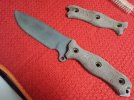
I ckd my stock, I have wall thickness from .02 -.065 mostly T-316. My theory is, it needs to be flared in the knife in order to stabilize it under flaring. The reason I say that is because if you've drilled any out, it's as if the tube itself bellows out locking itself in very tight contact with both the blade and the scales. If you've drilled one out you know how tight the tube still is even once the scales are off. Put a caliper on it, it's not .25 diameter :D ` I think the whole key to this fastener system are tight tolerances of the holes in blade and handles.
 
I ckd my stock, I have wall thickness from .02 -.065 mostly T-316. My theory is, it needs to be flared in the knife in order to stabilize it under flaring. The reason I say that is because if you've drilled any out, it's as if the tube itself bellows out locking itself in very tight contact with both the blade and the scales. If you've drilled one out you know how tight the tube still is even once the scales are off. Put a caliper on it, it's not .25 diameter :D ` I think the whole key to this fastener system are tight tolerances of the holes in blade and handles.
That makes sense. Especially of you were to put all three tubes in the holes before starting the press work. When my tubes kept bending I had visions of crooked tubes causing scales to hang out past the edges of the tang. Keeping the tubes supported would probably make s world of difference. Now I'm wondering if I could rig up a flaring setup that would work in a cartridge reloading press. Hmmmmmm.
 
I think a reloading press would work but there is a cheap 1/2 ton Arbor press at Harbor Freight that will give you better support and using the correct hardened flaring dies is worth the money. I think USAKnifemakers has the dies in S7 hardened polished steel you might check them out if you plan on doing more than one knife.
 
I think USAKnifemakers has the dies in S7 hardened polished steel you might check them out if you plan on doing more than one knife.
Bingo! That's where I got mine. Little tip for ya with the arbor press- I stuck a small rare earth magnet on the side of the ram, holds the die in place and eliminates the effects of gravity- just one of those little things that can frustrate the hell out of you. There is a magnet in the arbor press but it wasn't strong enough to hold on mine and it actually fell out- but I didn't spend a lot on it either, I mean, it's an arbor press, again, not high tech
 
It's hot vinegar night! I'm batchin it for a couple days so going at it- making some photos and a bit of video` shall see how she goes. I can tell you the reaction is immediate. On the second dip now. It's certainly having an effect. So far what I've seen, is the smoother and shinier areas turning black quickly. Those area where transitions are that always seem to get the shiniest first when polishing, like where the grind stops. It's very blotchy first time through- after 4 or 5 is when I'm going to have certain expectations based on my studies so far. If it doesn't do what I want it's no biggie, start over again :D ~ A lot of times to find what works requires finding out things that don't, at least for me LOL!
 
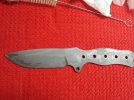
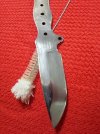
Update- Shiny pic where I started- then after first dip *not what I expected but it got better* - then where I ended up after 4 passes through. End of first phase results. I think it could be oiled up at this point and called a wrap but I'm not done yet


after4dips.jpgfirst dip.jpg


shinyb.jpg
 
Update- Shiny pic where I started- then after first dip *not what I expected but it got better* - then where I ended up after 4 passes through. End of first phase results. I think it could be oiled up at this point and called a wrap but I'm not done yet


View attachment 981566View attachment 981567


View attachment 981568

Inspirational, Leo!!!

This thread has had the most easy to understand run-down of re-tubing I have read so far.

Much appreciated to those lending advice.

Bravo on your creativity and bravery, Leo!

Can't wait to see it with an edge when you call it done!
 
Thanks for the encouragement :D
Well, I'm done with what I'm doing on this for now. I was happy the color I got with the grayish look above but it's blotchy. Decided to follow through with the other test and I got what I was going for in color just not the smoothness of color. There's some blotches I can't account for. If you don't look real close, turned out nice :confused:
I followed up this vinegar thing, which I kind of look at as a primer. Then Super Blue cold phos acid. Just happened to be what I had but I plan on trying Oxpho next project. I have my doubts how well it will hold up, we'll see. I'll get pics up after I flare me some tubage.

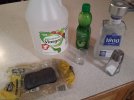
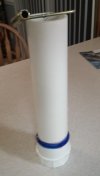
Items I suggest for a perfect experience! all the basics including instant balls of courage :D:p:thumbsup::thumbsup::thumbsup:

Dipping tools.jpg dipping tube.jpg
 
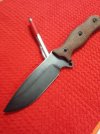
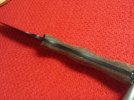
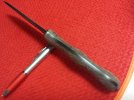
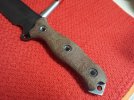
Here are the results from this experiment. I got some of the things I expected but not others~learned some stuff and that's always worth the effort.

View attachment 982474
View attachment 982471
View attachment 982472
View attachment 982473

That is very cool, and just the figuring, research and then grabbing Jose's Juevos and going for it has to be worth it! I think it looks great. Use and some upkeep will always be somewhat necessary on naked SR101 to keep it worry free, regardless. Love the blued look on the tan canvas - very business-like.

C
 
Thanks fellers` I'm happy enough with it for now- I put a nice edge on it and back into the Brown sheath for now. SO on to the A2 TG full steam ahead :D
 
Thanks CO. I'm all done sharpening now, my 3rd "stupid sharp" completion with shiny edge. I'm getting better with this EdgePro and my technique, just growing pains and learning curve things. I need to watch what I'm doing with angles a little closer. I've ended up with what I've wanted on purpose so far, but I can see where I could really screw one up if I'm not careful. I certainly can see why the Wicked Edge would be super amazing and much easier but I'm just thankful to have a very capable machine to do a good job.
I'll try to get some better pics tomorrow in the sun and try to get some details of what I'm not happy with. It's really strange what happened in a couple spots with this 101 steel. Kind of need to see it and bounce it off you all to tell me what you think happened. I also have 2 small dots that puzzle me. It's almost like it's 2 small dots of SS that are shiny, would not take any kind of the etch or the blue, really strange. I'm so far from a metallurgist I can't even spell it right without spellchecker LOLO!
Meh, the wicked edge has it's limitations as well especially below 12-15 dps. Nice to not have to switch sides though but stones are really expensive but diy stones are pretty fun.
 
Little bit of update - The finish I put on this sr101 seems to be holding up nicely in toughness and I've put a stupid sharp mirror polished edge on it. It's been serving in the shop as basic knife laborer just fine, really can't believe how fond I've become of this thing. I ran into a little no-no. It's pool closing day, took my beater Batac along for service opening, cutting or needed pry bar/hammering duties. I spun caps off the liquid chlorine, used the razor sharp point to carve out all the safety foil and assorted garbage that gets in the way. I finished up, cleaned up all the trash and grab the knife and holy hell :eek::eek::eek: tip of the blade was solid brown rust! = results are- chlorine is a no-no LOL! ~ It got surface rust from the fumes alone and a little juice. I wiped it down with some "BC Barricade" and even buffed it a tad and all is fine.

On another note more experiments coming. Last week I ordered some BC Black Magic and some Oxpho creme to try out on the TGA2. THat one is a bear, been trying to take lines out of the steel with diamond hones but man, what a lot of work. The better I get it looking the more critical I become and feels like I'm backing up at times LOL!
 
Back
Top