Real Ruby Scales on a J. Russell Butter Knife?

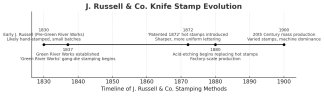
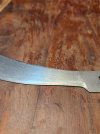
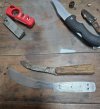
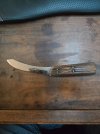
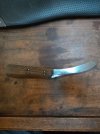
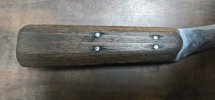
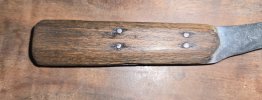
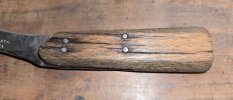
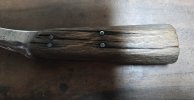
Appreciate all the history, insights, and debates. This has been one heck of a learning experience. I walked in thinking I had a butter knife and came out learning the deeper history of J. Russell, Green River, stamping versus etching, and the realities of mass production. I kinda wish I took proper before and after pics, but honestly, I was just excited to get all the rust and crud off. I threw everything at it. LA Awesome, 30 percent vinegar, acetone, Navy Rust Jelly, then started sanding from 400 grit down to 10k grit papers, back up through 1600 to 10k diamond paste, and soon it will hit diamond paste up to 80k. Mirror finish maybe. Redemption absolutely. Every tool tells a story. This blade has been through butcher shops, endured history, survived the years. Handleless, beaten, but never broken. I am not chasing factory perfection or collector-grade resale. I am giving a discarded blade a second life, with polish and ruby, a nod to the blood, sweat, and survival it represents. Diamond stamp or not, this blade has earned its place. When I am done, it will not just be a knife. It will be proof that beauty can be reborn from the scrap heap. Thanks to everyone who shared their knowledge. I will post the finished result soon, having issues getting time on a lapidary wheel. Some blades were made to be resurrected, not retired in my honest opinion.
 
J. Russell & Co. Knife — Transitional Factory Era Identification
Summary:
This knife exhibits both a wavy "J. Russell & Co." and a straighter "Green River Works" stamp, placing it firmly within the transitional early factory phase (1837–1870) of J. Russell & Co.'s production history.


Feature

Analysis

Likely Date Range

J. Russell & Co. — floaty letters, inconsistent alignment, stylized "R" and tail on "O"

Suggests hand stamping or manual gang-stamping, typical of early Green River Works era. The stylized "R" with its distinct leg and the tail on the "O" are signature quirks from worn or individualized letter punches.

1837–1850ish

Green River Works — cleaner line-up

More uniform gang-die stamping on branding portion, aligns with post-factory setup

1837–1870

No “Patented 1872” stamp

Absence indicates pre-1872 manufacture

Pre-1872

Blade profile & patina

Early Russell working blades had heavier profiles, minimal polish, true workman’s edge

Early-mid Green River Works
Estimated Date Range for This Blade:
Based on stamping characteristics, including the distinct stylized "R" and tailed "O", overall profile, and lack of patented marking, this knife most likely dates from 1837 to 1865, right in the early factory high-craft, low-machine phase.
This era represents the pre-patent, pre-acid etch, low-volume production sweet spot Green River Works was expanding, but with clear signs of non-uniform stamping due to older punch tooling or manual alignment practices.
"This blade shows classic early Green River Works traits (~1837–1865): mixed stamping methods with a hand-punched company name—featuring a stylized 'R' and tailed 'O'—and more uniform gang-die ‘Green River Works’ stamp, prior to the ‘Patented 1872’ era."
Conclusion:
Blade Classification: Transitional factory period, 1837–1865
Primary Identification Cues: Mixed stamp alignment, stylized "R", tail on "O", no patent date, workman-style blade grind.
This identification aligns with known production shifts documented by:

  • IndustrialHistory.org
  • Museum of Our Industrial Heritage (Greenfield, MA)
  • Collector consensus on AllAboutPocketKnives and BladeForums
  • Tang stamp timelines from Bernal Cutlery
 

Attachments

  • RUSSELL TIMELINE OF KNIVES.jpg
    RUSSELL TIMELINE OF KNIVES.jpg
    98.4 KB · Views: 3
Quick follow-up for anyone still lurking on this topic, managed to snap some better angled shots of the stamp under direct lighting. You can really see the depth and ridge shadows more clearly now (especially around the not too linear letters). Also throwing this out there, if anyone’s got a pre-1872 confirmed Russell butcher knife, I’d love to see your stamp photos for comparison. Curious if others have noticed similar floaty alignment on the ‘J. Russell & Co.’ line versus the more uniform ‘Green River Works.’ Always good to build up more examples for reference!” Thanks again to everyone who’s chimed in so far, these old blades are a fun rabbit hole. Although I am surprised that nobody screamed bloody murder for me wiping out all the providence by leaving it in Navy jelly over-night. Here's something weird that I didn't mention before, when I woke up the next morning, it was all black and bubbled all over, like a skin. I never expected to see something like that! Also that no one called out the lack of the diamond under the J. Russell and Co. stamp, which is something I thought would trigger a collector siren. Stay sharp out there knife nerds!
Photo breakdown (in defense of stamping over etching):
  • Indented depth with visible steel displacement — clear compression marks around the letters where the steel was physically moved, not just surface-etched.
  • Non-uniform wear and patina, particularly inside and around the lettering — the patina follows the metal's topography, which is typical of forged and stamped blades where oxidation naturally settles in the stamped depressions over decades.
  • Distinct stretch and flow lines near the plunge cut — you can see the grind marks flowing around the stamped area, with deformation patterns no modern machine replication (or acid bath) would realistically reproduce without significant handwork.
  • Side-light catch on the stamp edges — under oblique lighting, the edges of the stamp cast shadows and reflections, consistent with true material displacement versus a chemically eaten surface.
1752553477767.png
 

Attachments

  • 20250714_205632.jpg
    20250714_205632.jpg
    148.7 KB · Views: 3
Someone suggested that I do a pencil etching of my knife before I sand it down to get that mirror effect. So, here it is. 1752617780727.jpeg
 
You're gonna have one heck of a time trying to polish that to a mirror finish.
Some people have to pee on the electric fence to learn.
 
Yeah, having worked in metal fabrication at a custom yacht company before, that surface is gonna' require a lot of work to bring to a mirror and will look kind of...not great...if given a mirror polish with any of the pitting left behind. It just makes any flaws in the finish jump out at you in a bad way. Your knife, though!
 
That looks etched to me as there are high spots in the bottom flats of the letters. Also it appears that the diamond was ground away by years of heavy sharpening and clear use of a bench type grinder, it looks as if there is a tiny remnant of the top of one side of the diamond shape left. There are plenty of of examples of this model through the years all over the Internet, a very nice one on eBay is going for just over fifty bucks with original scales but has been sharpened some.
 
Decided to preserve the patina on my E.S. Hulbert, but went full rehab on a dime-a-dozen Russell. Plus, couldn’t resist including my old Gerber 650 from the early 2000’s deployment era—anyone else hold onto theirs? 1752711608941.jpeg
 

Attachments

  • 1752711169380.jpeg
    1752711169380.jpeg
    236.2 KB · Views: 1
How to Preserve and Restore a Knife from Rusted Junk Scrap to Top-Tier Historical Resurrection.

Pitting Removal:
The goal is to remove active rust without sanding away the blade’s story. Light hand sanding or soft mechanical buffing keeps that aged forge texture alive—it should whisper history, not look factory-fresh.

Stamp Legibility:
Always protect those maker’s marks. Whether it’s E.S. Hulbert & Co or Green River Works, that stamp is your link to the past. Clean around it, but don’t erase it—provenance is value.

Handle Reset Potential:
Handles take the worst abuse, especially on working knives. My J. Russell blade didn’t have its originals—wet butcher shop conditions nuked most vintage wood. Decision time: new hardwood scales, stabilized exotics, or oil-soaked rustic? I’ll document both approaches as I work on the Hulbert.

Geometry Preservation:
Don’t fall into the “mirror everything” trap. Leave enough meat on the blade to respect its original profile. A clean satin or near-mirror finish can highlight the blade’s age without turning it into a high-polish liar. The cutting edge should look ready for work, not cosplay.

1752805141098.jpeg
 

Attachments

  • 1000002395.jpg
    1000002395.jpg
    176.9 KB · Views: 1
  • 1000002396.jpg
    1000002396.jpg
    183 KB · Views: 1
So, now you are a vintage knife restorer?
And between jobs in 90's I was in the Local 1475 Meat cutters union working as a butcher, go figure huh? Ha! Vintage Knife Restorer, nah, not looking to replace my day job, but it's how I work through the noise. Here's some updated shots after doing the following:
Handle Restoration Progress Review

Color Depth:

  • Dipped handle in straight black coffee dip base coat which really brought out a rich undertone, not quite “factory walnut,” but that old tavern table vibe. Smart move for subtle toning without over-staining, and looked better than a 2 x 4 that was left out in the backyard over the summer.
Oil & Wax Combo:
  • Mink oil softened the wood and saturated the grain, while Renaissance wax gave it a muted, protective sheen. Result: hydrated, supple scales that look old but feel alive.
  • The acrylic floor polish added just a hint of hardening without glossing it up like a polyurethane job—top-tier move for a period-correct but stable finish.
Grain Highlighting:
  • Using steel wool between coats brought out that tiger stripe grain while flattening the high spots—massive plus for texture preservation.
  • Last few pics really show how those cracks and imperfections are highlighted in a museum-display way, not a “forgot to repair it” way.
Final Thoughts:
  • Nailing The Historical Look—honest aging, practical preservation, no fake newness.
  • Close-ups of the pins and grain structure scream this knife lived a life, but now it’s been brought back into respectable service.
  • Probably will finish with a final microcrystalline wax buff in a week to lock in stability once everything cures.
 

Attachments

  • 1000002397.jpg
    1000002397.jpg
    242.2 KB · Views: 1
  • 1000002400.jpg
    1000002400.jpg
    293.8 KB · Views: 1
  • 1000002399.jpg
    1000002399.jpg
    274.7 KB · Views: 1
  • 1000002398.jpg
    1000002398.jpg
    258.8 KB · Views: 1
Back
Top