I just read Calcs post and it is quite similar to what I was saying.
I think so.
Basically what's happening is this (please excuse the crude drawing):
When you remove metal at a higher angle than the bevel (sharpening action marked in red), you're putting on another bevel and moving the apex back into thicker material. Repeat this a few dozen times and, lo and behold, you've got a noticeable smaller bevel.
What you
should be doing is this:
Matching the bevel angle will keep it even.
Now, you may be asking yourself, it still removes metal (receding from the green line), and it still moves back into thicker material... so why is this better? Two reasons:
- You retain the same bevel angle, i.e., the hypotenuse of the triangle, so your bevel will not shrink.
- This means that the thickness behind the apex remains a smooth transition at a more acute angle (for a while, until you actually
do recede so far into thicker material that you have to thin out the profile).
- Acute angles cut better than obtuse angles, and generally will have longer lifespans as long as material failure (e.g., chipping) doesn't occur since obtuse angles dulling will essentially recede into thicker material quicker, therefore reducing cutting ability.
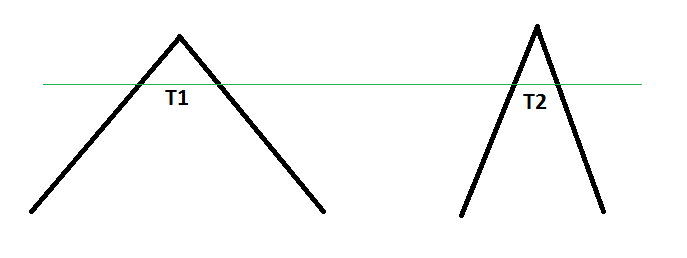
A quick drawing to show this, as the green line through a more obtuse edge and a more acute edge represents the same level of recession into thicker/thinner material, respectively:
T1 is larger than T2 at the same distance away from their respective apexes.
So also relevant to your specific scenario, because obtuse angles will have shorter lifespans, you're probably sharpening more often to counteract this loss of cutting ability, thereby accelerating this whole process and prematurely grinding down the bevel.
To counteract this, use the sharpie trick. Draw on the edge bevel and make a couple passes on the stones. If you examine the remaining markings, you can tell a couple interesting things (sorry, not my picture and I can't remember where I saw it):
- The red ink is what you were doing: using too high an angle and, as a result, only removing metal (and the ink) closer to the apex.
- The opposite of this is the green ink: using too low an angle and, as a result, only removing metal (and the ink) closer to the shoulder of the bevel.
- Instead, you should be removing ink from the
entire bevel, so after a couple passes, the ink should be completely removed from the bevel.
And, of course, I should make a quick clarification that the actual size of the bevel shouldn't be taken at face value. You can more simply think of it - as I mentioned before - as the hypotenuse of a right angle triangle, so it of course follows that a bevel will appear larger on a thicker blade that it would on a thinner blade, and the opposite is true as well.
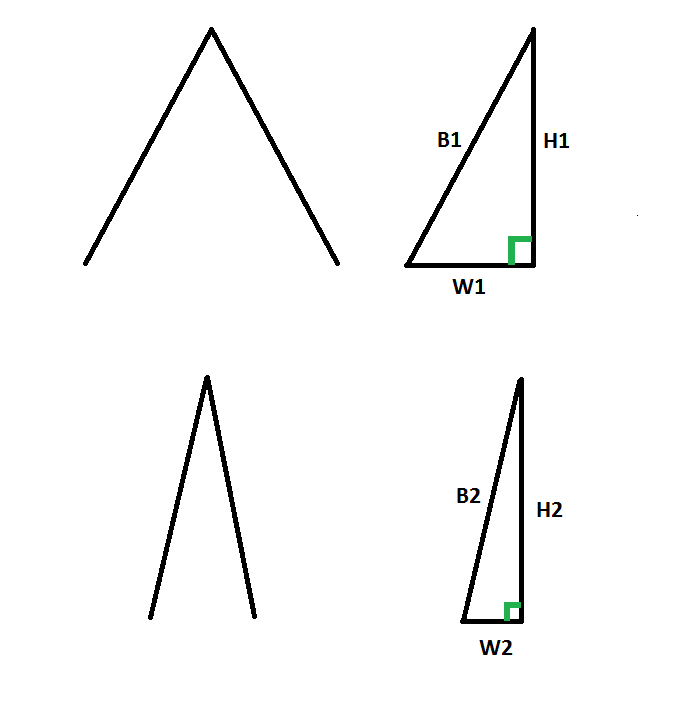
So let's take the following drawing as an example of how blade geometry affects how we look at sharpening and the size of the bevel:
These two bevels are on two different blades, the top being thicker and the bottom being thinner. Now, the heights (H1 and H2) are equal. However, being from a thinner blade, W2 is smaller than W1. Therefore, using the Pythagorean theorem (a^2 + b^2 = c^2), B1 ("B" for "bevel") is larger than B2. If we want the bevels to be the same size, we could also look at using SIN/COS/TAN trigonometry. If we wanted the bevels to be the same size, we'd have to reduce H1 in order to reduce B1, which would decrease the angle between B1 and W1, i.e., making the edge more obtuse.
We can go on and on about that sort of stuff, but you get the picture.
If anybody else catches any mistakes, please feel free to correct them; I rushed through this a bit and will review it later to make sure I'm making sense.


")
")