RyanW SPK Passaround WIP

RyanW

Moderator
Joined
Jul 17, 2009
Messages
3,327
I will be starting a Passaround thread of my SPK (Sportsman's Phalange Knife) in the next week. The knife is not finished so I thought it would be nice to do a WIP of the knife so that people following or participating in the passaround can see exactly what they have in their hands.

I will post the link here when I start the Thread:

Back Story:
My grandfather William Weeks was a cattle rancher (the “W” in my logo was his brand), butcher, construction foreman, oil man, owned and operated “Bill’s Bar and Café”. He was an amateur boxer, which often came in handy when things got heated at the bar…. on, and On, and ON!

He butchered his own cattle, hunted deer and elk his entire life, the freezer was always full. The knife he used and claimed as the “best working blade ever made” was the Schrade Sharpfinger 152OT. I was lucky enough to acquire his knives at the time of his passing. Below is his knife, the tip is broken and edge is completely gone. It will stay this way!
Willie152OT.jpg


I was recently approached by a group of bow hunter’s known as “365 Pursuit” for a custom knife that will be their go to in the field…. My mind immediately thought of Grandpa Willie! I started researching and came across what I feel is a top authority of the Sharpfinger 152 “Codger_64” and this thread:
CLICK ME

After many Emails with Michael (Codger_64) and more research I started working through the designs Here:
CLICK ME


The Design:
SPKPassaround.jpg


Design Features:
  • Pinky Well on Butt to aid in many of the common grips utelized with this design
  • Fine thumb jimping to aid in finger purchase in wet or bloody conditions.
  • Extra Belly to help skinning and caping
  • "Safe Choil" left dull (Like Sharpfinger)
  • Textured Bi-Tone G10 Handle
  • Tapered Tang
  • Thong Tube
 
Last edited:
Great! Please show pictures of the entire process if you don't mind! I love it when a plan comes together! :thumbup:
 
Thanks Codger, Joe (Wait for the passaround Thread... haha), and Dan!

First update and first Change up. I am going to be using 3/16" instead of 1/8" I wanted a heavy tapered tang, I will thin it down close to 1/8" when all is said and done.

SPKWIP001.jpg


1. 3/16" x 1.5" x 8" Aldo 1095 Bar Stock with design traced on it. Hand punched to stop drill bit from walking.

2. Pilot Drilled all pin holes with 1/8" Bit then the appropriate holes with 1/4" Bit. I then enlarge the holes with #30 & #F bits respectively. I make sure to have my drill press table square to the bit. Then I make sure my Bar stock is even with the top of my ShopFox Vise. This is very important when it comes time to drill the handle scales. I dont want to fight Pins at glue up time.

3. I mark pin holes with an "X" and then drill the weight reducing holes in the tang. This helps me in my brain fart moments to avoid drilling the wrong holes for weight reduction with my Uni-Bit.

4. Then using my mounted Porta-band saw cut the excess material away, I have found that an 18TPI blade tears through steel like butter. Always cut relief cuts where needed to avoid blade pinch and having to back out of a cut.

SPKWIP002.jpg


5. Then to the KMG to clean up the edges, I use an older belt for this. I use the 2" contact wheels on appropriate curves and the Platen on the rest. Again Make sure the Plate is Squared up.

6. I am now ready to mark the center line around the entire blade. I actually mark it a little off center so I have two lines running parallel along the edge.

7. here you see the two lines made by scoring from each side of the blank... Center is in the middle of the two lines. This will help with the Primary grind and when tapering the tang.

8. I like to have visual markers to check sides for even grinds. I trace the blade on cardboard and mark the approximate plunge I want, then cut it out. I then trace it on both sides of the Blade to help with grinding.

TIME TO COMPLETE: 45min (+/-)

I just want to say. I am no Expert, and this is just how I do it... If you have any comments or questions I would love to hear them. I am always open to new and better ways to do something! If you wonder why I did something a certain way, I either have a reason or am missing something in my simple brain.

Thanks for following
Ryan
 
Last edited:
This is going to be great... Subscribed
 
Looks good so far Ryan!! :thumbup:
 
Thanks for following.

I have been asked by a member if it would be possible to keep track of time it takes to do each segment so that he can have an idea of time involved in the making!

I will do my best to give times, but it isn't cut and dry because I tend to multi task. It may make me reconsider my knife making endeavors and move to something more profitable! :D
 
Looking good buddy!:thumbup: I'll be watching this.....should be a bit more entertaining than reruns of Grey's Anatomy on Netflix! :D

Great pics!
 
haha thanks Buddy! Keep Grey's Anatomy in your Instant Que... May change your mind!
 
Thanks Patrice! I thought I would try an easier format where photos don't suck up too much space, but are still there.

Got a little time in today.

SPKWIP3.jpg


9. Rough ground the primary bevel with 50 Grit Norton Blaze belt. I stopped each side at the scribe line (Photo #7) to leave some thickness during HT. Mike Quesnenberry once said the "W" in RyanW must stand for WARP... :mad: 1095 is my kryptonite!

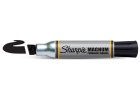
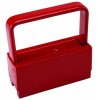
10. After I grind the bevel, the tang is still full thickness. Time for the Tapering of the tang! I feel tapered tangs are neccessary to maintain a good balance in the knife. I use a 30lb. magnet from harbor freight to keep a good grip on the tang and be able to apply pressure starting at the base and slowly work my way up the flat of the Tang. It makes it really easy to watch where you are at by using a Big Ass Sharpie marker over both sides of the tang.
--- Big Ass Sharpie ---
101004_x.jpg
--- Harbor Freight Magnet ----
image_16159.jpg

11. Here you can see what it looks like as you grind up the Tang removing the marker as you grind. I first get the butt where I want it (I stopped at the scribe lines again) then move the grind up and off the top towards the edge.

12. here you see one side tapered and the other not... I then repeat the process and closely inspect to make sure all lines are even on both sides.

SPKWIP004.jpg


13. Sorry Duplicate photo...

14. This is a different angle showing one side tapered

15. This is a photo of both sides tapered, The left scribe line is hard to see, but it tapers out away from the line at the same rate as the one you can see on the right.

16. Here is the Rough ground and tapered tang ready for the Thumb Jimping... Tonight

TIME TO COMPLETE: 30 Min (+/-)
I would love to hear comments or questions.
Ryan
 
Good Question Mr. Lemee... The blue stuff works just as well and I actually use it sometimes, it tends to bleed and run down the sides of the blade cause I am sloppy. Besides I can just add them to the better half's shopping list if I wrote "Layout Fluid" she would probably bring back sunscreen :D
 
This project is moving along much faster than I had expected it would. I suspect that I would still be cutting out paper-doll knives if it were me!

:p :thumbup:
 
good question mr. Lemee... The blue stuff works just as well and i actually use it sometimes, it tends to bleed and run down the sides of the blade cause i am sloppy. Besides i can just add them to the better half's shopping list if i wrote "layout fluid" she would probably bring back sunscreen :d

LOL... :D

I really like following work in progress threads. This one is coming along nicely, and already starting to come to life :thumbup:
 
Ryan, I just typed response to your last PM, but your PM box is full. :D

I'll send you another reply when I get home from work. Probably between midnight and 2 a.m
 
Back
Top