-
The BladeForums.com 2024 Traditional Knife is available! Price is $250 ea (shipped within CONUS).
Order here: https://www.bladeforums.com/help/2024-traditional/
You are using an out of date browser. It may not display this or other websites correctly.
You should upgrade or use an alternative browser.
You should upgrade or use an alternative browser.
Slipjoint question, is this normal?
- Thread starter Hengelo_77
- Start date
- Joined
- Aug 27, 2004
- Messages
- 2,701
I think Stacy and JD make very valid points.
I am going to include a few of your photos with a few lines and arrows added in. Please know that I only want to help you build a great slip joint and I am not pointing out what I see as design flaws as a way to denigrate your efforts but to help you on your way.
Let's assume your heat treat company accurately reported the hardness. If correct I feel you're fighting a bit of an uphill battle with too soft of a spring. Can a slip joint work with those harnesses? Yes, with a proper designed tang and spring with a light enough pre-load.
The first picture I marked up is a tang in relationship to your spring. The arrow points to "high" spot that should not be there. That high spot in that tang is causing all kinds of problems. The only spot of the tang that should ride on the spring is what AG Russel calls the "opening " torque point. The back of the tang should be a straight line from opening to closing torque points, NEVER convex as in your photo. Slightly concave can be gotten away with.

This second photo illustrates the fact that I think your placing the blade tang pivot hole too far off center to the lower extreme. This in effect leaves your back spring too wide which stiffens up the spring considerably. I added lines more inline to where I feel the pivot hold should be placed. Of course there is quite a bit of latitude and depending on the blade shape, frame shape , primary or secondary blade this will change. Point being is that your back spring is very wide and gets really resistant to flexing.
I also feel as if your center pin hole for the backspring should be closer to the edge of the back spine, but to be fair I do know know how closely they are shaped to your frame profile. Remember a back spring flex's primarily from that center pin forward to the tang, but also , to a much smaller degree from the center pin to the rear pin.

The last item I will touch on this evening is your sanding method using the 1-2-3 block, granite and sandpaper. In theory it should keep things square, in practice I have my doubts. Removing sufficient amounts of steel in the 60 plus Rockwell C scale to fit up a tang has got to be a time consuming effort along with keeping the tang tight against the 1-2-3 block preventing any minute introduction of a radius or out of square condition.

Last picture is a great simple resource giving a good idea of what a round tang and square tang should look like and nomenclature.

I am going to include a few of your photos with a few lines and arrows added in. Please know that I only want to help you build a great slip joint and I am not pointing out what I see as design flaws as a way to denigrate your efforts but to help you on your way.
Let's assume your heat treat company accurately reported the hardness. If correct I feel you're fighting a bit of an uphill battle with too soft of a spring. Can a slip joint work with those harnesses? Yes, with a proper designed tang and spring with a light enough pre-load.
The first picture I marked up is a tang in relationship to your spring. The arrow points to "high" spot that should not be there. That high spot in that tang is causing all kinds of problems. The only spot of the tang that should ride on the spring is what AG Russel calls the "opening " torque point. The back of the tang should be a straight line from opening to closing torque points, NEVER convex as in your photo. Slightly concave can be gotten away with.
This second photo illustrates the fact that I think your placing the blade tang pivot hole too far off center to the lower extreme. This in effect leaves your back spring too wide which stiffens up the spring considerably. I added lines more inline to where I feel the pivot hold should be placed. Of course there is quite a bit of latitude and depending on the blade shape, frame shape , primary or secondary blade this will change. Point being is that your back spring is very wide and gets really resistant to flexing.
I also feel as if your center pin hole for the backspring should be closer to the edge of the back spine, but to be fair I do know know how closely they are shaped to your frame profile. Remember a back spring flex's primarily from that center pin forward to the tang, but also , to a much smaller degree from the center pin to the rear pin.
The last item I will touch on this evening is your sanding method using the 1-2-3 block, granite and sandpaper. In theory it should keep things square, in practice I have my doubts. Removing sufficient amounts of steel in the 60 plus Rockwell C scale to fit up a tang has got to be a time consuming effort along with keeping the tang tight against the 1-2-3 block preventing any minute introduction of a radius or out of square condition.
Last picture is a great simple resource giving a good idea of what a round tang and square tang should look like and nomenclature.
- Joined
- Aug 27, 2004
- Messages
- 2,701
I will also add this photo that I edited to add in a backspring in red lines.
If you notice the backspring in this open position ONLY touches the blade tang at 2 points. One on the opening torque point and one at the back square. The radius on a square tang are a lot tighter than many people might imagine. That small compact area that actually touches the backspring is more of a wiping action that moves front to back as the blade is opened or closed.
While this point is exaggerated in this drawing it is an important point. The back square angle and the face of the backspring angle are NOT matched. A very slight difference for sure, but by doing it this way there will never be a gap between the spring and back square. I have never seen in one my knives an upsetting of the spring face due to opening or using. IF the backspring is too soft this could happen.
ea42
Knifemaker / Craftsman / Service Provider
- Joined
- Jan 1, 2006
- Messages
- 4,074
Hengelo that was excellent advice from Ken, he's spot on on all the important aspects. I was going to mention the same things but no need now! I do have a few photos that touch on exactly what he mentioned as I happen to be working on a batch of blades right now. Also, do yourself a huge favor and ditch the 420, that stuff is divot hell and I'm speaking from experience. Try using the CPM154 for your springs as well and bring the RC up to between 45 and 49 on the springs. You'll notice a world of difference. Also as Ken mentioned thin your springs more behind where the kick contacts them. You can cut then right up to the center pin which gives you a longer flex area. Check out the spring I'm using. Here are the pics. I clean up the inside front and back square with 120 grit belts. Inside front with a small wheel and back square on the platen. The corners are sharp at this point. I then go to the scotch brite wheel and cut and round those corners on the wheel. I use a good deal of pressure on that operation, hence the need for a hard wheel. I also draw the corner across the wheel in one smooth motion from one end to the other. Don't stop and start halfway. That's especially important on a cam tang. If you stop a grinding motion halfway across that arc it'll feel like a speed bump when you open the blade. The corner at the back square is rounded on the side of the scotch brite wheel as it's difficult to reach all the way on the radius. I do hit as much of that part as I can on the radius once the corner is rounded just to align the scratches with the direction of blade travel. Not sure if that's necessary with that fineness but it can't hurt. I also clean the inside of the spring on the small wheel with 120 grit and a light pass on the scotch brite wheel where the blade contacts it. That brings the finish on the tang to around 240 on the corners and the spring at a smooth 120.


Eric
Eric
Last edited:
Hengelo_77
Basic Member
- Joined
- Mar 2, 2006
- Messages
- 6,319
Thnx for all the advice I realy appreciate it. I want to get better so I appreciate honest advice and mistakes beeing pointed out.
About the pre-load, I drill the back hole in the liners about 1mm~1.2mm higher then where the hole in the spring is.
I aim for a medium pull for opening and closing.
I'll get to work with all the good advice here but it will be a few weeks/months before I'll be able to show new work.
There is a lot of good advice here, I'll be checking this thread a lot.
Hengelo_77
Basic Member
- Joined
- Mar 2, 2006
- Messages
- 6,319
It may be just the camera angle, but Knives #1 and #3 look like they have too much torque point pressure on the backspring. Perhaps more and smoother radius on the corner would help. The spring also looks very stiff.
What do you mean with "too much torque point pressure on the backspring".
I don't understand what you mean.
Stacy E. Apelt - Bladesmith
ilmarinen - MODERATOR
Moderator
Knifemaker / Craftsman / Service Provider
- Joined
- Aug 20, 2004
- Messages
- 38,513
I didn't word that too well.
I meant that the corner (torque point) would rub really hard on the spring due to the tight radius of the corner and the stiffness of the spring. Per your hardness info, the spring is very soft compared to the blade and would easily gouge. The depth of the gouging in your photos indicates a great difference in hardness. I am sure that 90% of your issue is a spring that is far too soft. Your blade is 20 HrC points harder than the spring *. Raise the spring hardness 8-10 points and I bet most of the issue goes away.
The advice on switching the steel for the spring sounds like a good idea, too.
* Note - The Rockwell scale is logarithmic, not linear. The deference between 42 and 62 is many times more than 32% harder
Hengelo_77
Basic Member
- Joined
- Mar 2, 2006
- Messages
- 6,319
There is a lot of good advice here and I'm going to take it step by step.
"Ditch the 420 and use RWL34 for the spring as well" pushed me out of my comfort zone and stimulated me to try relieving the liners with the pantograph mill I have. I think I can do without the washers, and use RWL34 for the spring and blade like this.
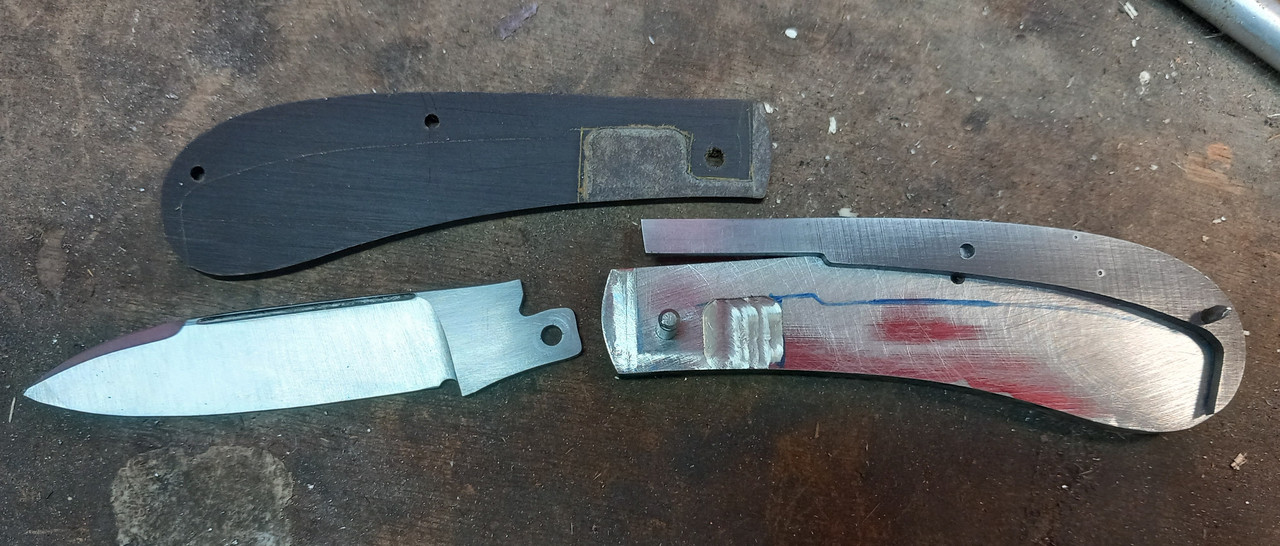
I still run into a problem with the stainless liner material I use. I ordered "ground to 240grit on one side" and assumed that it would be flat.
It comes from a large roll and tends to not be flat.
I ordered 1mm.
Should ordering 1,5mm and grinding it back to 1mm myself give good flat liner material?
My pantograph milling machine is not heavy enough to mill thick stock back to liners with integral bolster.
(I tried that and it seriously overheated)
"Ditch the 420 and use RWL34 for the spring as well" pushed me out of my comfort zone and stimulated me to try relieving the liners with the pantograph mill I have. I think I can do without the washers, and use RWL34 for the spring and blade like this.
I still run into a problem with the stainless liner material I use. I ordered "ground to 240grit on one side" and assumed that it would be flat.
It comes from a large roll and tends to not be flat.
I ordered 1mm.
Should ordering 1,5mm and grinding it back to 1mm myself give good flat liner material?
My pantograph milling machine is not heavy enough to mill thick stock back to liners with integral bolster.
(I tried that and it seriously overheated)
M.McAlevy
Knifemaker / Craftsman / Service Provider
- Joined
- Feb 16, 2014
- Messages
- 913
Just wanted to say thanks to the makers contributing to this thread and others like it. Blade forums has been an integral part of my knife making journey.
I just made my first two slip joints. Pictures of #2 below. Action is pretty good. Always room for improvement.


I just made my first two slip joints. Pictures of #2 below. Action is pretty good. Always room for improvement.
ea42
Knifemaker / Craftsman / Service Provider
- Joined
- Jan 1, 2006
- Messages
- 4,074
Just wanted to say thanks to the makers contributing to this thread and others like it. Blade forums has been an integral part of my knife making journey.
I just made my first two slip joints. Pictures of #2 below. Action is pretty good. Always room for improvement.
View attachment 2743816
View attachment 2743817
View attachment 2743818
Looks good!
Eric
I've been following this thread because I've been having problems with the last couple of slipjoints I made over the last month. They just were not as smooth as should be and didn't have the "snap" when opening 'n closing. I went round 'n round working on those darn backspring and blades. Finally, yesterday it clicked for me. I had the corners too round. I had a fairly strong spring and kept rounding the corners to make it easier to open. This extra rounding of corners provided a much longer area of drag as the corner was moved past. During the night before it sorta clicked. Yesterday I squared up the corners leaving a very small corner radius - just to break the sharp point of corner. Now I got nice "snap" action just like the other slipjoints I've made. MUCH better action. I should mention I run my blades in the 60 Rc range and backsprings in the 45-50 Rc range.
So, if you've got too much drag while opening/closing past the corner, be sure it's not too much rounding, just a small radius to break the sharp corner. It does need some radius, but not too much. Maybe 1/32" radius? NOT the 1/8" radius I might have had before.
Slipjoints are fun..... when they work right
")
Last edited:
rrrgcy
Knifemaker / Craftsman / Service Provider
- Joined
- Aug 21, 2005
- Messages
- 126
Maybe helpful being more specific in production, backed up by govt specifications in drawings for war material (i.e., 1911, Springfield 1903, M1919 plans) and in general machining academic knowledge: In machining, firearms gun making, you aim for about a 5 Rc difference between two mating/moving pieces to minimize wear and maintain longevity of the parts.
(I recognize the "spring" aspect is the variable which likely accounts for a wider variance!)
(I recognize the "spring" aspect is the variable which likely accounts for a wider variance!)
Last edited:
ashwinearl
Knifemaker / Craftsman / Service Provider
- Joined
- Nov 9, 2006
- Messages
- 562
Thanks
Hengelo_77
Basic Member
- Joined
- Mar 2, 2006
- Messages
- 6,319
Yes I ditched the 420 for the spring.
I now use RWL34 for both the blade and spring. I have the springs no softer then 47 HRC and I finish the tang of the blade at 400grit and the face of the spring at 240grit with lithium grease on it.
I also make sure that the rise of the spring between open and half is simular to half to closed.
I now use RWL34 for both the blade and spring. I have the springs no softer then 47 HRC and I finish the tang of the blade at 400grit and the face of the spring at 240grit with lithium grease on it.
I also make sure that the rise of the spring between open and half is simular to half to closed.
Hengelo_77 did you ever resolve the issue? I'd like to know changes you've made to design or process.
Thanks