Small Batch run of MagnaCut Frame Locks

Now it's time to cut the lockbar and mill the lock relief. This takes about 30-40 min per blade, so I'll be done this weekend when I get some more shop time. I did two of them already and thought I'd go ahead and include this portion now. I use .025" cutoff discs from McMaster Carr along with their 1/16" wheel arbor.

IMG_8983.jpg

IMG_8984.jpg

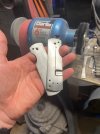
I place two drill bits in the holes that I drilled out for the ends of the lock bar. Then I place the handle scale in the vice with a couple of parralells stacked on top of each other. I set the drill bits on top of the handle scales and tighten the vice. Now my handle scale is level and even.

IMG_8985.jpg

I run the mill at 2500RPM and take it slow to cut the lock bar relief. If you're careful, the disc won't break although they are pretty fragile.

IMG_8990.jpg

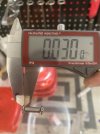
Once the lock bar is cut, I use a 5/16" carbide ball nosed end mill to mill the lockbar relief. Running at about 700RPM, I take about .005-.008" cuts using the DRO to make sure I am not taking too much of a bite at once. My little mill can't handle much more than that. We are shooting to get the "webbing" on the lock bar relief around .045" so we have good tension on the lockbar but not so much that it's a bear to unlock.

IMG_8988.jpg

IMG_8987.jpg

When the relief is finally cut, the cut in our lockbar is covered with the effects of milling our lock bar relief. Since the scale is still secured in the vice, I use the cutoff wheel to re-open that lockbar cut. After that I'll take it to the drill press and re-open the hole at the end of the lockbar relief with my 5/64" drill bit.

IMG_8991.jpg

IMG_8992.jpg


IMG_8994.jpg

Looks like we are pretty close to our .045" target!

IMG_8995.jpg
 
Nice work.
I don't see any coolant,as much of a pain in the arse as it is do you use flood coolant,I think it would be beneficial.
 
I
Nice work.
I don't see any coolant,as much of a pain in the arse as it is do you use flood coolant,I think it would be beneficial.

I normally do, had a brain fart last night though! It is messy, but does make for better and smoother cuts! Good eye!
 
Now it's time to cut the lockbar and mill the lock relief. This takes about 30-40 min per blade, so I'll be done this weekend when I get some more shop time. I did two of them already and thought I'd go ahead and include this portion now. I use .025" cutoff discs from McMaster Carr along with their 1/16" wheel arbor.

View attachment 1804390
30-40 min per blade is really slow .I make some tool to hold my Dremel to cut that.If I found pictures I will show you .Something like this ,maybe you can make it ? 2500 RPm is really too slow for cutting disk to cut nice .
C6u3qJV.png
 
30-40 min per blade is really slow .I make some tool to hold my Dremel to cut that.If I found pictures I will show you .Something like this ,maybe you can make it ? 2500 RPm is really too slow for cutting disk to cut nice .

Yea, I wish my mill would go faster but I make due. I know that is the reason the cut isn't as crisp as it can be. I know LMS sells some pulley that will increase the RPM to around 5000RPM. I'd just have to upgrade my spindle bearings to handle that kind of speed. Plus it will cut my low range torque which I like to have for milling the titanium.

I have use two piece of hardened steel to act as a guide and used my dremel before. I should probably re-visit that technique. I do like the setup that you have pictured. It looks like it is more stable and repeatable than the two pieces of hardened steel that I clamped to my liner.

When I say 30-40 min, that is setting up the scale, cutting it, milling lock face, cleaning up lock bar cut, and re-drilling the lockbar hole at the end of the lockbar. The actual cutting takes about 15 min or so.
 
While the scales are still flat on both sides, time to drill and tap the holes for my pocket clip. I set the clip in place and use an automatic center punch to mark the holes. Then I take it to the drill press and use a 5/64" bit to drill the holes. I am using threadform taps, so this is the correct hole for this application. Once the holes are drilled I use my TapMatic to tap the holes. This was the best investment I have made. Can use one tap for literally hundreds of holes. Quick and easy! The screws are too long, so a quick hit on the belt grinder gets them to their proper length.

IMG_9001.jpg

IMG_9002.jpg

IMG_9003.jpg

IMG_9006.jpg

IMG_9004.jpg

IMG_9005.jpg
 
Next, I will counterbore the pivot screw and the pocket for the bearings. I am using a .314 carbide counterbore with a 3/16" pilot from USAKM. The head of the screw will be counterbored .030".

IMG_9007.jpg

IMG_9009.jpg

The bearing pocket will be counterbored to a depth of .042" (bearing is .062" thick and I want .020" clearance on each side of the blade). I use a 13/32" carbide tipped counterbore for this.

IMG_9010.jpg

IMG_9011.jpg

IMG_9014.jpg
 

Attachments

  • IMG_9008.jpg
    IMG_9008.jpg
    420.7 KB · Views: 0
Next. I need to relieve the liners in the area of the lockbar to make unlocking the blade easier and to provide some relief from the hard edges while unlocking the knife. I place my grinder in the horizontal position and use one of the contact wheel on the bottom of my platten to do this. Holding it at roughly a 45 degree angle. Just making sure the keep both sides even and symmetrical.

IMG_9015.jpg

IMG_9016.jpg

Now it's time to set the detent. I use my arbor press for this. I have a .020" feeler gauge that I place around the detent ball so I set it with exactly .020" of the ball sticking up from the liner. This is because the clearance between the blade and the frame is .020"

IMG_9017.jpg

IMG_9018.jpg
 
Now it's time to contour the scales. I start out by putting Dykem on the edges of my scales. Then, using the height gauge, I scribe a line .065" from the outside edge to give me a line to grind to. To do the coutnouring, I use a pair of 1-2-3 blocks and superglue each line to the blocks. Making sure the detent is off the edge of the block and the outside of the scale is the one I'm contouring. I place the grinder in the horizontal position and use a rocking motion against my platen to get the desired shape. I take this up to about 480 grit for now.

IMG_9019.jpg

IMG_9020.jpg

IMG_9021.jpg

IMG_9022.jpg

IMG_9023.jpg

IMG_9024.jpg


IMG_9025.jpg

IMG_9026.jpg
 

Attachments

  • IMG_9027.jpg
    IMG_9027.jpg
    369 KB · Views: 1
Just finished up contouring scales. Tonight I will start getting the edges of the handle scales up to a 480grit belt finish. Pics to follow...
 
Next up is to trim the pivot and stop pin and get them to their final length. I place the pivot in the knife and assemble it with my scrap piece of 1/8" steel to represent the blade. Then I take my digital calipers and measure how much it is sticking above my handle scale. In this instance it was . 058".

IMG_9039.jpg

IMG_9040.jpg

Since I counterbored the scale for the pivot screw to a depth of .030", that gives me .088" above the counterbore. Since I want the pivot to sit about .020" below the counterbore, I'll take off .108" from my pivot barrel. To do this, I place an end mill upright in my vice and put the pivot barrel in a 3/16" collet. Then using my DRO for the Z-axis, I mill it down to size.

IMG_9038.jpg

IMG_9041.jpg

Once the pivot barrel was at the correct size, I did the same thing with the stop pin and got it down to proper size too.

IMG_9042.jpg
 
Then it was time to soften up the edges of the scales so there aren't any sharp 90 degree angles. To do this I use my scotchbrite wheel on my bench grinder and at about a 45 degree angle, I just soften up all the inside and outside edges.

IMG_9044.jpg

IMG_9045.jpg

Then I released the lock bar. I placed the scale upright in my vice and used a square to get the lock bar cut perfectly vertical. Then I used the same cutoff wheel to release the lock bar.

IMG_9046.jpg

IMG_9047.jpg

Once that was done, I applied heat with my MAP torch to the lock bar relief until it was cherry red. Then using pliers, gently bent the lock bar to where the outside edge of the lockbar was just inside my handle scale.

IMG_9048.jpg

IMG_9049.jpg

Then, using the scotchbrite wheel, I chamfer the inside edge of the lock bar where it will contact the lock face of the blade.

IMG_9050.jpg

IMG_9051.jpg

After that, all that is left to do is bead blast the scales and stonewash them. I use 80 grit glass bead to do the blasting and my HF vibratory tumbler to stonewash them.

IMG_9058.jpg

Now I am just waiting for the blades to come back from heat treating, probably middle of next week.

Stayed tuned!!!!
 
Back
Top