Tanto - Aizu Shintogo Project

Joined
Oct 19, 2017
Messages
340
Hi,

First, Happy Hollidays and all the best to you and your families!


I have always loved the lines of a traditional Tanto with a straight spine, so I found the "Aizu Shintogo” and fallen in love with it.

Since I already had a 1/4” x 1 1/2"” bar of O1, I decided to use it for this project. On the next iteration, I’ll use something where I can get a hamon, but since I still have lots to learn, the O1 should work just fine.

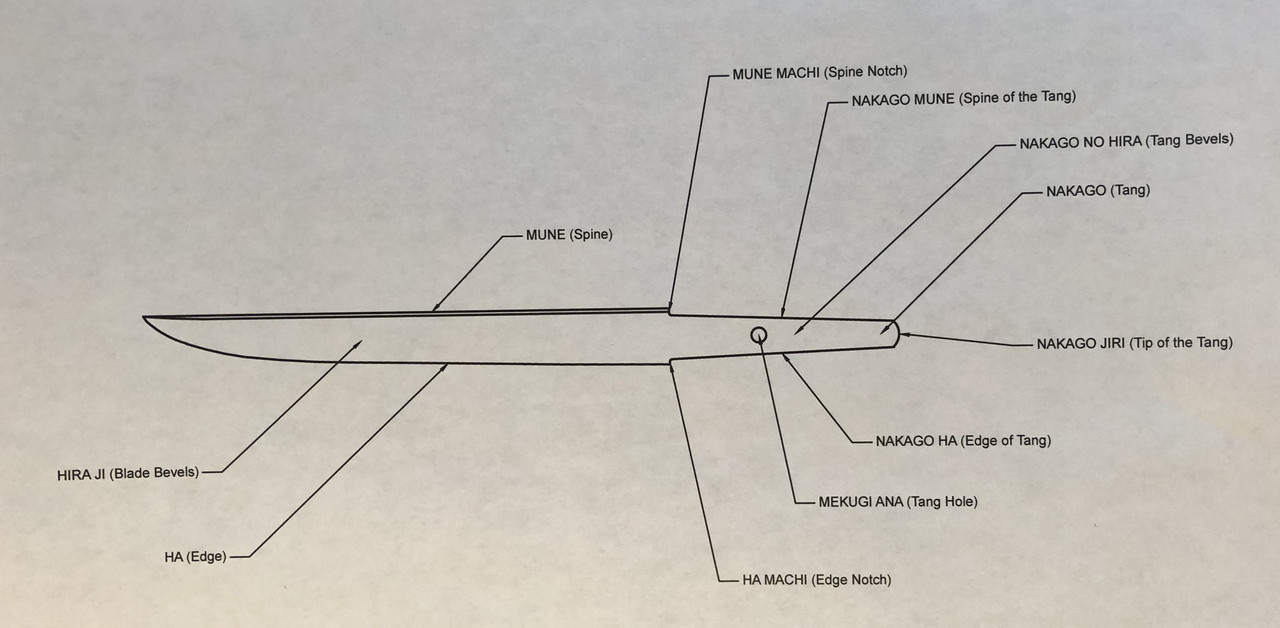
Last weekend I decided to look into it and start learning the parts names. Here is a diagram with the parts names pertaining to the blade and the blade design. If I missed anything, let me know and will update the diagram. As I progress through the project, I’ll add more terms as they come in scope.

Here is the diagram with the blade terms:

IMG-2254.jpg


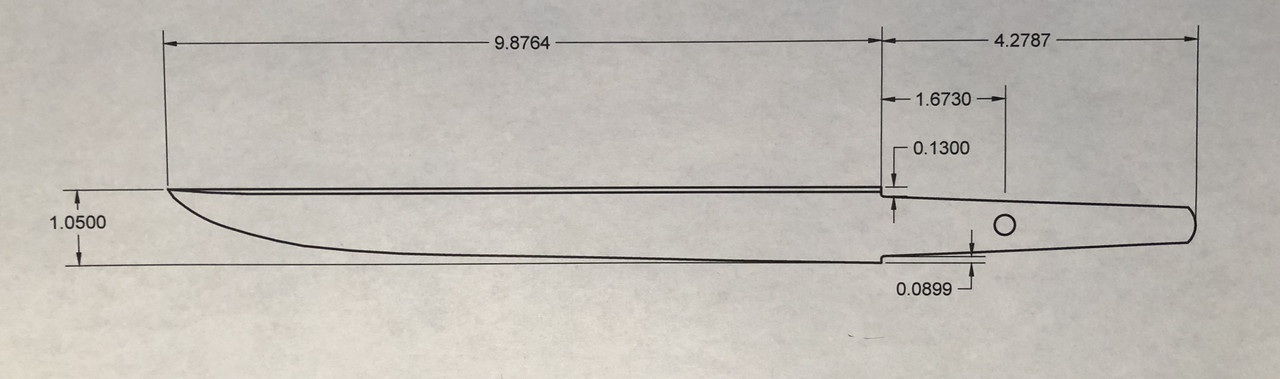
Here are the dimensions I reversed engineer from the original. Just a note, the length of the blade is supposed to be 10” instead of 9.8764” shown in the drawing.

IMG-2255.jpg


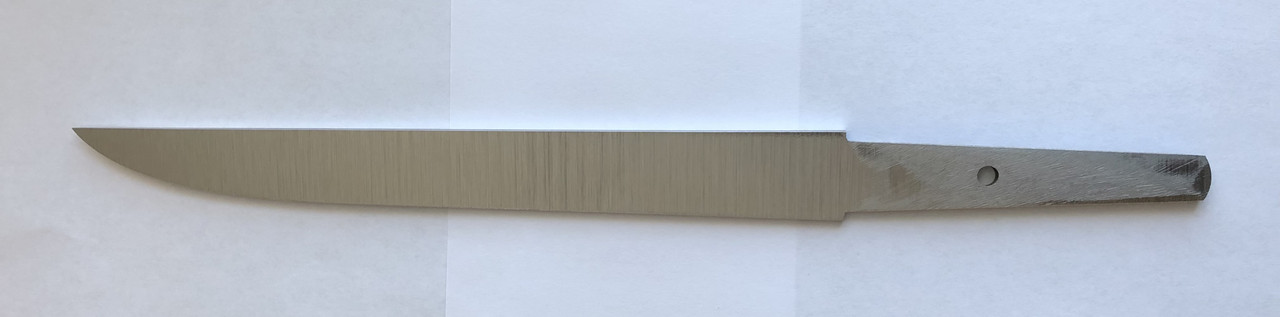
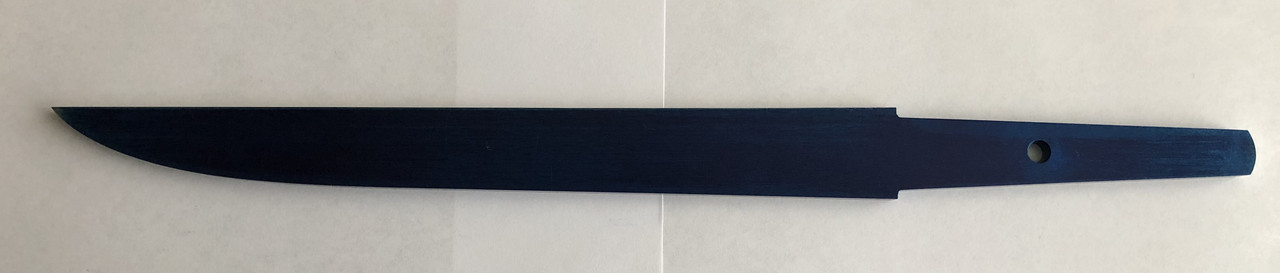
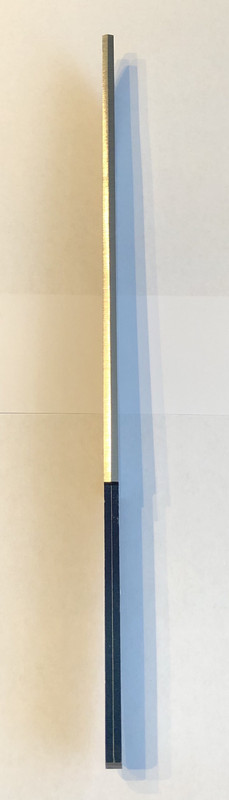
Here it is after shaping the profile and the spine chamfered, all on the grinder. More refinement of the spine will be done by hand, after the bevels are done. The chamfer on the grinder was done at 10 degrees tilting the work rest.
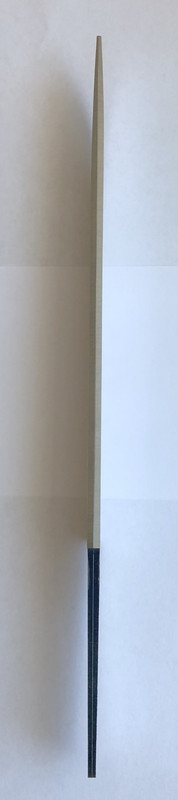
IMG-2252.jpg


The Spine:

image1-2.jpg


So here I have some questions for the versed in the Japanese swords off all types.

What are the next steps on the blade before HT ?

Should I, in the following order,

1. Grind the HIRA JI (blade bevels), extending them all the way underneath the HABAKI (blade collar)

2. Grind the NAKAGO MUNE (spine of the tang) taper to the NAKAGO JIRI (tip of the tang)

3. Grind the NAKAGO HA (edge of tang) to a 2mm (0.0790") thickness

4. Grind the NAKAGO NO HIRA (tang bevels) by blending between the 2 and 3 steps above.

Is step 4 correct?

Do you see any issues?

Stacy E. Apelt - Bladesmith Stacy E. Apelt - Bladesmith , I could really use your help Sir.

Thanks in advance,
Constantin
 
Last edited:
Your blade is hira-zukuri tanto. That is the most common tanto shape and a good shape to start with. Everything from spine to edge is on the same bevel.

1) It is best to grind the Ha-ji as a FFG to an edge around .08"/2mm wide before HT. If doing a traditional hira-zukuri with an apple seed grind, do the convexing after HT. Work it down to 95% on a grinder and finish on stones if you have them. If not, finish by hand with the paper wrapped around a hard block of wood.

2) Don't do much on the tang beyond the basic bevel until after HT. The tang is traditionally not hardened, or the tang is drawn with a torch to a much lower hardness. You should be able to file the tang with a good file. The nakago-ha and nakago-mune are chamfered at something like 45° and leave a small flat nakago mune and ha around 1-2mm. It is best to do them after HT.

3) The ha-ji and ha are shaped all the way down the blade continuing down the nakago. They goes past the habaki and machi. See next answer for more.

4) As just said, the nakago-no-hira (nakago-ji) is beveled the same as the blade in grinding. The ha and mune are added after the ji.

I usually do not drill the ana until the blade is nearly done and the tsuka is being fitted. It's OK to do it first, but you are stuck with it where it is when fitting the tsuka and planning the maki. Trust me, the machi get moved forward, nakago get shortened, and the current mune and ha may move up or down in shaping. Don't cut the machi full depth until all the ha and ji work is nearly done.

Depending on your equipment and skill level, do the foundation work (shitaji-togi) on the grinder and do the shiagi-togi by hand … preferably with water stones. A grinder will do it, but it really needs to be VS or you will burn the edge.

The biggest tip is go slow.
 
Looks great so far. I agree with Stacy, go slow, plan each step. I think you can do a lot of the grind after HT. Even a much larger katana isn't too bad to grind after. I'd rather have it straight. Will you HT yourself?
 
Your blade is hira-zukuri tanto. That is the most common tanto shape and a good shape to start with. Everything from spine to edge is on the same bevel.

1) It is best to grind the Ha-ji as a FFG to an edge around .08"/2mm wide before HT. If doing a traditional hira-zukuri with an apple seed grind, do the convexing after HT. Work it down to 95% on a grinder and finish on stones if you have them. If not, finish by hand with the paper wrapped around a hard block of wood.

2) Don't do much on the tang beyond the basic bevel until after HT. The tang is traditionally not hardened, or the tang is drawn with a torch to a much lower hardness. You should be able to file the tang with a good file. The nakago-ha and nakago-mune are chamfered at something like 45° and leave a small flat nakago mune and ha around 1-2mm. It is best to do them after HT.

3) The ha-ji and ha are shaped all the way down the blade continuing down the nakago. They goes past the habaki and machi. See next answer for more.

4) As just said, the nakago-no-hira (nakago-ji) is beveled the same as the blade in grinding. The ha and mune are added after the ji.

I usually do not drill the ana until the blade is nearly done and the tsuka is being fitted. It's OK to do it first, but you are stuck with it where it is when fitting the tsuka and planning the maki. Trust me, the machi get moved forward, nakago get shortened, and the current mune and ha may move up or down in shaping. Don't cut the machi full depth until all the ha and ji work is nearly done.

Depending on your equipment and skill level, do the foundation work (shitaji-togi) on the grinder and do the shiagi-togi by hand … preferably with water stones. A grinder will do it, but it really needs to be VS or you will burn the edge.

The biggest tip is go slow.

Great, thank you so much, these will help me with the next phase.
I’ll report back on the progress.
 
Looks great so far. I agree with Stacy, go slow, plan each step. I think you can do a lot of the grind after HT. Even a much larger katana isn't too bad to grind after. I'd rather have it straight. Will you HT yourself?

Thank you.
Yes, I’ll be doing the HT myself.
 
I’d like to be proactive and source the handle/scabbard wood. I’m reading that a great substitute
from what was originally used in Japan, is the “Nootka Cypress” wood that is widely found in North America and it is a cedar, with all the properties matching the original.

Anybody know where I could buy this from, nicely dried and ready to use?

Thanks again,
Constantin
 
I use alder. Plain old poplar also works well. If you can't find what you want, I can send you a piece of alder.
 
Nootka Cypress is called a lot of things. The most common name is Sitka cypress/cedar, It is also called yellow cedar and yellow cypress. Most good exotic wood suppliers would have it. Boat building wood suppliers always have it. It is very popular for wooden canoe building. Since it is an Alaskan cypress, it shouldn't be hard to find in Canada.

That said, alder is just as good. I bought a big old flitch many years back and have a lot left. No telling how many years it had been aging. The fellow at the wood yard said it had been there since he went to work there as a young man. I suspect the place still has the rest of that big stack in the racks.

Thank again Stacy. Yes, I googled it and found as you've mentioned that the boat building supplies has it. Something like $35 for a plank, 3/4" x 4" x 6'. I'll ask to see if they can book match two planks.

I may take you on the alder offer, I'll let you know once I get closer to that milestone.

Constantin
 
Hi, just an update.

I did the initial bevels, leaving a 2mm thick edge, as per Stacy recommendation, hopefully no warp. If any, I’ll fix it in the temper.

It is finished at 80 grit. I didn’t see the point going higher, since after the HT, I still have to grind some more and should help the ATP-641 stick better to the blade, I think.

The tang is left pretty rough, since it will be grinded some more after HT to re-match the blade bevels.

I think it is ready for HT. I’ll be targeting for 61-62 HRC.

Let me know if you see any issues.

Stacy E. Apelt - Bladesmith Stacy E. Apelt - Bladesmith , I have a question please.

After the HT once I start working on the bevels again, as I’ll be grinding and get the blade edge thinner and thinner, so will the NAKAGO HA.

Is it possible that it will get too thin? Is there a minimum for the NAKAGO HA thickness?


Here are some pics.

IMG-2256.jpg


IMG-2257.jpg


IMG-2258.jpg


Thanks again,
Constantin
 
No, because the nakago-ha is stepped back from the blade ha (because of the machi) it will still have a small flat area. If it gets too thin, just grind back a tad. That is what I meant in my comment about not drilling the ana too soon.

Important thing to remember:
The nakago has to be the same thickness and profile as the blade is at the machi ... or a tad less … for the habaki to slide forward and fit perfectly on the blade bevels. Many/most first time makers make the nakago too thick, or differently shaped. It needs the same zukuri as the blade, and it should slightly reverse taper from the machi to the nakago-Jiri.

Makes sense now doing the ana and maki at the end, thanks.

Just for clarification, I read that at the machi, the spine has to be the thickest and the nakago tapers down, just like you mentioned above. This taper of the nakago should make fitting the habaki easier.
So we have two tapers going the opposite ways, one from the machi along the blade and the other from the machi along the tang. This is what I did and can be seen in the pic above.

Now here is where I am not clear. The habaki will be nice and flush following and in contact with the blade bevels until it meets the machi, then because of the tang taper, it will be a gap where portion of the habaki will not be in contact with the tang bevels.

So, should I have the distal taper of the tang start a bit after the machi so the that the habaki makes contact underneath for its full length?

Does it makes sense what I am saying? Not sure if I explained it properly.

Thanks again,
Constantin
 
The habaki has notches that stop at the machi. The metal on the mune side is usually the sheet of copper/silver/etc. the habaki is formed out of. The metal on the ha side is called machi-gane or machigane ( notch metal). The notches contact the machi and stop the habaki from moving forward any more. This is another reason you don't exactly place the machi at first. The notches have to be adjusted to get the habaki right. The depth of the notches can vary, but avoid having a long section of the habaki going down the blade past the machi. This is just inviting a problem with it getting snagged and bent.

A well fitted habaki doesn't have much gap on the tsuba side, but some is acceptable and pretty much normal.

Take a look at this tutorial and it should make things clear. This is only one method of making a habaki, but the fit is the same on all.
http://islandblacksmith.ca/process/making-habaki/
 
Looks great so far. I agree with Stacy, go slow, plan each step. I think you can do a lot of the grind after HT. Even a much larger katana isn't too bad to grind after. I'd rather have it straight. Will you HT yourself?

Just came out of the quench and I picked up a bend. I’m trying to fix it now during the temper.

Thanks to Stacy’s point of keeping a 0.8” edge before HT, it should help me rectify the problem.

In retrospect, I should have HT then grind. I totally agree with you and it’s not a big deal grinding after HT with good belts, great point!

I do this anyway with aeb-l, even with 3/16” stock.

Thanks,
Constantin
 
Sorry to hear about the warp, hopefully you can get it straightened out.
One comment about the habaki. I think if you get your blade to final shape first, you can fit it very closely. I used silicon bronze and rubber mallet hammered it to shape in place. I stopped a couple times to anneal which is really easy, just heat to reddish and plunge into cold water. I braized it with silicon bronze rod which matched the color. I was able to take it on and off but with a very snug fit. You can make some adjustments with files and paper. I applied some optional cold blue to age it.
 
The habaki has notches that stop at the machi. The metal on the mune side is usually the sheet of copper/silver/etc. the habaki is formed out of. The metal on the ha side is called machi-gane or machigane ( notch metal). The notches contact the machi and stop the habaki from moving forward any more. This is another reason you don't exactly place the machi at first. The notches have to be adjusted to get the habaki right. The depth of the notches can vary, but avoid having a long section of the habaki going down the blade past the machi. This is just inviting a problem with it getting snagged and bent.

A well fitted habaki doesn't have much gap on the tsuba side, but some is acceptable and pretty much normal.

Take a look at this tutorial and it should make things clear. This is only one method of making a habaki, but the fit is the same on all.
http://islandblacksmith.ca/process/making-habaki/

Great, thanks again Stacy!
 
Sorry to hear about the warp, hopefully you can get it straightened out.
One comment about the habaki. I think if you get your blade to final shape first, you can fit it very closely. I used silicon bronze and rubber mallet hammered it to shape in place. I stopped a couple times to anneal which is really easy, just heat to reddish and plunge into cold water. I braized it with silicon bronze rod which matched the color. I was able to take it on and off but with a very snug fit. You can make some adjustments with files and paper. I applied some optional cold blue to age it.

Great, thanks for the tips.
 
HELP !!!

Oh, so disappointed right now. Got the blade straighten in the temper, no problem.
Did a two hours temper at 350F, just to establish a baseline and was going to adjust from there for the final hardness.

I usually get at least 62HRC at this point. So everything should have been fine, I thought.

My wife wanted to make some pizza in the oven and mentioned that something seem to be weird with our oven, it doesn’t seem to adjust the temperature. Long story short, I unplugged and replugged the oven and everything seems to be ok now.

But than I thought, I should check the hardness of my blade. Surprise, surprise, it is at about 50 HRC, damnit. So it looks like the oven went crazy and the temper was way too high.

The blade has bevels all over at this point, so no parallel flats to accurately measure hardness, but still I could see that the impressions made by the diamond penetrator are too deep compared to previous sample coupons I have made before.

So, I would like to harden the blade again. Do I just re-run the hardness program, or do I have to do some annealing or normalization before?

Again, this is O1.

If any of these are needed, please guide me since I’ve never done any of these before.

Thanks in advance,
Constantin
 
To me it depends how much of a practice run this is. I looked at a tempering chart and it says you would have had to be at 800F or higher to get down to 50. It might not be an accurate measurement. If I were you I would probably just finish it now, maybe minus any expensive menuki etc...
 
To me it depends how much of a practice run this is. I looked at a tempering chart and it says you would have had to be at 800F or higher to get down to 50. It might not be an accurate measurement. If I were you I would probably just finish it now, maybe minus any expensive menuki etc...

This is my first run at a tanto. And you’re right, practicing grinding the bevels, go through the build of the blade, etc. it will make me better for the next one. If a throw away, I will at least finish the blade on the grinder, as practice, won’t spend any more effort beyond that.

Just checked the oven and the max is like 525F, but who knows if it went full blast beyond that.

Confused of the HRC reading I got. Measuring on non parallel surfaces is not accurate anyway.

Thanks,
Constantin
 
Back
Top