Viking Sword project - WIP

Stacy E. Apelt - Bladesmith

ilmarinen - MODERATOR
Moderator
Knifemaker / Craftsman / Service Provider
Joined
Aug 20, 2004
Messages
38,472
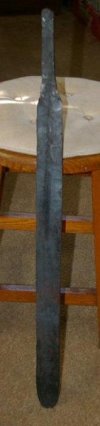
I am working on a sword for Ashokan, and will be posting a sort of WIP as I go along.

The billet is a composite with left and right twist center panel, and plain edges. The center makes a herringbone pattern. The herringbone is 1084/15n20. The edges are 1084.
Many thanks to Rob "Decker' for doing the build up of this billet.

The tip of a sword with a center panel has to be welded in such a way as to have the edge flow around the center at the tip. This can be done by welding the edge to the core in a long "U", but that can be fraught with problems.
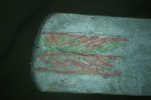
I chose to do a butterfly weld. In such a weld, you make a curved "V" cut in the end of the billet, shaped like the inverse of the tip shape desired. You then forge weld the butterfly into the tip. If all goes well, the edge will flow around the core with little or no visible weld line.

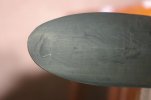
OK, this one came out pretty good. I drew out the end four inches after the weld to make sure it was solid and see how the pattern comes out. I like it. It looks much better than these quick and dirty photos.

The photos are of:
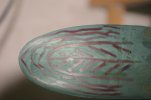
The butterfly cut out shape drawn in red.
The final tip after a quick sand and etch. The bright line is a scratch.
The pattern after the weld marked in red.
The rough billet showing the herringbone in red highlighting.
 

Attachments

  • Viking sword 011.jpg
    Viking sword 011.jpg
    43.7 KB · Views: 103
  • Viking sword 009.jpg
    Viking sword 009.jpg
    50.8 KB · Views: 113
  • Viking sword 007.jpg
    Viking sword 007.jpg
    35.6 KB · Views: 127
  • Viking sword 004.jpg
    Viking sword 004.jpg
    24.6 KB · Views: 118
Last edited:
I'm pulling up a front row seat for this one! I can't wait to see how this project goes. I always love seeing what other folks make with the ugly hunks of steel I put in the mail to them :)

-d
 
Definitely looking forward to following this project. A non-Japanese Stacy sword is kind of special :)
 
I got out in the forge for an hour after the big storm blew through yesterday, and drew out all but the last part of the tang. It is now six inches longer and 25% wider. I will draw out the tang to the final size, clean up the bevels enough to check the center placement, and draw the edges out about 25% more this weekend.

After the forging is done, the steps are:
Big files and lots of sweat to shape the bevels smooth.
Cut the fuller.
Lots of hand sanding and stoning.
HT
Lots more hand sanding.
Fitting the hardware.
Engraving and inlay of the hardware.
Handle work.
Sheath ( I have something special in mind).
 

Attachments

  • Viking sword 004.jpg
    Viking sword 004.jpg
    11.6 KB · Views: 188
Last edited:
Looking good Stacy! Cant wait to see it done...though with all the filing, sanding and stoning...I doubt it will be this week lol. Tell your elbows sorry for me :p
 
THERE WILL BE MORE THAN ONE !!!!

A companion Viking dagger, and maybe another item, is to be made along with this project :) .
 
Looks like a very cool project!

Do you generally not use a grinder when making these?

If so, you are way more patient than I am!
 
Yes ,it is for Ashokan.
If you want a hint about this project, the type is a waegsweord, and the sword has a name....GUOSWEORD.

Johnathan,
I use a grinder where one is more efficient than an 18" bastard file. A file will leave a long smooth surface and a grinder may make a wavy surface. On a 3.5" knife blade the wave won't show, but on a 24" sword, it can be a problem. When I am knocking off the scale and dents, the grinder is the tool for the job.....My momma didn't raise no fool.
 
Stacy,

I'm looking so forward to that weekend this year. You just made it that much harder to wait.

Aldo
 
I use a grinder where one is more efficient than an 18" bastard file. A file will leave a long smooth surface and a grinder may make a wavy surface. On a 3.5" knife blade the wave won't show, but on a 24" sword, it can be a problem. When I am knocking off the scale and dents, the grinder is the tool for the job.....My momma didn't raise no fool.

Ok, makes sense. I didn't know if you were trying to go with and old school, no electricity approach.
 
If you don't mind me asking: What is the estimated final thickness of the blade (or is it a distal grind)? I rarely see those types of specs given in texts I've seen and I'm not fortunate to get to feel one in real life, so all I am left with is SSO's.

Thank you.

ETA: I was also curious how many heats you needed to forge the tip.
 
Last edited:
The billet started at .350" and is going to forge down to a distally tapered blade that is about .250" at the ricasso. That figure will be reduced by the wide fuller that will be the width of the herringbone center.
The thickness between the fullers will be about .100", and the thickness at the herringbone-edge ridge will be about .200".

The fullering makes the blade about 20% lighter and moves the balance back toward the hilt, thus reducing the pommel weight as well, and yield a lighter and faster sword. It will effectively make the blade thinner....with little or no loss in strength.
 
Will you be giving demonstrations of your swordsmanship (and, of course, the handling quality of the sword) once it is done? That would be quite something to behold, I think.
 
Back
Top