Viking Sword project - WIP

I'll be following this one all the way through, that's for sure!

It's looking really great so far Stacy.
 
I may cut some targets with it before the final etch and polish.......just for fun.
As far as my swordsmanship, well, I stayed at a Holiday Inn once.
 
Can't wait to see the final product, looks like an awesome start!
 
I got out in the forge today and spent four or five hours working on the sword. It was 94 in the shade, but who cares.The smithy gets up to about 105 from the forge running. I took regular water breaks and did fine.
As I worked the tang and ricasso, I noticed that the line down the middle was getting larger. There has always been a line where the two twist billets joined, and I thought it was just a surface artifact. As I drew out the tang, the line opened up into a four inch long gap. I stopped and inspected things and realized that the initial weld had not taken fully here. I re-welded and drew out the tang. After that, I decided to see if all the other lines were surface features or incomplete welds. After grinding the blade clean, it was clear that there are many places where the weld is not solid. I will re-weld the blade form end to end and try and close up the lines as tight as possible. After the fullering, any that still show will be burnished shut with a carbide rotary burnisher. That should make them invisible.
Luckily, I have not drawn the edges all the way out yet, so there is plenty of side surface to hammer on in the re-weld. Any upsetting will be drawn back out when I finish the edge bevel.

In the photos, you can see the chalk circles around the splits.There are seven on one side and eleven on the other. There is only one real bad area, at the ricasso. It is clearly part of the split that formed in the tang. I did not carry the re-weld that far down when I did the tang, so it still is a pretty big line.
The tip was welded up 4" back when I did the butterfly weld, and is fine. The area just below the ricasso split is fine,too. If needed, I will drop the shoulders down an inch and put the split under the hilt.

This kind of stuff happens. You just take care of it and move on. I still think the sword will turn out fine.
 

Attachments

  • Viking sword 004.jpg
    Viking sword 004.jpg
    44.7 KB · Views: 43
  • Viking sword 001.jpg
    Viking sword 001.jpg
    38.3 KB · Views: 43
  • Viking sword 009.jpg
    Viking sword 009.jpg
    53.9 KB · Views: 40
  • Viking sword 007.jpg
    Viking sword 007.jpg
    48.5 KB · Views: 44
  • Viking sword 008.jpg
    Viking sword 008.jpg
    38.2 KB · Views: 32
Nah you should start over...KIDDING! That looks really great! I cannot wait to see the progress, Stacy.
 
What could you have done to make those welds take better the first time ?

Are you doing this all by hand ?, or are you using a press / power hammer ?
 
Well, I don't know what to say. I would have sworn those were all perfect welds at the time of forging. I'll be re-checking the other half of this bar for certain. I've NEVER had that kind of issue with a composite construction before and I'm surprised (and embarrased) to see it here. I'll be grinding the entirety of the second half clean before any further forging to check before I finish it up for you Stacy. My most sincere apologies for the extra work I caused you on this one. Rest assured that I'll make it right.

-d
 
Rob, I am in no way impugning you or your work. Things like this happen. The more complex the weld, the more chance of problems. That is probably why few makers do composite billets like this. Guys like Kevin probably have a secret barrel, hidden in the basement, of blades that have similar problems.
Like so many things , the flaws we see are not even noticed ( or are taken to be normal) by most who will examine the sword. If it was for a commission, and would be selling for many thousand dollars, the situation would be different, but I plan on keeping this sword as a display item.

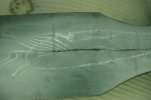
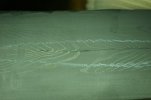
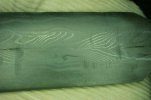
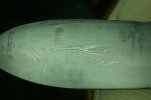
FWIW, I did all the drawing at near welding heats, starting about 2200F, just to prevent any shearing. I never forged below 1800F. I checked the center weld to make sure it looked tight as I widened and stretched the billet. I ,too, was confident it was a secure weld until the tang split.

In hindsight, I should have taken a clean up grind on the billet ( it still had its forge finish on it) and done a welding pass up and down the entire bar first...just to be certain. I only ground the end and did the butterfly weld, carrying that weld up about 4" to make sure the tip was solid.

The Count,
Rob did the initial billet, and I am doing the drawing and shaping of it. He uses a power hammer ,and I think a press,too. I am using hammers to do the work. My press is torn down until I get the new shop built, where I will re-install it in a new configuration.
 
Back
Top