-
The BladeForums.com 2024 Traditional Knife is available! Price is $250 ea (shipped within CONUS).
Order here: https://www.bladeforums.com/help/2024-traditional/
You are using an out of date browser. It may not display this or other websites correctly.
You should upgrade or use an alternative browser.
You should upgrade or use an alternative browser.
Virtual BBQ WIP. GNiCr40Al4 frame lock folder.
- Thread starter Salem Straub
- Start date
")
- Joined
- Oct 20, 2008
- Messages
- 5,547
I decide to experiment a bit with this one. The original pattern does not include a bolster, and with the bolster screw locations, I thought it might work better to make the top bolster screw the location of the stop pin as well. (Rather than drill in front of the screw for a press-fit pin.) So, I went for it.
I drilled the top hole out and reamed it to 3/16," then used the liner to locate the opposing hole in the frame for the stop pin. I drilled through the liner to make a blind hole in the frame, and reamed it to 3/16".
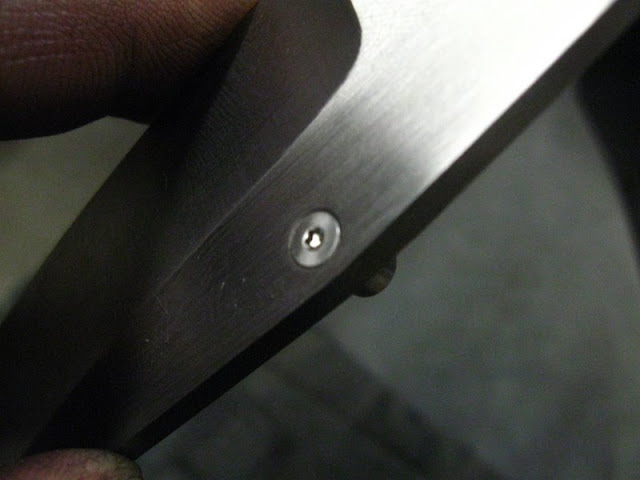
I drilled through the blind hole with #43, then counterbored the backside with #19. A shortened 3/16" threaded stop pin now press fit into the frame. With the liner installed, it press fit into the liner.
I ground the blade tang pretty close to the necessary shape.


With the pin in, the blade stopped a little short of where it needs to.

So, I used first a chainsaw file, then 280 paper wrapped around a 5/32" bit to shape the last bit on the closed position stop pin area of the blade. I like to shape this area round to provide more surface for the blade to stop against.


I made sure that the blade was correctly aligned against the handle in the open position by filing and sanding.

The next step was grinding the lock area on the tang. I used a steel wedge to set the platen to 7 degrees, then used a 220 grit belt to grind the lock.


I scribed the lock onto the frame to mark for the cut. I took a small straightedge and scribed a line back to the end of the lock bar. I punched, then drilled a #19 hole at the planned end of the lock bar.


Now for the fun part, cutting the lock bar out. I threw a cobalt slotting saw in an arbor, colleted it into the mill, and dialed the speed to 90 rpm. I clamped the frame in the vise, making sure the scribed line was parallel with the top of the jaws by the use of the small steel ruler.
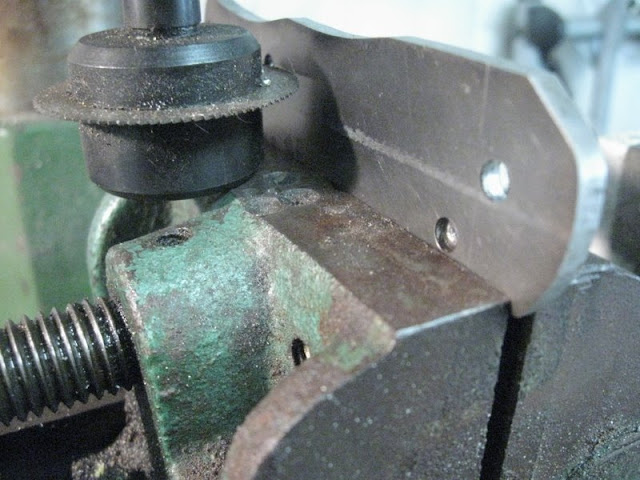
I plunge cut the start of the kerf with slow feed and plenty cutting oil. The cut started ahead of the drilled hole, and plunged in until the saw broke through the front of the hole, but not the back edge of the hole.

I ran the table back very slowly, again plenty of oil, until the blade had reached the end of the line on the inside of the frame. I don't know technically what the feed rate was, as it's a manual table, but I probably took five minutes to cut the long side of the lock. Those little blades are spendy and easy to ruin on TI.

Next, I chucked up a HSS 5/16" endmill (have a carbide, but no collet the right size.) I slowly cut the lock relief in, leaving about .045" at the bottom, and ran the mill forward 3/16" or so to provide a bit more flex area for the lock.

I used my DeWalt portaband to cut the end of the lock (the blade is narrower than the bigger saw), then finished cutting the long side in with a ground thin hacksaw blade.


I cleaned up the lock face a little, leaving it square, and checked the fit against the blade, ground a bit more, and stopped when the lock bar would just barely stick against the lock face of the tang. That's where it will stay until I get the blade back from HT.
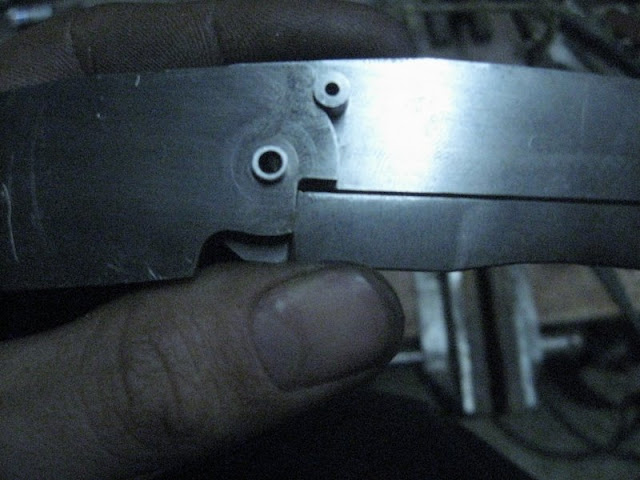


Overall the design adjustment worked, although the end of the lockbar is definitely too close to the pivot for my taste, and I don't think I'd do it this way again without some real re-configuring of the lock geometry.
Now to bevel the back of the bolster. I took the bolster over to the mill, and used a straightedge to set it in with the back parallel with the jaws. I used a protractor to set the angle vise to 30 degrees. I used the same HSS end mill to slowly cut the dovetail angle with multiple passes.

I set my platen to a similar angle, then try-fit and ground the scale front to match the back of the bolster. I superglue tacked the scale onto the liner with the bolster installed.
I marked out the location for the three scale screws, drilled through the scale with #43 and through the liner with #51, tapped the holes, counterbored the scale, and installed the scale. I shortened the screws by clipping the ends off with them installed in the liner, then grinding flush to the liner surface with 220 grit.

At his point, I ground all the edges flush for a smooth profile.


Time to rough grind the blade. I went at it with a worn out Blaze 50 to do the starter bevel. It took a long time, I could tell already this was tough stuff. I took it down to about .030.

I did myself a favor and threw on a brand new 967F gold belt for the rough hollow with the 12" wheel. Good thing, this stuff is very taxing to grind. It's wear resistant and gummy at the same time, and heats up very fast. Since I was holding the blade in the handle to grind it, I didn't want it to heat up much- I dipped the blade every pass. I still burnt my fingers from time to time, until I got wise and used a push stick. This rough hollow took me over an hour to achieve; normally It would be about ten minutes or less to get to 400 from the pre-bevel.


I finish ground several hardened blades immediately afterward, 52100 and CruForgeV, and even in the un-hardened state the GNiCr40Al4 blade cut slower with the Gator belts. Whew! Here's a gratuitous shot of one of the 52100 hunter blades...

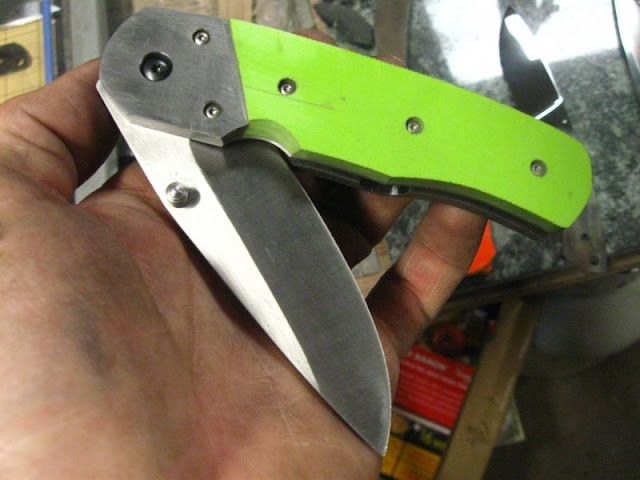
And here is what the folder looks like right now. I've got take a bit of a break right now, waiting for some parts to come in and I have several other knives to build.

Ye Olde Shoppe Dog. Say hi, Whitey. He's a pit-yote.

Thanks for your continued interest, comments are of course welcome, stay tuned!
I drilled the top hole out and reamed it to 3/16," then used the liner to locate the opposing hole in the frame for the stop pin. I drilled through the liner to make a blind hole in the frame, and reamed it to 3/16".
I drilled through the blind hole with #43, then counterbored the backside with #19. A shortened 3/16" threaded stop pin now press fit into the frame. With the liner installed, it press fit into the liner.
I ground the blade tang pretty close to the necessary shape.
With the pin in, the blade stopped a little short of where it needs to.
So, I used first a chainsaw file, then 280 paper wrapped around a 5/32" bit to shape the last bit on the closed position stop pin area of the blade. I like to shape this area round to provide more surface for the blade to stop against.
I made sure that the blade was correctly aligned against the handle in the open position by filing and sanding.
The next step was grinding the lock area on the tang. I used a steel wedge to set the platen to 7 degrees, then used a 220 grit belt to grind the lock.
I scribed the lock onto the frame to mark for the cut. I took a small straightedge and scribed a line back to the end of the lock bar. I punched, then drilled a #19 hole at the planned end of the lock bar.
Now for the fun part, cutting the lock bar out. I threw a cobalt slotting saw in an arbor, colleted it into the mill, and dialed the speed to 90 rpm. I clamped the frame in the vise, making sure the scribed line was parallel with the top of the jaws by the use of the small steel ruler.
I plunge cut the start of the kerf with slow feed and plenty cutting oil. The cut started ahead of the drilled hole, and plunged in until the saw broke through the front of the hole, but not the back edge of the hole.
I ran the table back very slowly, again plenty of oil, until the blade had reached the end of the line on the inside of the frame. I don't know technically what the feed rate was, as it's a manual table, but I probably took five minutes to cut the long side of the lock. Those little blades are spendy and easy to ruin on TI.
Next, I chucked up a HSS 5/16" endmill (have a carbide, but no collet the right size.) I slowly cut the lock relief in, leaving about .045" at the bottom, and ran the mill forward 3/16" or so to provide a bit more flex area for the lock.
I used my DeWalt portaband to cut the end of the lock (the blade is narrower than the bigger saw), then finished cutting the long side in with a ground thin hacksaw blade.
I cleaned up the lock face a little, leaving it square, and checked the fit against the blade, ground a bit more, and stopped when the lock bar would just barely stick against the lock face of the tang. That's where it will stay until I get the blade back from HT.
Overall the design adjustment worked, although the end of the lockbar is definitely too close to the pivot for my taste, and I don't think I'd do it this way again without some real re-configuring of the lock geometry.
Now to bevel the back of the bolster. I took the bolster over to the mill, and used a straightedge to set it in with the back parallel with the jaws. I used a protractor to set the angle vise to 30 degrees. I used the same HSS end mill to slowly cut the dovetail angle with multiple passes.
I set my platen to a similar angle, then try-fit and ground the scale front to match the back of the bolster. I superglue tacked the scale onto the liner with the bolster installed.
I marked out the location for the three scale screws, drilled through the scale with #43 and through the liner with #51, tapped the holes, counterbored the scale, and installed the scale. I shortened the screws by clipping the ends off with them installed in the liner, then grinding flush to the liner surface with 220 grit.
At his point, I ground all the edges flush for a smooth profile.
Time to rough grind the blade. I went at it with a worn out Blaze 50 to do the starter bevel. It took a long time, I could tell already this was tough stuff. I took it down to about .030.
I did myself a favor and threw on a brand new 967F gold belt for the rough hollow with the 12" wheel. Good thing, this stuff is very taxing to grind. It's wear resistant and gummy at the same time, and heats up very fast. Since I was holding the blade in the handle to grind it, I didn't want it to heat up much- I dipped the blade every pass. I still burnt my fingers from time to time, until I got wise and used a push stick. This rough hollow took me over an hour to achieve; normally It would be about ten minutes or less to get to 400 from the pre-bevel.
I finish ground several hardened blades immediately afterward, 52100 and CruForgeV, and even in the un-hardened state the GNiCr40Al4 blade cut slower with the Gator belts. Whew! Here's a gratuitous shot of one of the 52100 hunter blades...
And here is what the folder looks like right now. I've got take a bit of a break right now, waiting for some parts to come in and I have several other knives to build.
Ye Olde Shoppe Dog. Say hi, Whitey. He's a pit-yote.
Thanks for your continued interest, comments are of course welcome, stay tuned!
- Joined
- Apr 16, 2008
- Messages
- 814
:thumbup: Thanks for your detailed presentation. I bought a mill last summer and haven't got it up and running yet, so the milling tips are super useful.
Very envious of your grinds, I can't seem to get that smooth plunge and sweep.
Very envious of your grinds, I can't seem to get that smooth plunge and sweep.
- Joined
- Oct 20, 2008
- Messages
- 5,547
Now, to install the detent ball in the lock bar. I marked the location and punched it. The ball should sit in an area that's continuously covered by the blade when not in the open position. Usually this is pretty close to the front top corner of the lock bar. I'm using a 1/16" 440C detent ball, so I drilled with a #53 bit to allow a press fit into the titanium.

I used a drill press type vise and a block of G10 to press the ball in. The G10 is so the ball doesn't get a flat spot on the top. I pressed it in until it was just a bit over halfway, rising above the surrounding metal by about .025".

With the ball pressed in, I dyed the reverse side of the blade with Dyke, all around the pivot area.

I put the blade back on the frame side, with the pivot and stop pin installed, then closed the blade. This caused the detent ball to scribe a line in the Dykem.
I center punched for a hole just about .020 in front of where the detent scribe line ended. This will place the center of the hole just in front of center of the ball when in the closed position, causing it to not quite fully fall into the hole, providing a more positive holding action. Also, this will hold the lock bar slightly off the blade, to prevent scratching.

I drilled the hole with a 1/16" bit, about 1/16" deep. I deburred and stripped the Dykem.

I reassembled and checked the detent action. It didn't fall in the hole quite as much as I wanted, so I enlarged the detent hole slightly with a larger bit. Checked again, it works just right.
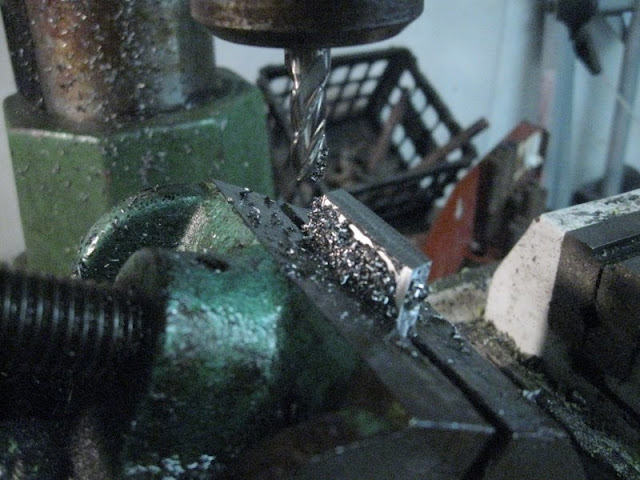
Now, to drill for the thumb stud. I had a four-step turned stud from USA Knifemaker's Supply, so for the pilot I drilled a 1/8" hole as deep as the shoulder on the stud, about .070. I switched bits to a #49 to drill the rest of the way through. Since #49 is a tad too small for a clearance hole for 1-72 screw, and I don't have the correct bit, I used a tapered bit to slightly ream the hole to the correct size for the screw.

I countersunk the backside deep enough for the flathead torx screw to sit flush, and deburred.

I installed the thumb stud. The screw did not need to be shortened. Sweet!

I assembled the knife again, the closed the blade to locate where the relief notch for the stud will be. I marked it with pen.

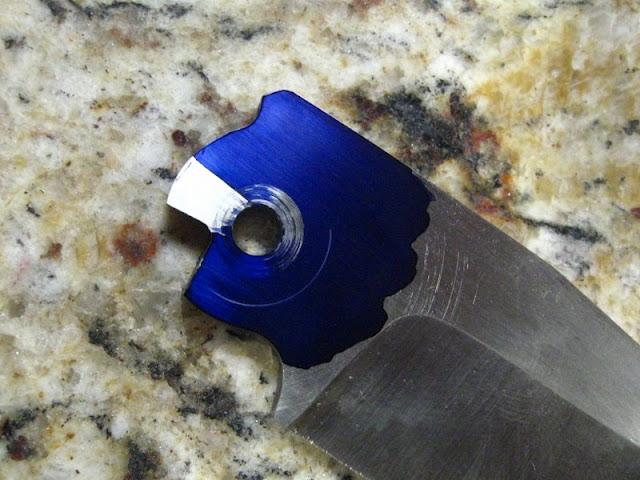
I rough ground the relief in with a 5/8” wheel, at 220 grit.


A progress shot of the knife as it is now.
I sent the blade to Peters Heat Treating this morning. Hopefully I get it back in time to finish this knife before I go to Hawaii for three weeks.
Thanks for reading, as always I welcome comments, will tolerate reasonable heckling, and am open to suggestions. Stay tuned! Observe as well my new profile pic, yes that is my back with anvil-hammer-tongs tat. You don’t have to like it.
I used a drill press type vise and a block of G10 to press the ball in. The G10 is so the ball doesn't get a flat spot on the top. I pressed it in until it was just a bit over halfway, rising above the surrounding metal by about .025".
With the ball pressed in, I dyed the reverse side of the blade with Dyke, all around the pivot area.
I put the blade back on the frame side, with the pivot and stop pin installed, then closed the blade. This caused the detent ball to scribe a line in the Dykem.
I center punched for a hole just about .020 in front of where the detent scribe line ended. This will place the center of the hole just in front of center of the ball when in the closed position, causing it to not quite fully fall into the hole, providing a more positive holding action. Also, this will hold the lock bar slightly off the blade, to prevent scratching.
I drilled the hole with a 1/16" bit, about 1/16" deep. I deburred and stripped the Dykem.
I reassembled and checked the detent action. It didn't fall in the hole quite as much as I wanted, so I enlarged the detent hole slightly with a larger bit. Checked again, it works just right.
Now, to drill for the thumb stud. I had a four-step turned stud from USA Knifemaker's Supply, so for the pilot I drilled a 1/8" hole as deep as the shoulder on the stud, about .070. I switched bits to a #49 to drill the rest of the way through. Since #49 is a tad too small for a clearance hole for 1-72 screw, and I don't have the correct bit, I used a tapered bit to slightly ream the hole to the correct size for the screw.
I countersunk the backside deep enough for the flathead torx screw to sit flush, and deburred.
I installed the thumb stud. The screw did not need to be shortened. Sweet!
I assembled the knife again, the closed the blade to locate where the relief notch for the stud will be. I marked it with pen.
I rough ground the relief in with a 5/8” wheel, at 220 grit.
A progress shot of the knife as it is now.
I sent the blade to Peters Heat Treating this morning. Hopefully I get it back in time to finish this knife before I go to Hawaii for three weeks.
Thanks for reading, as always I welcome comments, will tolerate reasonable heckling, and am open to suggestions. Stay tuned! Observe as well my new profile pic, yes that is my back with anvil-hammer-tongs tat. You don’t have to like it.
- Joined
- Oct 13, 2011
- Messages
- 377
Lol. Loving it Salem. The tat is pretty sweet too.
- Joined
- Sep 27, 2007
- Messages
- 7,680
Really good stuff Salem, I'm enjoying this a lot!! This has given me some ideas about how to do things a bit differently on my next folders.
Thanks for taking the time buddy!:thumbup:
Thanks for taking the time buddy!:thumbup:
- Joined
- Oct 20, 2008
- Messages
- 5,547
Glad you all are enjoying it. Jonny, did you finish that first folder in that thread you started? I don't think I saw it. I'm gonna go look now, can't wait to see some more from you. Your style would really lend itself to liner locks.
I want to see some more folders from Patrice, too. He may be pissed at me for flying in the face of the advice I gave him on a folder thread- don't put the lock so close to the pivot. Then again, Patrice seems too nice of a guy to be easily ticked off. And I'm too obdurate to let my own hypocrisy slow me down...
As I read over what I've written so far, there are things that I'd add or word differently here or there- like, probably the more common method for pressing the detent ball in is to use an arbor press. (I don't have one, it's on the list.) And, carbide end mills would be better than HSS for all of this. (Just got my own mill, still tooling up.) And, after installing the detent ball and trying it out, I used 400 paper to soften the bottom edge of the lock on the blade tang to smooth the ride over the ball.
- Joined
- Sep 27, 2007
- Messages
- 7,680
Hey buddy,
Yep, I finished the first one but the detent hole was off a bit and messed up the retention. After looking at your WIP I'm thinking of going back and expanding the detent receiver hole just a bit to see if I can get solid retention when closed.
Folders are no joke! I'm sure once you get into the mode and are doing it all the time things get "a bit" easier, but there is a steep learning curve going from fixed to folders. That what makes it fun though.
- Joined
- Oct 20, 2008
- Messages
- 5,547
That may well work for you, Jon. I don't know if it's frowned on for mechanical reasons by expert folder makers, it's just something I've found that can work if your location is a bit too far at first. I know I'm picking something up, however slowly, if I'm beginning to know how to respond well to a mistake.
Folders are no joke, indeed. And you're right, for a guy coming from fixed blades for years, that's why they are a refreshing challenge. Also, it's easier with folders to carry your work anywhere you go, to show people.
Eric! Hey, thanks for dropping in. Nice to see you.
Folders are no joke, indeed. And you're right, for a guy coming from fixed blades for years, that's why they are a refreshing challenge. Also, it's easier with folders to carry your work anywhere you go, to show people.
Eric! Hey, thanks for dropping in. Nice to see you.
Stacy E. Apelt - Bladesmith
ilmarinen - MODERATOR
Moderator
Knifemaker / Craftsman / Service Provider
- Joined
- Aug 20, 2004
- Messages
- 38,586
Glad to see you are having the same results with sanding this stuff as I had. It is tough beyond belief. Wait until you get it back from age hardening
- Joined
- Oct 20, 2008
- Messages
- 5,547
Oh brother. I can hardly wait. I surmised as much, that's why I drilled the detent ball hole before HT. I think this blade is getting a belt finish... I'll bet it SUCKS to do anything with in the hardened state. Other than use as a cutting tool.
- Joined
- Oct 13, 2011
- Messages
- 377
If its that tough I would definitely not want to be the one putting the final sharpening on it.
- Joined
- Oct 2, 2010
- Messages
- 221
its very interesting result. i had many feedbacks that saying the alloy is extramly tough. some say it feels tougher than A2. i used 55 x 10 x 7mm size samples did some unnotched impact toughness test, and giving result is 36j/cm2. acctrully a little bit lower than A2. its a decent toughness for stainless alloy at hrc 57, but definatly not outstanding. however from the feedback and my own using experience i found the alloy perform better when under high frequent periodic impact. the very high elasitic strain rating capacity allow the alloy aborsb most of impact through elastic deformation. i am not sure if i using the correct english words, but similar mechanism happens there. this might give the user the feeling that the alloy is tougher than it should be. however once the strain rating under the impact is greater than the alloy can handle, very little plascity the alloy has. Conan's father told him the steel must bend before break. well thats not fit for this alloy, it will flex to take the impact as much as possible. but once pass the limit, it will break with little bending. thats the biggest con for this alloy as knife blade since user who are not formilar with it might get hurt.
Last edited:
- Joined
- Oct 20, 2008
- Messages
- 5,547
Thanks for the dizzying as always metallurgical background, Hammer. How far do you think a blade such as this would deflect before snapping? I don't know if toughness is exactly the right word for what I experienced grinding it, perhaps "abrasion resistant" comes closer to the mark.
I don't know how threads start another page- obviously when they get long enough, but is it the software, or a mod that comes along and does it? I keep wishing this one would go to a third page, so my dialup connection doesn't have to load it when I check replies...
I don't know how threads start another page- obviously when they get long enough, but is it the software, or a mod that comes along and does it? I keep wishing this one would go to a third page, so my dialup connection doesn't have to load it when I check replies...
- Joined
- Dec 22, 2009
- Messages
- 503
Looking damn fine Salem!
Stacy E. Apelt - Bladesmith
ilmarinen - MODERATOR
Moderator
Knifemaker / Craftsman / Service Provider
- Joined
- Aug 20, 2004
- Messages
- 38,586
The pages display 20 posts per page, AFAIK.
The next post should be page 3.
On a paglike this one, with lots of photos, the bandwidth of the page can be very large, so dial-up connections will be slower than a page with just some short text posts.
The next post should be page 3.
On a paglike this one, with lots of photos, the bandwidth of the page can be very large, so dial-up connections will be slower than a page with just some short text posts.