-
The BladeForums.com 2024 Traditional Knife is available! Price is $250 ea (shipped within CONUS).
Order here: https://www.bladeforums.com/help/2024-traditional/
You are using an out of date browser. It may not display this or other websites correctly.
You should upgrade or use an alternative browser.
You should upgrade or use an alternative browser.
Virtual BBQ WIP. GNiCr40Al4 frame lock folder.
- Thread starter Salem Straub
- Start date
- Joined
- Feb 7, 2006
- Messages
- 1,327
Fantastic work Salem, and a great WIP. Really happy to see the progression on this one.
- Joined
- Oct 20, 2008
- Messages
- 5,547
Hey Ryan, Mike, thanks. Good of you to stop in and comment. And now there's a page three! Great. I'm really hoping to get that blade back in time, otherwise this WIP will be on hiatus until March 4th or so.
- Joined
- Oct 20, 2008
- Messages
- 5,547
With the blade out to Peters, I turned to the handle. Next step: the lock over-travel stop. I like to use a thumb disc for this, it's just convenient and even looks cool IMO. If I had a lathe I might turn something for this, but thumb discs are cheap and easy to get.
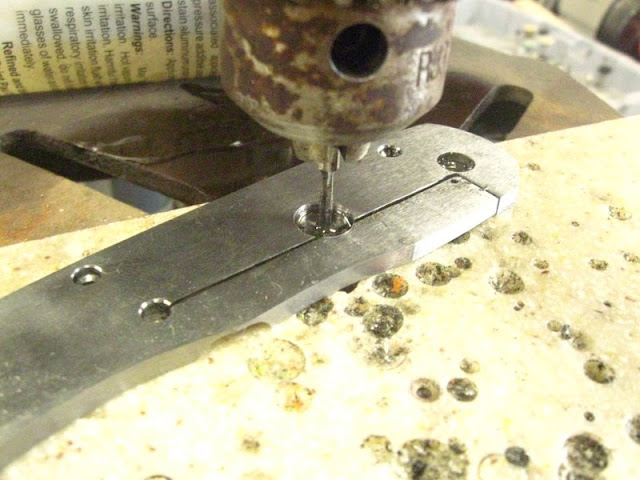
The disc is 3/8" diameter with a counter sunk clearance hole for an included flathead torx 2-56 screw. So, I chucked up a 3/8" end mill first, to mill/drill a recess for the disc to sit in. I used a 3-jaw chuck rather than a collet for the end mill. I did this since I’m using a round column mill- the quill only has so much travel for drilling, and the head when adjusted separately does not hold center on the table. The clearance necessary to change from a collet to a chuck with R8 shank for the center drilling would necessitate raising the head, and losing my center. So, it’s chuck all the way.
I milled the 3/8” pocket for the disc, checking the fit occasionally until the disc sat just a hair above flush with the surrounding TI. I un-chucked the HSS end mill and chucked up a spotting drill, for accuracy in drilling the center of the milled hole. I drilled with the 1/16” HSS spotting bit until the c-sink started cutting.

I switched to a #49 bit, drilled through. I c-sunk the top of the hole a bit more to improve tappability.

I took the frame over the hand tapper, used lots of tapping lube and patience to tap 2-56 threads into the center hole.
I installed the disc and screw, clipped the screw end off, and ground flush to the inside of the frame. Fits good.


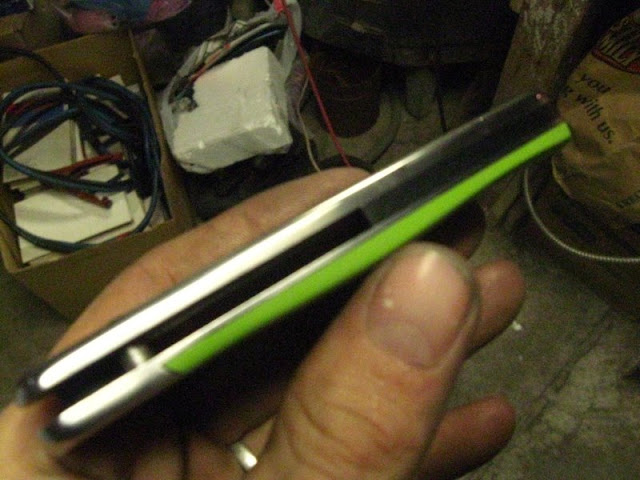
Now, to shape and sand the handle. I ground the edges and contoured the scale with a gold 967 roughing belt first, then moved to 220, then 400 j-flex belts to refine contours.
220 j-flex.

A dirty 400 belt finish.

Sides at dirty 400. The green G10 stays dirty until the end.


I started hand sanding at 400, with Redline paper on an eraser backer. Then I moved to 600 on the same backer. At 600 hand sanded.


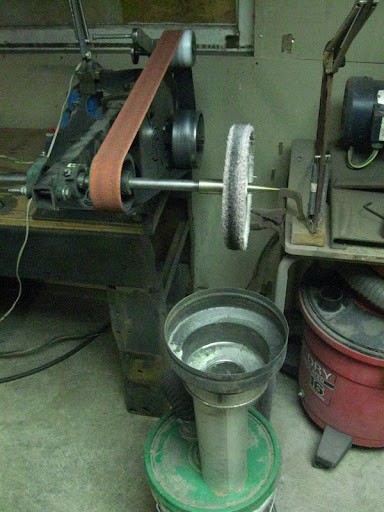
Next, I went to my buffer- or rather, the buffing tooling arm I recently built for my 3hp variable grinder. This thing works great, it has a Baldor quick-change cone arbor on it, very convenient. I hit everything lightly with pink scratchless rouge. The scale was taken off and buffed, due to cross-contamination coloring of the G10.
Sorry about the fuzz pics.

I’m off to Hawaii for three weeks, tomorrow. I’m having the blade sent to me there, so I can assemble and use it. I’ll finish it totally, install the pocket clip and finish-finish grind the blade etc. when I get home, and post finish pics and some cut/sharpening feedback on the alloy.
See you all in three weeks. Thanks for reading.
The disc is 3/8" diameter with a counter sunk clearance hole for an included flathead torx 2-56 screw. So, I chucked up a 3/8" end mill first, to mill/drill a recess for the disc to sit in. I used a 3-jaw chuck rather than a collet for the end mill. I did this since I’m using a round column mill- the quill only has so much travel for drilling, and the head when adjusted separately does not hold center on the table. The clearance necessary to change from a collet to a chuck with R8 shank for the center drilling would necessitate raising the head, and losing my center. So, it’s chuck all the way.
I milled the 3/8” pocket for the disc, checking the fit occasionally until the disc sat just a hair above flush with the surrounding TI. I un-chucked the HSS end mill and chucked up a spotting drill, for accuracy in drilling the center of the milled hole. I drilled with the 1/16” HSS spotting bit until the c-sink started cutting.
I switched to a #49 bit, drilled through. I c-sunk the top of the hole a bit more to improve tappability.
I took the frame over the hand tapper, used lots of tapping lube and patience to tap 2-56 threads into the center hole.
I installed the disc and screw, clipped the screw end off, and ground flush to the inside of the frame. Fits good.
Now, to shape and sand the handle. I ground the edges and contoured the scale with a gold 967 roughing belt first, then moved to 220, then 400 j-flex belts to refine contours.
220 j-flex.
A dirty 400 belt finish.
Sides at dirty 400. The green G10 stays dirty until the end.
I started hand sanding at 400, with Redline paper on an eraser backer. Then I moved to 600 on the same backer. At 600 hand sanded.
Next, I went to my buffer- or rather, the buffing tooling arm I recently built for my 3hp variable grinder. This thing works great, it has a Baldor quick-change cone arbor on it, very convenient. I hit everything lightly with pink scratchless rouge. The scale was taken off and buffed, due to cross-contamination coloring of the G10.
Sorry about the fuzz pics.
I’m off to Hawaii for three weeks, tomorrow. I’m having the blade sent to me there, so I can assemble and use it. I’ll finish it totally, install the pocket clip and finish-finish grind the blade etc. when I get home, and post finish pics and some cut/sharpening feedback on the alloy.
See you all in three weeks. Thanks for reading.
Last edited:
- Joined
- Sep 27, 2007
- Messages
- 7,680
Thanks for another great update Salem! Have an awesome trip:thumbup:
- Joined
- Oct 20, 2008
- Messages
- 5,547
Okay, I'm back. Hawaii was awesome, by the way. I acquired a 400 yr old nihonto (hand forged Japanese katana) on the trip!
I had the blade sent back to me from Peters HT to Oahu. I received it in Kaneohe, then took it and the handle over to Ken Onion's place for some advice and feedback, and to catch up with Ken.
He was generous with his time as always and gave me a lot of good tips on lock geometry and execution, lock face angles and methods of cutting them, as well as a ton of stuff that went right over my head (as usual- he's light years ahead of me with knifemaking.)
Back to the present. The blade came back in good shape from Peters, a little tarnished but the color came right off. They included a note saying it had tested to 58 Hrc. I was really happy with that, as that was about the highest I expected and it could easily have been 57.

I lapped it on some 220 paper to clean the flats, and went over the bevels with Gator A65 on the 12" wheel.
I wrapped some 600 sandpaper around a drill bit and polished the stop pin contact area on the tang, to establish it as a register to final shape the lock to.
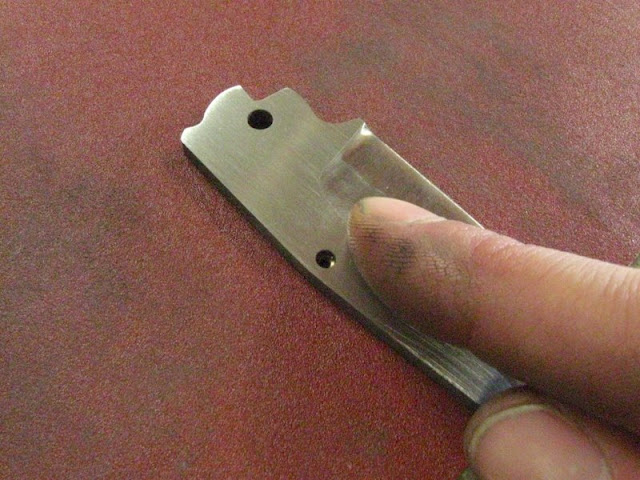
I put it all back together and checked the lockup. It needed a little off the lock face still, which was good- you want to have a little adjustment here after HT. I sanded the lock face on my 1x42 grinder, table set to 7 degrees, and kept checking the fit until it looked like this.

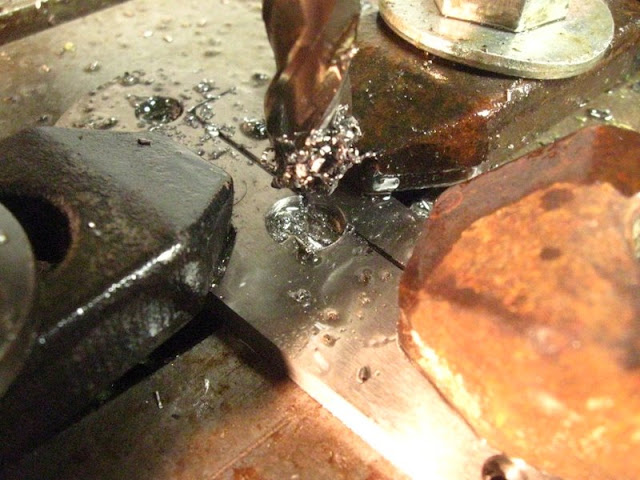
Pocket clip time. I had a clip blank from USA Knifemaker, and set out to fit it to this handle. First I cut the length down a bit and rounded the end, then I used the vise, a small hammer, and G10 punch to shape a couple bends into it.

I used a cross peen hammer over a gap in the vise jaws to recurve the tip. I smoothed the edges and broke the inside edges off the clip with 220 slack belt, to reduce pocket wear. I drilled two #43 holes for the mounting screws.

I tacked the clip onto the handle where I wanted it, with super glue. I drilled #49 holes in the frame.

I counter bored the holes from the back side with #43, halfway in. That way I'm only threading about half the depth, with clearance the rest of the way. Still strong, and less possibility of snapping a tap off in it.
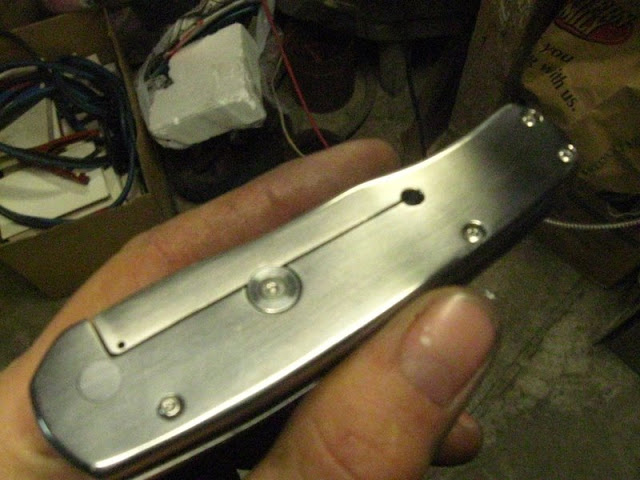
I lightly c-sunk the top edges of the #49 holes in the frame, then tapped them to 2-56. I installed the clip with screws, clipped the extra length off the screws, and ground them flush with 220. The placement came out how I wanted- two mounting screws echoing the backspacer screws in placement, and the rounded end of the clip sitting centered in the overtravel stop.


That was the last of the shaping and fitting operations. It walks and talks well. Now it's all finishing, mostly on the blade and clip. The next post should be the last. It will include a video clip I took today of cycling the knife a few times. Stay tuned! Thanks for watching.
I had the blade sent back to me from Peters HT to Oahu. I received it in Kaneohe, then took it and the handle over to Ken Onion's place for some advice and feedback, and to catch up with Ken.
He was generous with his time as always and gave me a lot of good tips on lock geometry and execution, lock face angles and methods of cutting them, as well as a ton of stuff that went right over my head (as usual- he's light years ahead of me with knifemaking.)
Back to the present. The blade came back in good shape from Peters, a little tarnished but the color came right off. They included a note saying it had tested to 58 Hrc. I was really happy with that, as that was about the highest I expected and it could easily have been 57.
I lapped it on some 220 paper to clean the flats, and went over the bevels with Gator A65 on the 12" wheel.
I wrapped some 600 sandpaper around a drill bit and polished the stop pin contact area on the tang, to establish it as a register to final shape the lock to.
I put it all back together and checked the lockup. It needed a little off the lock face still, which was good- you want to have a little adjustment here after HT. I sanded the lock face on my 1x42 grinder, table set to 7 degrees, and kept checking the fit until it looked like this.
Pocket clip time. I had a clip blank from USA Knifemaker, and set out to fit it to this handle. First I cut the length down a bit and rounded the end, then I used the vise, a small hammer, and G10 punch to shape a couple bends into it.
I used a cross peen hammer over a gap in the vise jaws to recurve the tip. I smoothed the edges and broke the inside edges off the clip with 220 slack belt, to reduce pocket wear. I drilled two #43 holes for the mounting screws.
I tacked the clip onto the handle where I wanted it, with super glue. I drilled #49 holes in the frame.
I counter bored the holes from the back side with #43, halfway in. That way I'm only threading about half the depth, with clearance the rest of the way. Still strong, and less possibility of snapping a tap off in it.
I lightly c-sunk the top edges of the #49 holes in the frame, then tapped them to 2-56. I installed the clip with screws, clipped the extra length off the screws, and ground them flush with 220. The placement came out how I wanted- two mounting screws echoing the backspacer screws in placement, and the rounded end of the clip sitting centered in the overtravel stop.
That was the last of the shaping and fitting operations. It walks and talks well. Now it's all finishing, mostly on the blade and clip. The next post should be the last. It will include a video clip I took today of cycling the knife a few times. Stay tuned! Thanks for watching.
Last edited:
- Joined
- Jan 9, 2011
- Messages
- 16,489
Awesome work in progress and knife! Thanks for sharing!
- Joined
- Oct 13, 2011
- Messages
- 377
Salem, thank you immensely for this. It has been very enjoyable to watch the progress on this folder. Your talent is great. Maybe someday I'll get close to your level. I doubt it, but maybe.
- Joined
- Feb 7, 2006
- Messages
- 1,327
Very nice Salem!!! Man...makes me want one lol
Not only do you love every minute, you make it look too simplified. The one thing I always love about your WIPs in general is the intuitiveness that comes jumping out at the reader. You feel your way through the work, and it translates itself into the designs. Simply marvelous, inspiring, and another benchmark--thank you as always, Salem.
Great WIP, thank you. I just ordered the 410 material for liners on my first folder, I have all the other hardware and am going to use some cpm154 to make the blade. I think I have my template and paper model set and it's guides like this that are helping me refine it and see potential problems with my design or areas I need to plan better.
- Joined
- Oct 20, 2008
- Messages
- 5,547
Thanks for the comments, guys.
Daniel, I watched a couple of your shop vids in Customs the other day. Right on, good stuff.
Calvin, I got some old sawmill blades the other day, contemplated making something out of them and was reminded of your work... you're progressing well, by now you'd look at some of my early knives with a disdainful eye.
Mike, now you can make one just like it if you want. This is the manual, you can do it!
Ed, what a thoughtful and nice thing to say. I do often feel my way through a knife, although sometimes it's like being in the dark without a flashlight. You are welcome for the WIP, it's my pleasure.
Remy, that's great. I can't wait to see your folder. Cpm154 is a great steel, what are you using for scales? Love your sig, by the way.
- Joined
- Oct 20, 2008
- Messages
- 5,547
Here's a short vid of a couple knife cycles. Enjoy!
[video=youtube;4SHBMaMIZn0]http://www.youtube.com/watch?v=4SHBMaMIZn0[/video]
I sharpened it up, had little trouble getting a shaving edge. Roughed in a burr at 60 grit, refined burr with 600 Gator, paower stropped on my 1x42 with leather belt and green compound.
[video=youtube;4SHBMaMIZn0]http://www.youtube.com/watch?v=4SHBMaMIZn0[/video]
I sharpened it up, had little trouble getting a shaving edge. Roughed in a burr at 60 grit, refined burr with 600 Gator, paower stropped on my 1x42 with leather belt and green compound.
Now all it needs is a spoiler and some flame decals so we can watch it go tear doughnuts around the room--the folder's turned out slicker than greased lightening. You see the phrase "High Speed Cutlery" thrown around pretty frequently, often in kitchen knives, but this is a pure pocket hotrod.
If you want to say that a Gustavo Cecchini is a Ferarri, this is a Corvette. If you'd decided to add the crossed flags as a handle detail, it'd not have surprised me.
Speaking of GTC, I hope you do an upgraded version some day with some of his racebearings--this folder doesn't need them though, if that blade swung open any smoother, if I were the owner, I'd be afraid it'd just fly out of my hand. I still feel I'm a long way away from attempting a folder, but you can believe, when I do, this WIP will ride sidesaddle along in the back of my mind.
- Joined
- Sep 27, 2007
- Messages
- 7,680
What an awesome end result Salem! Really nice.
- Joined
- Oct 20, 2008
- Messages
- 5,547
Thanks guys. Ed, I'm definitely researching the best ways to put together an IKBS type of knife, when I get tooled up for it I will surely give it a shot. You can pretty much think Ken's IKBS knives open. So smooth.
Nebulae, I have been carrying this around for a few days and and using it like a pocket knife- so far just fine. But in a day or two I'm going to throw some serious whittling and cardboard cutting at it and see how the edge holds up. I'll post results, maybe in a new thread as well.
Nebulae, I have been carrying this around for a few days and and using it like a pocket knife- so far just fine. But in a day or two I'm going to throw some serious whittling and cardboard cutting at it and see how the edge holds up. I'll post results, maybe in a new thread as well.
- Joined
- Jan 9, 2011
- Messages
- 16,489
That is just awesome! Nice video!
- Joined
- Oct 20, 2008
- Messages
- 5,547
Hey JTR357, you're welcome. Glad you enjoyed it.
Thanks Daniel. I hate my voice in that video- you know, when you record your voice it plays back a lot different than you hear it when you speak! Ah well.
Thanks Daniel. I hate my voice in that video- you know, when you record your voice it plays back a lot different than you hear it when you speak! Ah well.