Whacha Been Up To......

Thanks for that write up Gary vey nice work!

Been busy this week since the rodeo. Ground 17 blades for a new batch of knives and still have 3 more to do. Have 2 sheets of 26C3 that I'm cutting up, have 42 blades there and on the leather front finshed these off"

crpXsy8.jpg


This is an extra long scabbard made for a specific rifle, fits 26" barrels whereas the standard scabbard I make fits up to 20" barrels.

zRTKO7F.jpg


Tooled with initials and Carlos Border stamping.

IEAuUyV.jpg


Ya know how things kinda go in groups? I hadn't made a belt and matching sheath in a while. So of course I had 2 sets to do.

First was a roughout belt with Carlos Border stamping and a matching pancake sheath for a Benchmade knife:

KLytik1.jpg


8Mq4IQo.jpg


oQ8M2BH.jpg


This is only the second or third roughout belt I've ever made. Kinda cool, might have to make me one.

Next up was a black basket stamped belt with matching pancake sheath. This was for a Randall dagger. Leather used here was drum dyed Herman Oak. I won't dye leather pretty much and using the drum dyed veg tan allows ya to tool normally and have the color without some of the problems of dyeing, such as color transfer etc.

Qwawys0.jpg


When I make a belt for a specific handmade buckle like this, I do require the customer to send me the buckle as lots of times we need to adapt the belt to the buckle some. I've just learned the hard way on this deal. This belt needed to be skived quite a bit to fit into the loop of this buckle and needed the tip sanded a bit more than normal.

With the Randall sheath:

atPd7dn.jpg


6mk24Ms.jpg


p7fp9iF.jpg


Also as part of the same order the customer had me make another sheath for this knife to match a previous belt I had made him.

ET5Upgb.jpg


YQ9uBQX.jpg

You sure do excellent work
 
Some nice work guys and Dave, looks like a good setup there too.

Well, here's a TIP folks, when you go to grab your stitching prongs to set the stitch spacing, BE SURE TO READ the number on the tool ;) 
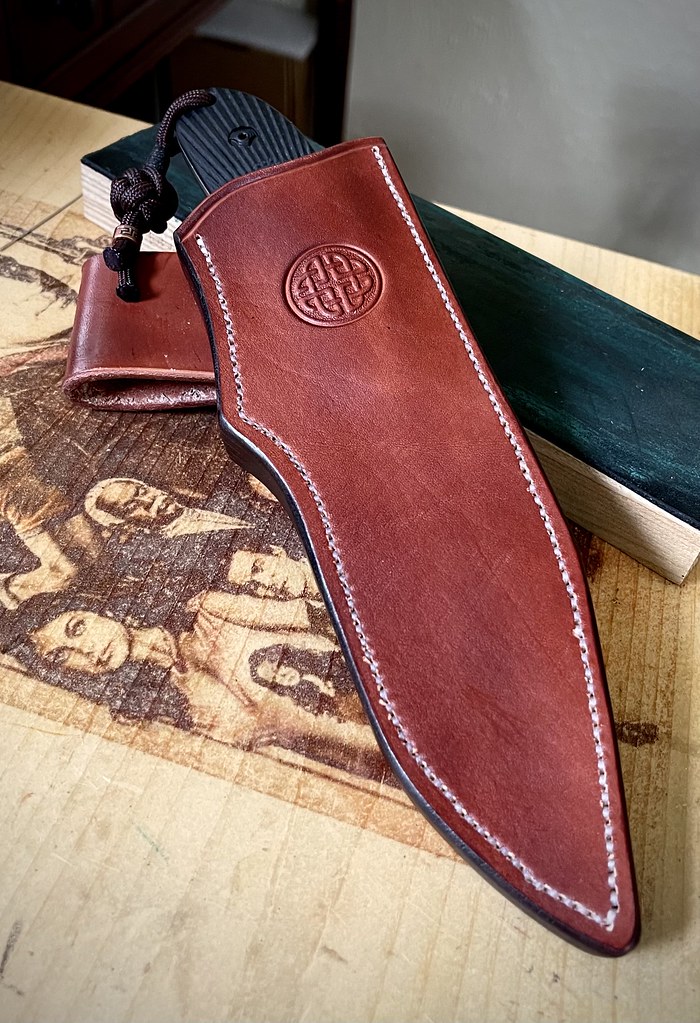
I recently picked up a couple sets to give me some more options as I started doing the two needle sewing thing. I have this Ritter knife made by Hogue and while the knife is nice, the sheath is one big compromise, trying to please everyone and missing the purpose, my opinion of course, but if you unsnap the strap, it gets bouncy and that's a dangerous condition. So I got some thicker leather in, as I don't take in fixed blade sheaths, just something I am not keen on doing, got some Weaver 8/9 oz leather, very nice. And then proceeded to figure out a pattern I wanted for it, I was going to do a wrap around pouch but ended up doing this one instead. I layered the welt with the main welt in the center and a tapered welt above and below it to make it centered, worked well but as you can see, it be thick. I could have wet molded around the knife so I wouldn't have needed such welts but didn't want to make one like that, go figure ;)

So off I go, making all the pieces and getting them glued up and the time came to mark the stitching holes I figured I'd give the 4mm prongs a whirl. I reached for the boxes and didn't realize that they both have the same picture on the front, both indicating 4mm prong stitching irons....didn't realize until I went and hammered in the first set of holes and thought, hmmm tighter than I expected, shrugged and hammered in a few more and then seeing the long string of TIGHTLY spaced holes my pea brain decided to look at the stitching iron...oooops it's 3mm....duh so...all that work and time, had to keep going with them. I thought well maybe I can stitch every other hole? but didn't sit right with me so a longish night of hand stitching. And lemme tell you a mighty long length of thread!!! I was getting nervous as I rounded the tip and headed up the other side, I'd have hated to run out of thread but ended up with about a foot of thread when all was said and done...whew !!! that was close.

Here's the box of the stitching irons;

Untitled by GaryWGraley, on Flickr

This is the knife, longish guard extends out, blade humps out past the handle spine, everything to make my day ;) the guard is good though as I like setting the stop inside to catch the guard, but the spine higher than the handle means you need to leave the opening wide enough to accept the knife.

Untitled by GaryWGraley, on Flickr

Untitled by GaryWGraley, on Flickr

Untitled by GaryWGraley, on Flickr


I like using a copper rivet swivel belt loop on longer fixed blades, allows you to angle the sheath up when you go to sit down and still has strength so when you go to draw the knife it doesn't buckle like some ring swivels can, this is a good way to carry a large knife. Inside I laid down a layer of thin pig skin to cover the head of the copper rivet but it was sunk into the leather pretty good anyways. I use a ball peen hammer and use the peen portion and strike that with my mallet to make a concave area for the head to sit down into, this also strengthens that area, as some will try and cut out leather to make room, but I don't like weakening an area that I'll rely on to hold the knife.
I glue the belt loop together first, and then punch in the hole that is very tight to the copper rivet diameter, then I put some mink oil paste between the belt loop and the back of the sheath to provide some smoother rotation, after a few months of wearing it will swing a little more as right now it is quite snug, which I prefer anyways.

Untitled by GaryWGraley, on Flickr

I ended up having to drill out the holes, I hate drilled holes but at 3mm spacing I couldn't get clearance for the needles and thread and as you can see the welt is pretty thick, 3/4" worth at the top.

Untitled by GaryWGraley, on Flickr

while I really don't like the stitching on this, it ain't going anywhere ;) !!

Untitled by GaryWGraley, on Flickr

Untitled by GaryWGraley, on Flickr

So...dats dat, I like it a lot better than the sheath it came with. And with the wider opening of the sheath, it's easier to return the knife back without seeing it, I just pinch down around the tip of the blade, feel for the opening and there it is.

G2
I think that turned out great. Looks very nice.

Jon
 
Thanks Jon, it is far nicer than the original sheath in actual carry, works very well and I think more folks should try the copper rivet swivel belt loop, it is very good way to carry a larger knife.

this is a Cold Steel knife that I did a cord wrap on the handle and added the swivel belt loop to it to make it carry better.


G2
 
Couple of Rangeflap Holsters shipping out today. Always intersts me how things seem to go in groups. Not only two Rangeflap holsters, but two with the same tooling. Two with painted initials and even the first initial is the same:

g9Mej8M.jpg


RTHKGgd.jpg


gCJGod0.jpg


iSmcWky.jpg


8E9HEef.jpg
 
Excellent leather work in this thread! Love it!!

A few projects I have finished up this week.
Top belt/pocket sheath is for 3.5”-4” bladed fixed (not the beautiful Bailey shown.)
EA505666-58F9-4F04-AC02-5B769246203C.jpeg650434F1-4178-4F62-8C50-BE5729A4F913.jpeg9AE8614A-7988-4EEC-899C-64682EC3352B.jpeg013D2A83-6D6B-44D5-9DED-C5DFC196919C.jpegFF84C7D4-729C-4A59-96D0-4E0A2F085E84.jpeg
5B44237F-91EF-4C22-852B-FA91010C2EC7.jpeg
This Canuck is in the game and absolutely loving it!! Shout out to duramax duramax Horsewright Horsewright Gary W. Graley Gary W. Graley for giving me tips here and there. :)

kobold kobold Nice wet forming. I like the looks of those. :)
 
Last edited:
Excellent leather work in this thread! Love it!!

A few projects I have finished up this week.
Top belt/pocket sheath is for 3.5”-4” bladed fixed (not the beautiful Bailey shown.)
View attachment 1634095View attachment 1634100View attachment 1634097View attachment 1634098View attachment 1634099
View attachment 1634107
This Canuck is in the game and absolutely loving it!! Shout out to duramax duramax Horsewright Horsewright Gary W. Graley Gary W. Graley for giving me tips here and there. :)

kobold kobold Nice wet forming. I like the looks of those. :)

Looking good !!! Hey anytime always happy to help !!
 
I got her done! My back will be out for a few days. Just put another layer of wax on the top.

View attachment 1634005View attachment 1634006
That looks great! Time to cover it in stuff!
Really like that one for sure!

Excellent leather work in this thread! Love it!!

A few projects I have finished up this week.
Top belt/pocket sheath is for 3.5”-4” bladed fixed (not the beautiful Bailey shown.)
View attachment 1634095View attachment 1634100View attachment 1634097View attachment 1634098View attachment 1634099
View attachment 1634107
This Canuck is in the game and absolutely loving it!! Shout out to duramax duramax Horsewright Horsewright Gary W. Graley Gary W. Graley for giving me tips here and there. :)

kobold kobold Nice wet forming. I like the looks of those. :)
Very nice work!
 
Looking good !!! Hey anytime always happy to help !!

That looks great! Time to cover it in stuff!

Really like that one for sure!


Very nice work!
Thank you for the kind words, Dave and Bill. I strive to do the kind of work you both do. Your workmanship is second to none. ☺️🙏
 
I have got back on my Carothers UF Bald Eagle sheath. I trimmed around the eye, and darkened the back of the inside of his beak with some watered down black paint. I think that I need to go back over the iris of the eye some more with some more yellow. I also don't know what kind of stamping that I want to do around him. What do yall think?

UF-SOB-12a.jpg
 
Back
Top