A really good low grit finish will show the scratches too, because they won't line up with the ones done deliberately. Something like a stonewashed finish is probably the way to go to hide scratches.
I suppose I'm just not interested in making something just because it's durable. So I'll do the finish I think works best. Plastic handles would be more durable than the wood I use, but I like the wood
If a makers want to be a tribal maker master that style, if he want to be a 50 grit final finish maker then master that.
Not wanting to make fine fit and finish knives is not an excuse for not mastering what you do want to make.
Hi Alex and Adam (and others). There is a phrase I have (unfortunately all too often) used in discussions in my professional career. That phrase is "we are in violent agreement" (saying the same thing, but arguing how it is being said - happens surprisingly often :-( ). I think that is the case here. I am not advocating just making something durable (and likely ugly). Make (and buy) what you want to and what appeals to you - I think where we differ is that I am saying, once bought, use the thing ... I would go so far as to potentially say intentionally make those scratches (an exaggeration - but see next couple sentences). Take
reasonable care of it, but dont necessarily exert a huge amount of energy fighting a battle to keep it pristine. I posted the photos of my older knives to try to make a point that while not pristine, they are still mostly shiny and doing quite well and still going strong. Sure they have scratches and some discoloration from acidic foods, but every single one of those blemishes are a reminder of the way they were used with my family, and the life I shared with those people. Life is just too short, and relationships with people too precious, to get wrapped around the axle over what is, in the scheme of things, small stuff like that (if you have not, it might be worth reading Erma Bombeck's "if I could live my life over" column piece). Something of a corollary to that is, do I personally want to bring a knife to a mirror finish if I know that downstream I have no intention of maintaining that mirror finish. My personal answer is "no" (but that is not saying I will settle for junk - again, see below) ... but this is life philosophy, and people reasonably differ in their own answer. More where we agree - those older knives of mine, for the most part, have polyoxymethylene (POM) handles. There is a reason (same as yours!) that I have a stock of Cocobolo, Kingwood, Wenge, Spalted Maple, and Cherry Burl (picking that up on monday

) waiting to be put on tangs when my technique makes it worthwhile

Adam - I also agree with your comment about mastering the knives you want to make - I suspect for me, that will land in the 220 grit followed by scotch bright area. As I said above, that does not mean I will settle for just throwing scratched and badly fit knives around. As an example (and here is another posting of one of my work products), Below is the (I guess fourth) knife I have completed - but this is actually the first knife I designed, profiled, and ground secondary bevel on 18 years ago. I actually hesitate to post this, because there is a LOT about this knife that I am not satisfied with (but I guess I am trying to assure you that I have no intention for settling for junk in the long run). This knife was and still is intended to be both an experiment with blade design, and a "learning vehicle" to develop technique (i.e. not necessarily to produce a really nice looking knife in the end...). I do a lot of chinese cooking (lots of veggies), which means thin blade for easy slicing, and wider blade for "scooping" cut food from board to prep bowl (O1 steel, 0.06" stock thickness, walnut handles, corby fasteners):
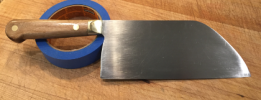
The width of the blade is customized to my hand to
just allow my knuckles to clear when scooping, the curvature at the end is intended to reduce weight (and improve blade center of gravity) versus the traditional rectangular chinese cleaver. things I intended to use the making process to learn skills on are: soldered bolster, using corby bolts, bevel grinding skills, and general blade finish, and handle finish. Used Tru-Oil on the handle - I really like it over the Tung oil I have been using! I will NOT settle for the kind of workmanship achieved on this blade. Things I do not like and will not settle on are:
Blade finish. Because of the thin steel there is significant warpage/curvature from spine to edge, making it virtually impossible to really get in there with finer grits on the grinder to remove deeper scratches:
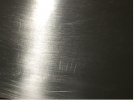
I actaully did a lot of hand sanding to get the blade even to this point - but because of the curvature of the entire blade, a (flat) backing block did not help at all. this kind of appearance is not acceptable to me. My only hope was to get in there with my thumb and fingers directly pressing directly and that was - painful. Maybe some day I will invest the time to really clean this up, but as Walter Sorrels said, "dont polish a turd". (the horizontal marks are the result of my attempt just to see what effect lengthwise straight pulls will produce, but not an attempt to get even these really good...). the source of this problem I think was mostly thin stock (and likely not the best quality source also). Lesson learned, use thicker stock (maybe if I want to drive to a final thinner blade, HT on the thicker stock, then surface grind to a chosen thinner thickness (JT - are your ears burning???).
Soldered bolsters:
Since I read Boyes book, I always had it in my mind that I would either solder or braze bolsters. Brazing is out for several reasons, so I at least had to try soldering. Despite best attempts to get things lined up and clamped down tight, something shifted, and one side of the bolsters lined up well:
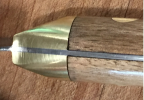
but the other did not (this is not acceptable to me, and neither are the underlying scratches on the bolster that I did not catch while grinding to finer grits :-( ):
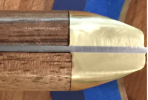
also, cleaning up the solder in front of and behind the blade is indeed extremely difficult to do without damaging the finish on the blade. So .... pins and epoxy/JB Weld and bolsers trued up prior to attachment it is for me in the future! (besides, with that approach you can use mosaic pins

). Also, Instead of attaching the handles, then drilling, then attaching the opposite side handle, I tried to get all the dimensions (holes, front fit to bolster, etc) all done prior to attachment - things clearly did not fit correctly (even with forward pressure applied), and hence the small but visible gap between the handle and bolster (again, not acceptable to me - and I have done better than this on previous builds with pins). Lesson learned. From now on I attach handles first then drill holes!
Finally (picture not shown), there were (just a couple) residual scratches on the handles that I either missed, or just did not show up until I started putting the Tru-oil on. Again, not acceptable to me - and so much easier to sand out than on the metal :-( .
Anyway, kind of long, but an attempt to try to assure you that I am not advocating settling for junky looking product but rather, call it a "targeted level of fit/finish refinement"

Historically I have a habit of taking targeted (but independent) stabs at developing technique, then all of a sudden pulling it all together. Hopefully soon I will have a knife I will be proud to post here - in the meantime here is this "learning effort" for the record. Hopefully someone else on the learning curve will be able to benefit from this.....


