-
The BladeForums.com 2024 Traditional Knife is available! Price is $250 ea (shipped within CONUS).
Order here: https://www.bladeforums.com/help/2024-traditional/
You are using an out of date browser. It may not display this or other websites correctly.
You should upgrade or use an alternative browser.
You should upgrade or use an alternative browser.
(WiP) A kukri's "working edges"
- Thread starter killa_concept
- Start date
- Joined
- May 19, 2009
- Messages
- 1,161
killa,
Is the green strop in the pic permanently mounted to your rig, and if so, since it sits so low how do you get to the entire blade? Thanks!
Oh no - the "rig" is just an old wine crate and block of wood that I use to elevate things to about chest level while sitting on the floor. It just serves as a simple way of storing all my sharpening gear - you can see a small clear tuperware under the "rig" containing the rest of my stuff. As for the strop, it's just a double sided one I made: two lengths of vegetable tanned leather glued to a piece of wood, one side with chromium oxide, the other side left bare. I figured that since most strops ran $25-30 I could simply make one myself for $8ish (about what 52" of vegetable tanned leather costs). Also, most strops came with green honing compound which is not 100% chromium oxide - even things like lee valley .5micron chrom oxide honing compound actually has other, coarser abrasives like aluminum oxide. If you're curious about that, read up here
")
No, I'm leading with the spine. That's just describing the angle.
What I was worried was, that the angle STILL seems to be influenced by the steep microbevel that those people put on it, which it is too easy to simly polish to a high lustre. (The recurve, where it cuts best, is simply where I've done the best job of removing it.) But after checking my other HI knives (including he Bura Salyan, with was never "professionally" sharpened), I've realized that this is a red herring. "Shaving" sharp isn't a realistic goal; I'm just going to try to do a better job cutting paper.
Agreed on paper cutting! I sandpaper all my edge profiles using the full bevel - not just creating a micro bevel which can become more obtuse over time. They won't shave and I don't think I'd want them to. I hacked up some dry hickory branches last weekend and the blade on my CAK went right through them like butter. Good'enuf! They'll easily cut paper and take shavings off my thumbnail.
- Joined
- May 19, 2009
- Messages
- 1,161
Ok that makes sense. Sorry for all of the granular questions. Do you mount the strop which is attached to the "smaller" piece of wood to the larger piece of wood (which as the sandpaper) when you use the strop?
I just flip the bigger block of wood onto it's side (so that the sandpaper/taped down mouse pad would be facing towards me) and rest the strop on that - friction keeps it in place
Agreed on paper cutting! I sandpaper all my edge profiles using the full bevel - not just creating a micro bevel which can become more obtuse over time. They won't shave and I don't think I'd want them to. I hacked up some dry hickory branches last weekend and the blade on my CAK went right through them like butter. Good'enuf! They'll easily cut paper and take shavings off my thumbnail.
Yep - so long as the kuk does what you need it to do, there's really no need to sharpen it up more. I just find that the kukri cuts through grass and lighter vegetation much better when it's razor sharp - that aside, it's mostly an OCD-esque need to keep all my knives shave-capable
Last edited:
I just flip the bigger block of wood onto it's side (so that the sandpaper/taped down mouse pad would be facing towards me) and rest the strop on that - friction keeps it in place
Yep - so long as the kuk does what you need it to do, there's really no need to sharpen it up more. I just find that the kukri cuts through grass and lighter vegetation much better when it's razor sharp - that aside, it's mostly an OCD-esque need to keep all my knives shave-capable
killa_concept, thanks for the info, that helps me a lot. I am going to put something together. Thanks!
- Joined
- May 19, 2009
- Messages
- 1,161
killa_concept, thanks for the info, that helps me a lot. I am going to put something together. Thanks!
Not a problem - I can send you a link to where I found the leather and chrom oxide if you'd like
")
- Joined
- May 19, 2009
- Messages
- 1,161
I personally got the chromium oxide here - they also sell it in 3oz, but 1.5oz is enough to probably last you a lifetime. You hardly have to use any on the strop (about as much as will stick to your finger) and only have to replace it when the strop becomes a blackish green (this takes several stropping sessions). The leather was some 1' 8/9 oz veg tanned leather from here - you get somewhere around 54-60" which is more than enough to make a couple of double sided strops while still having some scrap left over for a field kit :thumbup:
Oh, and you might have to sand the shinny side of the leather first to get the powder to stay on - use high grit sandpaper when you do this (I use 1000). Also use the 1000grit to sand off the compound when it gets clogged (blackish green), then remove it with a cloth rag before reapplying more powder.
Oh, and you might have to sand the shinny side of the leather first to get the powder to stay on - use high grit sandpaper when you do this (I use 1000). Also use the 1000grit to sand off the compound when it gets clogged (blackish green), then remove it with a cloth rag before reapplying more powder.
- Joined
- May 19, 2009
- Messages
- 1,161
Hey killa, are ya still workin' on this?
I was looking thru sharpening tips to add to the library and remembered i was waiting for it. It would be nice to have a comprehensive, easy to read tutorial.
Dang - I completely spaced on having made this thread. I'm working about 30 hours a week and am still going to classes full time - getting anything else done has been a nightmare to say the least.
In retrospect, I should have done a step-by-step pictorial of sharpening the 13" blem AK I nabbed about a week back... it came slightly duller than past kuks and now it's shaving sharp. I'll probably do that with the next khuk I pick up (though that might be awhile considering my broke-ness).
BTW, what part were you specifically looking for me to fix up?
No big deal, I had kinda spaced out on it too and when i saw it i was just wondering if ya were gonna finish it. It seems a waste to let go of what you've done so far. I had no specific part for you to finish. If you'd like i'll try to keep track of it and you could come back to it when you feel like it. Your work and education come first.Dang - I completely spaced on having made this thread. I'm working about 30 hours a week and am still going to classes full time - getting anything else done has been a nightmare to say the least.
In retrospect, I should have done a step-by-step pictorial of sharpening the 13" blem AK I nabbed about a week back... it came slightly duller than past kuks and now it's shaving sharp. I'll probably do that with the next khuk I pick up (though that might be awhile considering my broke-ness).
BTW, what part were you specifically looking for me to fix up?
- Joined
- May 19, 2009
- Messages
- 1,161
No big deal, I had kinda spaced out on it too and when i saw it i was just wondering if ya were gonna finish it. It seems a waste to let go of what you've done so far. I had no specific part for you to finish. If you'd like i'll try to keep track of it and you could come back to it when you feel like it. Your work and education come first.
Yeah - that would be great! I'd really like to toss some more stuff into this thread. Specifically:
1) A good step-by-step walk through of sharpening a khuk from a factory edge to a shaving one using the cheap mousepad method.
2) A good pictorial of how to put your wrist into a chop.
However, part one is dependent on my picking up another kukri which might be an issue as they've gotten spendier while I've gotten broker. Maybe I'll check in with Aunty to see if she has any blems that I might be able to afford... As for part two, that's dependent on getting some time to go camping or hiking as there isn't really much in the way of choppable vegetation around here (unless I want to start problems with my neighbors or the city
 )
)- Joined
- May 19, 2009
- Messages
- 1,161
Due to Aunty Yangdu's generosity, I have a 15" BAS with a blemished handle on the way! I'll be using it for the step-by-step how-to (with a good number of pictures of course) on my cheapo sharpening method! Hopefully I'll do a decent enough job to make it a standardized reference for future khuk owners looking to keep their HI works of art razor-sharp
Stay tuned guys
Stay tuned guys
- Joined
- May 19, 2009
- Messages
- 1,161
Quite sorry this has taken so long to update guys! Things have been a very hectic and finding time has been difficult. I'll add updates with posts like this as I find time... then, when I can hammer it out, I'll add the refined product to the opening post of this thread.
First off, pictures of my modest collection thus far - the frogs have all been flipped as I'm Left-handed. Left to right:
18" Vojpure by Sher (t), 18" m43 by Sher (y), 15" AK by Sher (t), 15" BAS by (??), 13" unsigned AK


Here's the blemished 15" BAS that Aunty Yangdu generously contributed for this How-to (MANY THANKS!). I've never seen this Kami mark before and am somewhat curious as to who it belongs to (anyone know?). Seems pretty well built and the great detail in the scroll-work really caught my eye.

The blade felt reasonably sharp - comparatively, I would say it was a bit sharper than previous khuks I've received from HI straight out of the box. It is definitely sharp enough to hack through wood, but that's not the point of this particular tutorial. Cutting paper, it did fairly decently in some areas of the blade, but only caused tears in others. Specifically, the sweet spot seemed to cause these tears whereas the belly allowed for decent (albeit un-smooth) cuts
Now, comparatively, here's what my 15" AK by Sher the Tiger is currently capable of... Even with it's Sher-style 1/2" thick spine and comparatively stout bevel, it can definitely slice given the proper sharpening job. This is the sort of edge we'll be putting on the BAS with this tutorial - and hopefully what others who try it themselves will be able to do as well
Yes - I'll probably look like I have mange by the end of this tutorial... I've accepted this as a necessary sacrifice

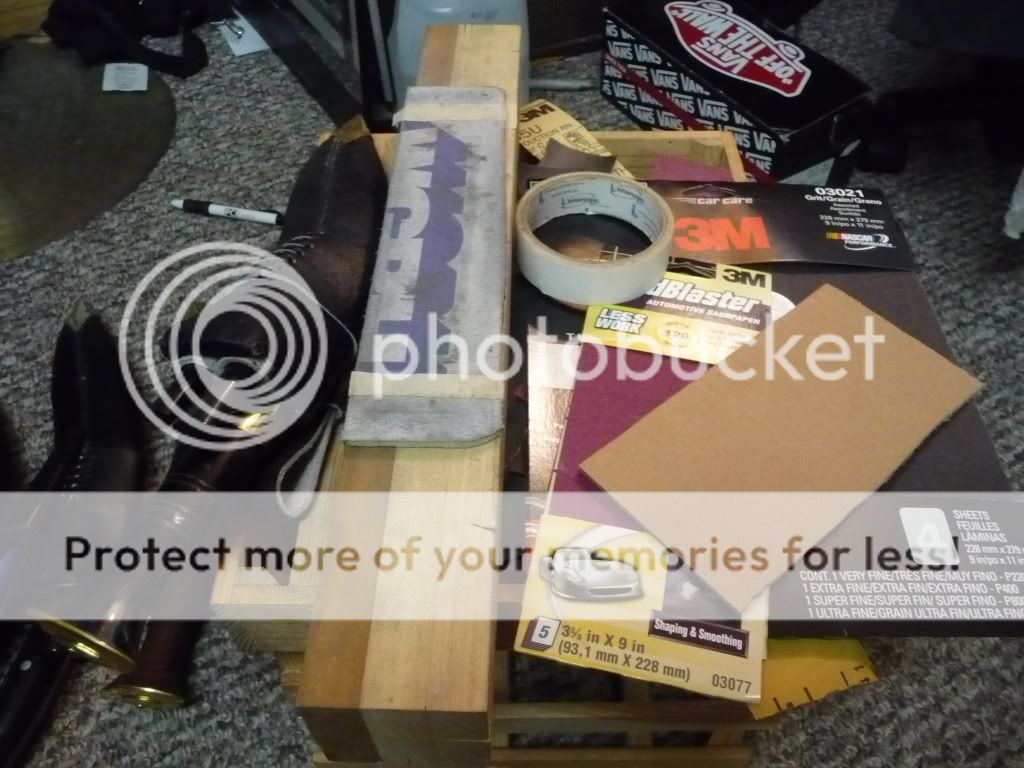
Now here's what we'll be using for materials. A block of wood for a base, part of a mousepad taped to that, some double-sided tape, sandpaper, some regular old cardboard and an HI khukri of course. The purple pack of sandpaper is 120grit and the assorted pack ranges from 220 to 1000. You'll be able to find all of this in the Automotive section of just about any big store (I found my stuff at Fred Meyer). I also decided to switch out my usual leather strop/compound - seen in the first post - for a regular old piece of cardboard to show that a shaving edge doesn't require as much work or money as people think
The total cost of this setup is probably less than $15 - and that's if you don't already have double-sided tape and a mousepad lying around.
First off, pictures of my modest collection thus far - the frogs have all been flipped as I'm Left-handed. Left to right:
18" Vojpure by Sher (t), 18" m43 by Sher (y), 15" AK by Sher (t), 15" BAS by (??), 13" unsigned AK
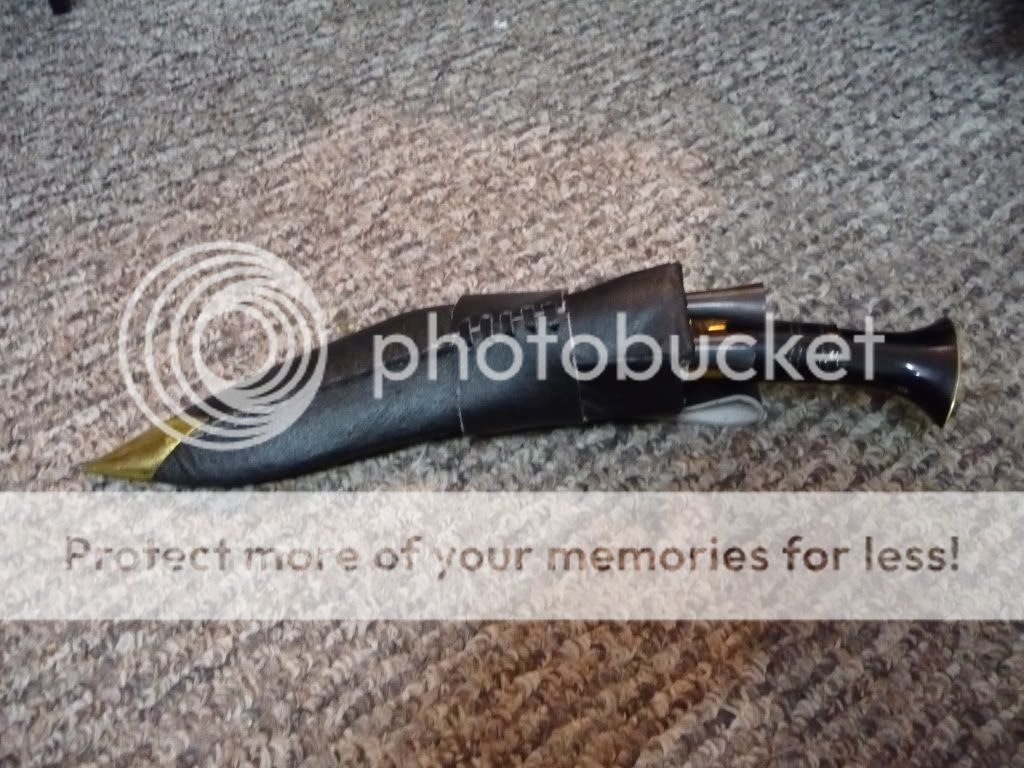
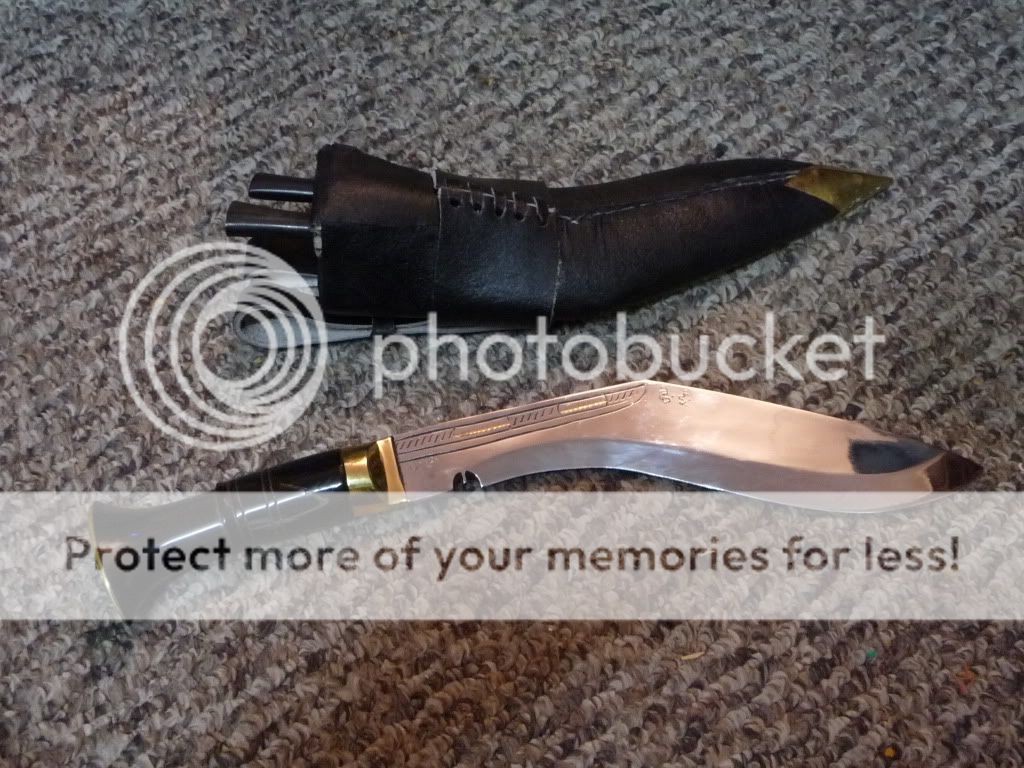
Here's the blemished 15" BAS that Aunty Yangdu generously contributed for this How-to (MANY THANKS!). I've never seen this Kami mark before and am somewhat curious as to who it belongs to (anyone know?). Seems pretty well built and the great detail in the scroll-work really caught my eye.
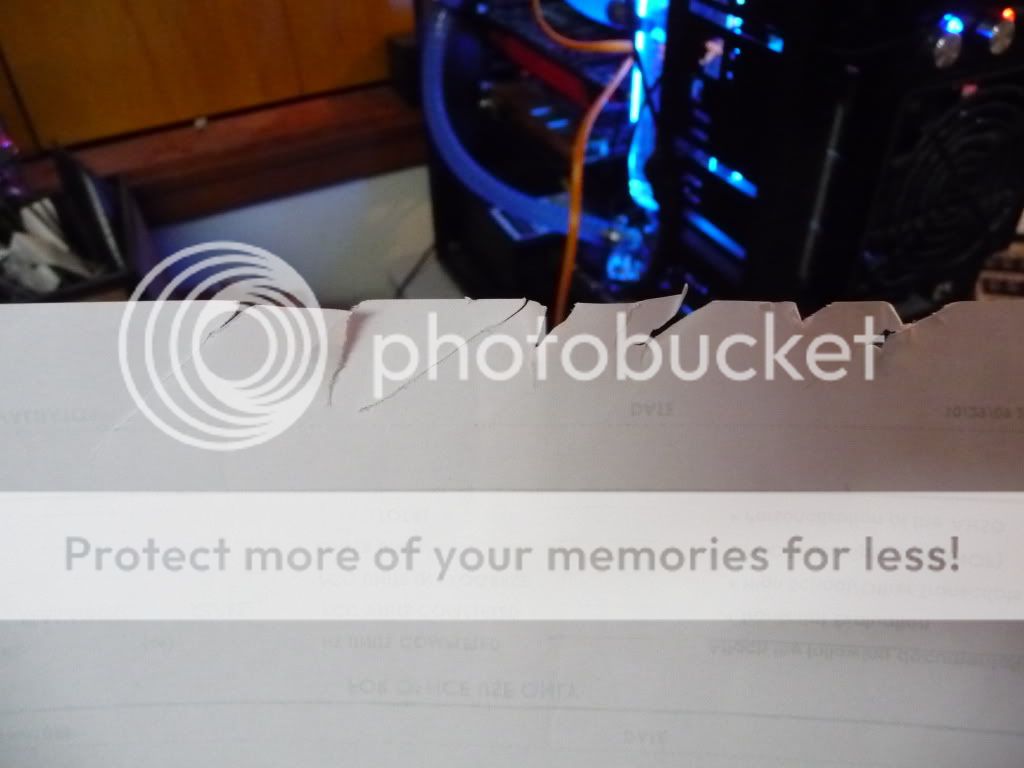
The blade felt reasonably sharp - comparatively, I would say it was a bit sharper than previous khuks I've received from HI straight out of the box. It is definitely sharp enough to hack through wood, but that's not the point of this particular tutorial. Cutting paper, it did fairly decently in some areas of the blade, but only caused tears in others. Specifically, the sweet spot seemed to cause these tears whereas the belly allowed for decent (albeit un-smooth) cuts
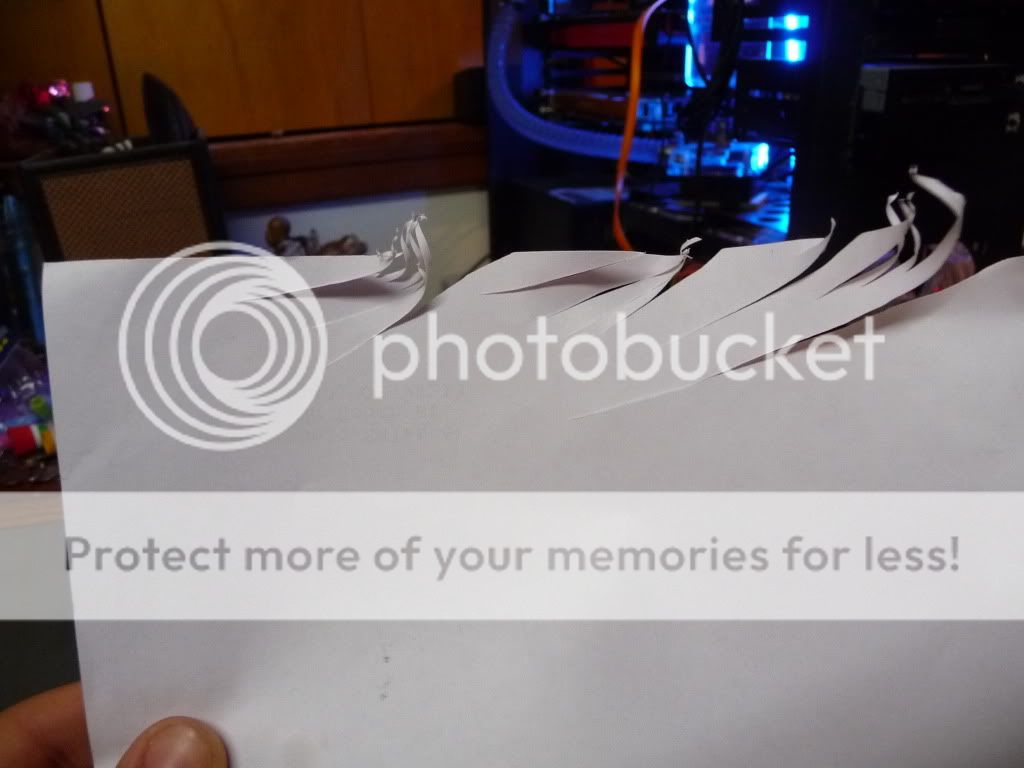
Now, comparatively, here's what my 15" AK by Sher the Tiger is currently capable of... Even with it's Sher-style 1/2" thick spine and comparatively stout bevel, it can definitely slice given the proper sharpening job. This is the sort of edge we'll be putting on the BAS with this tutorial - and hopefully what others who try it themselves will be able to do as well
Yes - I'll probably look like I have mange by the end of this tutorial... I've accepted this as a necessary sacrifice
Now here's what we'll be using for materials. A block of wood for a base, part of a mousepad taped to that, some double-sided tape, sandpaper, some regular old cardboard and an HI khukri of course. The purple pack of sandpaper is 120grit and the assorted pack ranges from 220 to 1000. You'll be able to find all of this in the Automotive section of just about any big store (I found my stuff at Fred Meyer). I also decided to switch out my usual leather strop/compound - seen in the first post - for a regular old piece of cardboard to show that a shaving edge doesn't require as much work or money as people think
The total cost of this setup is probably less than $15 - and that's if you don't already have double-sided tape and a mousepad lying around.
Last edited:
- Joined
- May 19, 2009
- Messages
- 1,161
**Reserved for sharpening process**
- Joined
- May 19, 2009
- Messages
- 1,161
**Reserved again, just in case**
Last edited:
- Joined
- May 19, 2009
- Messages
- 1,161
So no one has anything to say thus far? 
I'm really wondering on who's mark this BAS belongs to... I think it's a leaf? I've looked over the Kami marks threads and could not match it up
I'm really wondering on who's mark this BAS belongs to... I think it's a leaf? I've looked over the Kami marks threads and could not match it up