WIP Integral with a “Jumping Edge”

I worked on the back end a bit more today,… added a washer and started carving the wood down.

aaa047.jpg


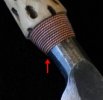
I also twisted up some wire for a wrapped ferrule, and started taking the wood down in that section. I’m going to fill the voids in that area with epoxy paste before I take it down anymore.

aaa054.jpg


aaa057.jpg
 
Dee-Licious.

Great to see it nearly done. It looks like a fun knife to use. The buttcap/washer treatment is my favorite part.

-Nick
 
That looks great, Tai. I love the way it came together. Wonderful design in all areas. It's all the little thing that make that knife jump out at you! (along with the jumping edge :D)

I look forward to seeing Chuck's work as well!

--nathan
 
Great fluting job managing that natural handle material Tai. Thanks for the pictures.

Take care, Craig
 
Sexy knife Tai. The fluting really made it come to life for me. At first I thought it was going to be an advert for your new hammer....you too can do forge magic with one of the new Tai hammers, (ha ha) but then I see you say you use a ball peen to do such mind (and steel) bending work.

I'm bamboozled over your twisted wire ferrule. How do you keep it in place? I think I see a part of the technique...but sure am stumped. Seems like, with usage, it would be prone to failure by-n-by.

attachment.php
 

Attachments

  • JumpyTai.jpg
    JumpyTai.jpg
    4.9 KB · Views: 138
Last edited:
Aaron, this is actually the 4th one of it’s kind,… so I guess it IS a regular model. :)
I’ve learned a few things each time.

Phil, I drilled two small holes for the ends of the wire and super glued them in. Both ends are on the edge side of the handle where they are less visible. The front hole goes in from the top of the handle, is bent over and catches in a secondary notch under the bolster. The secondary notch also helps keep it flush with the top end of the wood. I did the front first and wrapped towards the back. The shoulder cut into the wood stops the wire from slipping back and the wrapping also catches under a very shallow shoulder (about 1/2 the diameter of the wire) around the base of the bolster to keep it from slipping up. It's very secure.

I used two strands of copper wire and twisted them using a pistol drill.
 
Last edited:
That is really sweet Tai. Your work is always impressive and this totally jumps out at you. Everything about the handle truly works together. Love the copper, and could you please do a WIP on the wire wrap. I thought I had it but you lost me. Need the visual. Can't wait to see what Chuck does for it.

Pat
 
Phil, I did use my magic “TAI” hammer for the shouldering around the bolster and some other stuff. The ball peen was just for the beveling.

Anyway,...

Here it is all finished up. It came out to 12 inches OAL. I decided not to fill the large pores in the handle, just sealed it real good with shellac. It was such a nice piece of wood, (even harder than I originally thought),… and there’s just something wicked and mysterious about all those holes.

aaa102.jpg


aaa107-1.jpg


aaa127.jpg


aaa096.jpg
 
Last edited:
That's cool Tai. It turned out a little dressier than I expected. That would be a fancy dark voodoo...

You make stuff like nobody else I know. :thumbup:
 
I have little idea how to use a knife like that, but it sure looks cool! Thanks for the wire wrap explanation, although I must confess, I didn't understand it.

PS - I edited my post with the gag line about your new hammer. Hopefully it doesn't look like a quote anymore, because it wasn't.
 
Back
Top