WIP: To keep me motivated!

Status
Not open for further replies.
Joined
May 7, 2010
Messages
1,066
Hey all!

With all these BBQ WIP threads floating around, I have been really motivated to get out into the garage to work as much as I can. I'm holding down 9 courses right now... but even if I can manage sanding something for 30 minutes a day I think I can keep knocking out some knives!

This will probably be a leisurely WIP, given my courses, but I know you guys love WIPs as much as I do and posting photos of my work is always fun :D

Some of you may or may not recall this batch I started back in AUGUST of 2011. Yep.. I've been slacking. I've set myself a goal of at least 3 knives out to heat-treat per month. That should finish off this batch by spring and finish off the remainder of my O-1.

DSCN0952-1.jpg


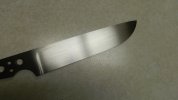
Of course before I decided to do this I never had any intention of documenting the progress, so unfortunately I only have the drilled/profiled picture in the batch for this knife, and what you see now at a 400g Pre-HT finish (Almost ready to go out). This knife is the second from the right in the top row of the batch.

DSCN1076.jpg

DSCN1078.jpg

DSCN1081.jpg

DSCN1084.jpg

DSCN1088.jpg


Some quick specs on this knife:
1/8" O-1 stock
10.25" OAL
6" FFG blade with a very slightly dropped point.

I worked hard to keep the plunges sharper than I normally do. This was helped by first filing in the plunge lines with a 1/8" chainsaw file, and finishing them on the grinder with a glass platen. Then while handsanding, I was careful to not round over the transition as much as I would in the past. I think it adds another level of detail and crispness that was lacking from my earlier knives. I hope to improve on this as I go, I really prefer how it looks this way.

This blade awaits some stabilized maple burl or redwood burl scales... :thumbup:

This mini WIP will include two more knives, the same model of which I used in the Newbie KITH exchange. I loved the results of that one so much I am really excited to finish off the other two. These are in the top row, 3rd and 4th from the right in the batch.

From here on out, I will try to document every step I take in my work, so it will be as painful or entertaining as possible!

Thanks for reading guys :thumbup:
 

Attachments

  • DSCN1081.jpg
    DSCN1081.jpg
    31.4 KB · Views: 31
Looking Great! If you are getting those edges thin enough I would say you are killing it so far. The profiles are sweet. I don't know anything about high carbon, but thin is in and light is right. James Terrio said that to me and he is so right.

Nice work on the hand rubs.
 
Last edited:
Thanks a bunch erik! I definitely love thin and agile knives more than anything, I'm eager to see how this one balances!

The edge is sitting at almost exactly 0.020 according to the calipers. I used to leave them more like 0.035-0.040 (I was deathly afraid of warpage) but I found that caused the cutting edge to be too obtuse when sharpened for the first time. Hopefully getting it a bit thinner will mitigate that problem, and increase the performance of my blades. Any CPM-154 I've done I send off at about 0.015 and that has worked just fine.
 
Well look at that fine looking batch!:D

I'm with Erik Wolffie, the profiles are looking good, as is the hand rubbed satin. Looking forward to seeing some of these get finished up. I'm really liking the chef's knife at the far right of the top row:thumbup:
 
I've taken AEB-L to .005-.007 and it holds up. The tip was so thin I had to straighten it several times, in the future, I will back it with wood like some others have suggested.. My guess is that CPM-154 will hold .010 without any issues, probably less. There is a lot about blade geometry that I want to learn, and you may want to stay away from thin edges on many knives, but when you can, make it thin and light IMO.
 
I apologize for not having an update on these in the last few days. It just happens that I have had several assignments come up all on top of each other.... sigh.

The weather has also dipped to below -5C for the past week, making working in my un-heated garage quite uncomfortable. We should be back up to decent temperature by tomorrow/the weekend however.

I also have 7 knives coming back from heat-treat tomorrow, so I will spend much of my time this weekend getting those handled and finished as they need to be shipped off to Germany ASAP (Very last christmas presents at this point...)

Carl_First_Timer sent me a Nick-Wheeler style hand-sanding jig a couple weeks ago when he offered a couple of them up. I'm getting it welded by a friend at a local autobody shop in the next few days, so it should be set up and ready to go for the next two knives in this batch.

Good things to come, I promise :thumbup:
 
I appreciate the support and kind words guys, it really means a lot!

Just a little sidetracked update here... 7 knives came back from heat-treat today. And I got out of my labs early today on account of a small fire in my building (nothing serious, just 24 hour sprinkler damage cleanup needed).

So I worked from about 3pm til 830pm getting the blades cleaned up, etched, scales drilled and pre-shaped, polishing the fronts of the scales, and finally epoxying them to the blades.

DSCN1089.jpg

DSCN1090.jpg


Boy am I tired. About time for a cold beer and dinner :D

Thanks for reading! I'll work on the other two knives in greater detail with LOADS of pictures tomorrow :thumbup:
 
sweet deal.. looks good man I love everyone in that batch....

its not even that cold out here (in comparison), so I don't have an excuse...

thanks for the kick in the pants :)

can't wait to see them all finished up...

small fire ehh?? :D hmmm....
 
Lol its nice to see that we both have the same epoxy prep and application tools! I deviate slightly from the ginger ale cans though. I use a red solo cup. I know this is a silly question, but why do you put your pins through before you have the scales mostly shaped? I get mine about 90% shaped and the insert and pin them. If this is more difficult let me know. I definitely need help in this area.
 
Mostly preference. I prefer to have everything perfectly lined up before and during the gluing process. Before I shape them further I just knock off the pins with my bandsaw and grind them flat. Cutting off the excess prevents over-heating and burn rings around the pins. To me it would seem doing pins after might be more difficult getting things lined up, but I am no expert :D

Time for a nice little on track update ;)

Here is a picture of my "shop" as is. I still drag around that drill press and all my tools pretty much every time I want to work. Parents are out this weekend though, so I have had this all set up since yesterday haha.

DSCN1096.jpg


I also did a nice slice on my thumb last night cutting scales on the bandsaw... always something oozing blood when I'm in the shop haha

DSCN1098.jpg


Anyways, down to business! Here are the two knives being worked on!

DSCN1095.jpg


The choil has already been roughed in with a round file, and the center lines double scribed over sharpie.

DSCN1101.jpg


The finger choils needed some work on these. So I clamped them up in the work bench, and went at it with a piece of 3/4" dowel and 120g Rhynowet paper. If you haven't tried this paper yet... DO IT NOW! Even sanding dry, it lasts probably 5x longer than any other paper I have tried, and it cuts at least twice as fast. Can't go wrong at $0.45/sheet!

DSCN1102.jpg

DSCN1103.jpg

DSCN1107.jpg


Now to rough in the plunges. To do this, I use a triangle file and a 1/8" round chainsaw file.

I start by creating a mark on both sides of the choil with the triangle file. This mark will guide the chainsaw file and make sure the choils are aligned on both sides.

DSCN1109.jpg

DSCN1111.jpg


Now I start with the chain saw file, and at a fairly steep angle start the plunges on both sides.
DSCN1112.jpg


If everything is lined up nicely, I work in the plunges about half way up the knife.
DSCN1115.jpg


The reason I only do the plunge part way up the blade, is because these are not the final lines for the plunge. This is sort of a built in "guide" for when I go to grind the knife. I will use this as a "backstop" against the edge of the platen, to set the line where I want my final plunge line to fall.
 
So we are ready to grind. This is my setup. The "grinder" you see is a 1/3hp General Electric grinder from KMStools. FAR from ideal. It is single speed, and runs at ~3500 rpm. WAY too fast. But, you learn to deal with what you got, and one day I will have a nice 2x72 to grind with :thumbup:

The dip bucket is full of water mixed with about 1cup of sunlight detergent and 1cup of baking soda. The sunlight breaks the surface tension of the water allowing grindings to sink to the bottom, and the baking soda stops it from becoming TOO much of a rusty mess in there.

DSCN1119.jpg


Here is the glass platen I installed around Christmas time. Man oh man, how the hell did I ever grind anything before this... my grinds are now perfectly FLAT, and my plunges are SO much better and SO much easier to cut in...

DSCN1121.jpg


And of course... before grinding on anything. Safety gear!

DSCN1124.jpg


Now to grind! I do everything freehand, no jigs or plunge guides. I do have the bubble jig from Fred, but the geometry of my grinder makes the guide get in the way when grinding one side. Once I build a true grind I'm sure I will be able to make use of it though!

I start by breaking the edge with a worn 40g belt.

DSCN1126.jpg


Now to start walking the grind up. Notice that I am not quite grinding into the plunge area quite yet. This picture shows I need a little more pressure/angle adjustment at the tip.

DSCN1128.jpg


Walking it up more... a little excess pressure near the plunge... still some tip adjustment needed. Always practicing and learning!

DSCN1130.jpg


Grind walked up as far is at will be with 40g. Top of the grind line is still a bit wobbly... as I said. Practice practice practice!

DSCN1132.jpg


Note: I always walk up the grind in stages, and never do one side completely. I have tried that, and basically it just ends in the edge not being centred... slow and steady makes for a better grind!

Alrighty, both knives ground to 40g! I have also ground into my plunges on the edge of the platen.

DSCN1137.jpg


Now I checked the edge with my calipers. And both knives are sitting at about 0.045 +/-0.005. That is pretty good in my books for a 40g rough grind. Once I'm done on the grinder with 80g it will be around 0.030

DSCN1140.jpg


Here we are finished up with the 80g. Grind lines are significantly less wavey... getting there! Plunges are further refined and cleaned up at this point, still need a bit more work. May do that with the grinder, or go to files a little later.

DSCN1142.jpg


And here we have both knives finished to 80g!

DSCN1143.jpg


Before my next update... I plan to have progress shown of the grinding finished to 120g, and hand sanding up to 400g.

Thanks for reading guys!
 
Nice man....I like the deal with what you have attitude I don't have a grinder i do it all with files cause I love to do it...Keep up the good work
 
I've set myself a goal of at least 3 knives out to heat-treat per month.

Unless you know something I don't, you're going to lose your behind sending only a few blades at a time for HT. Get as many as possible ready at once and send 'em in together. Same goes for gluing up handles, clearly you have the right idea epoxying a bunch at the same time :thumbup:
I used to do my plunges very much like you showed, but I've recently been converted to just starting the grinds a little ahead of where the plunge will be, and cleaning up the plunge afterwards. It really does save time/wear on files and I end up with fewer goofs. Try it, you may like it.
Regardless your designs look very smart and your grinds and finishes are looking really good! Your instinct about using files is right, it would only take a few minutes to straighten out some of those wavy spots. Just be sure to use a smooth cut file, no sense putting any deep scratches in those very-nearly-finished bevels.

I don't know anything about high carbon, but thin is in and light is right. Someone said that to me and I agree.

Hey man, you stole my line! I knew I should have copyrighted that :D
 
Status
Not open for further replies.
Back
Top