Wiring a PID for Your Tempering Toaster - Full Walk Through

So it looks to me like the Integral and Derivative are doing something.

The RED is the Auto Tuned performance (P58/I222/D55)

The BLUE was zeroing out the I and D (P50/I0/D0)

The ORANGE was halving the P (P25/I0/D0)


The RED Auto Tuned data has a lower peak and tighter oscillations around the set point. It appears that as P went down the overshoot went up and the oscillations got worse (when comparing BLUE to ORANGE.)

Cheers,
JK
 
sorry for the delay - tied up tonight, tomorrow I will likely be not available - so trying to get this out now. Ok ... so following up on Stacy's comment, it does appear that your controller might likely be using a "pulse width modulation" on the output ... which means is cycling the heating element on and off to varying percentages of time .. in effect increasing or decreasing the heat output over time. Good.

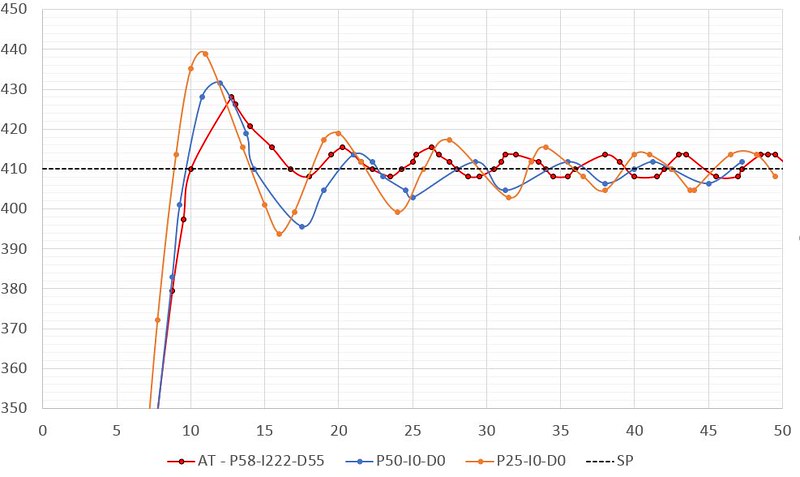
I went back through the thread, and found your "manual tuning guide". Looks like the controller is using a different definition of the PID coefficients than I had been used to. Inverse in fact. So in effect, for this controller a smaller value of the P coefficient actually leads to more of a "sudden" transition from on/off in the vicinity of the set point. So... to make the effect of the proportional control "smoother", or "gentler" - you need a BIGGER value of P. Small values of P will cause overshoot and oscillations. Bigger values will cause a slower approach to the set point, AND more of a downward offset at steady state. Same thing with the integral coefficient: small values will cause the integral input to have a quick and profound influence on the heater - bigger values (the manual says it is actually using "seconds" for units on this coefficient) will slow down the influence of the integral input. This makes sense in the data just above: when you shifted the P value from 50 to 25, you would expect a more profound influence of the proportional input - which is what you see (more overshoot).

Here is what I would suggest. First, confirm from the manual that a value of 0 for the integral and differential coefficient actually turns OFF that portion on the control (because the actual control equation includes a function of 1/I .. and if I is zero, the ratio is infinity. bad. If the controller does not "understand" that this means the function is turned off ... look for the way you actually turn "off" that function.

Start with integral and differential OFF (proportional only). then start with a rather "soft" proportional value (in this case, a HIGH value of the P coefficient. Try, say, 200. What SHOULD happen if the controller is working correctly is that the oven should heat SLOWLY towards set point, then level out and stay constant (no oscillations) at a lower temperature with some offset from the set point. If you still get overshoot and oscillations with a value of 200 for p, then INCREASE is in increments until you see the smooth asymptotic behavior described above. From there, decrease the P coefficient in increments: the offset should get smaller and smaller, and eventually you will start to see oscillations. When you see them, BACK OFF on the coefficient (make it bigger) until you get back to the point where there are no oscillations (but you have an offset). keep the proportional coefficient at that point and do not change it! NOW turn on the integral function, but use a BIG value of the integral coefficient (i.e. "slow" influence from that function). As a guess I would say something like "if using only P the oven took 5 minutes, then set the value of the integral coefficient to 600 (which is 600 seconds = 2*5 minutes). this should have the effect of decreasing the offset. Keep making the value of the integral coefficient smaller (in smallish increments): you should see the offset continue to decrease .. and eventually you will start seeing oscillations again. as before, when you see this back off (make bigger) the integral coefficient until you have no oscillations.

STOP THERE. the differential function is way too touchy to use unless you have an extremely robust system. However, now you KNOW what your offset is - so just change your set point for the controller to hit the actual temperature you want. For example, if while tuning your set point is 200F, but your actual achieved temperature without oscillations is 190 (offset = -10degrees) .... when you want to actually use the oven, just give the set point to the controller as 210. with the offset of -10 degrees, you will then achieve something really close to 200 ... which is what you really want. make sense?

Sorry if I confused things: the definitions for this controller are inverse of what I was used to in the past :-( . BTW - "autotune" is somewhat over-rated. Take the tuning stepwise like described above, and it really is not difficult at all.

Again, I am not sure if I will be able to input anything tomorrow (looks like we have a pet we have to put down :-( ). post what you find and I will catch up....
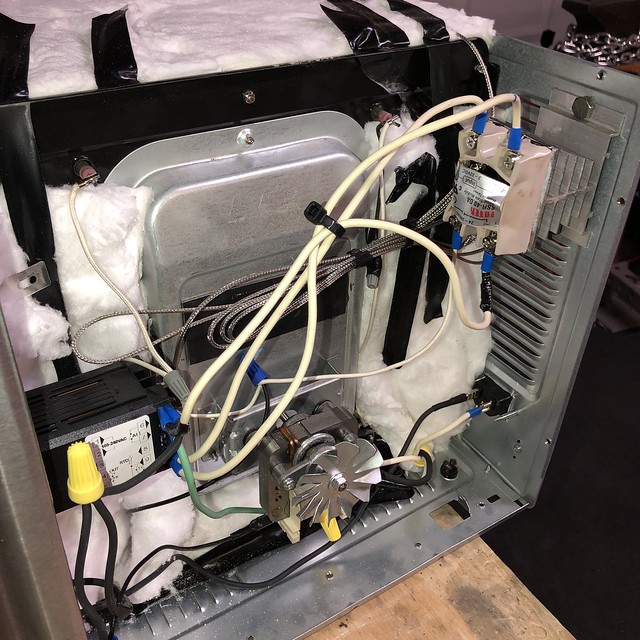
 
C Cushing H. - Holy cow your input has been extremely valuable! Thanks for taking the time to help me out. Your work flow above makes a lot of sense! I've started tonight. I was able to record two runs in the oven. One at (P200-I0-D0) and one at (P300-I0-D0). You can see the results in the graph below. I left the older runs on there for reference of the direction everything is moving. I think my next step is a P of 400.

Also I verified in my Rex-C100 documentation that a "0" value will deactivate both I and D.


Results thus far:


Cheers! :D
 
Yeah, that looks like i would expect. Keep going higher on the P coefficient to get rid of those oscillations. Glad i can help!
 
C Cushing H. - All Right! Well I got up to P600. Looks like most of the oscillation is out of it.

The BLACK is the P600. It looks a little strange, but I was trying to capture what it was doing. It was sitting on the edge of 209C and 210C; going back and forth. Only once did it fall to 208C at the end there. Total variance from Max and Min is 2 degrees C... which I feel is pretty damn good.

A result of this is that the oven takes about 30 min to get up to the set point, but hey, that's something I can live with.


Do you think it's worth starting to mess with the integral now?

Thanks!
JK

EDIT: ...... may be a little late for this.... but does anyone know of a data recorder I could buy and hook up to this PID? So that I can export runs into excel?
 
Last edited:
Oh boy. The next question is whether you believe the quality of the temp data (dont take it on face value to high precision). I would stop there and call it good enough (unless you want to get into an area called “measurement system analysis”, also sometimes called “gauge R&R”. Dont go there! . Just start making your knives!!
 
Thanks again for all the help! I'm not sure what kind of accuracy most people are getting out of their toasters, but I feel like 2 degree C is great.

The only improvements I may make now is to 1.) move the controller and SSR into the side toaster panel 2.) hook up the fan so that it runs 100% of the time (can be accomplished when moving the controller) 3.) maybe get a longer TC and install it on the left side of the toaster to get the wires out of the heating area.

:D
 
In one product development effort I struggled mightily to get a temperature variation below a few degrees C. I would call it a day! :) (i.e. a few degrees is REALLY good). Agreed with the fan running full time - never hurts to keep the energy of the the system spread around (sorry for the terminology ... but that is what you are doing with the fan.....). I am glad that this looks like it will work for you!
 
What do yall think about adding this adhesive heat shield to the inside of the glass door?

 
So I moved all my wiring inside of the toaster and wired it so that the fan would run non-stop. It was working pretty darn good then this happened about 50min in.

I'm guess it just got too hot in that compartment? The front panel was around 160F on the outside while the toaster was 410.

Yall think I should:
1.) Mount the SSR outside

2.) Relocate everything to a box outside of the toaster and live with the fan not running non-stop (Like it was before)
3.) Try to insulate the compartment better so it doesn't get this hot?


Cheers,
JK
 
Im not sure what i am looking at, but i would never recommend putting electronic components (lke an SSR ) inside of an oven. Heat kills electronics....
 
I suggest building the controller in a separate box and putting the box a foot away from the hot oven.
 
10-4, I'll rebuild it into a box... and the fan will just turn on and off with the elements.

This was the setup:

 
I like to put a fan blowing air across the cooling fins of the heat sink. Also, be sure to put heat sink compound between the SSR and heat sink when installing it.
 
I like to put a fan blowing air across the cooling fins of the heat sink. Also, be sure to put heat sink compound between the SSR and heat sink when installing it.

10-4, good idea with the PID box fan. I have an intel CPU heat sink and fan combo I could mount onto the back of the SSR. That would probably do a solid job. I also have more thermal paste (I did use it on the first build).

I think I may wire the convention fan in the toaster to it's own switch (and it's own power cable). This would allow the fan to run full time in the toaster.
 
I'd put it in a separate box. Metal boxes are usually much better at shedding internal heat than plastic ones. I fit a miniature thermocouple socket and a power socket (downstream of the SSR, to feed the elements) so I can use the control box for anything else I might want to control the temperature of.
 
So I moved all my wiring inside of the toaster and wired it so that the fan would run non-stop. It was working pretty darn good then this happened about 50min in.

I'm guess it just got too hot in that compartment? The front panel was around 160F on the outside while the toaster was 410.

Yall think I should:
1.) Mount the SSR outside

2.) Relocate everything to a box outside of the toaster and live with the fan not running non-stop (Like it was before)
3.) Try to insulate the compartment better so it doesn't get this hot?


Cheers,
JK

Haha, maybe not use a SSR made of cheese. :D

I didn't want to fiddle around too much, so I put my PID controller and SSR in a separate enclosure. Don't even need a fan, and I've used it extensively for a number of years now, no problem at all.

VmR12Ba.jpg
 
Yep, I’m going back to the box this time around. Got it ordered. I may use the mini-thermocouple jack idea too on the side of the box.

And then wire up the toaster convection fan on it’s own switch with it’s own power cord... May be slightly awkward having two power cords coming out of the toaster, but hey it’ll work.

Probably didn’t help that it was 100F in the garage yesterday when it blew!
 
So... to button this thread up (bringing it full circle).... Here is a PID #2 with leanings. This thing is kicking ass now largely thanks to you guys! ( Major thanks to Stacy E. Apelt - Bladesmith Stacy E. Apelt - Bladesmith C Cushing H. Stromberg Knives Stromberg Knives )

0:35 - Motivation for Rebuild
2:48 - Components Needed
3:54 - Setup Project Box
4:21 - Mounting SSR & other Panel Components
7:55 - Wiring the PID
13:15 - Full Wiring Overview
14:10 - Tuning Strategy, Tips, & Results


Back
Top