-
The BladeForums.com 2024 Traditional Knife is available! Price is $250 ea (shipped within CONUS).
Order here: https://www.bladeforums.com/help/2024-traditional/
You are using an out of date browser. It may not display this or other websites correctly.
You should upgrade or use an alternative browser.
You should upgrade or use an alternative browser.
Work Sharp Knife & Tool Sharpener - Ken Onion Edition
- Thread starter UnknownVT
- Start date
") thanks
thanksIn most of my recent reviews when I had to sharpen a knife - I made reference to this Ken Onion edition WSKTS and the original Work Sharp (belt grinder) Knife Sharpener (link to review)
I thought it would be worthwhile showing some of the knives I have used this sharpener with -
and the resultant edges using my cheapo usb microscope.
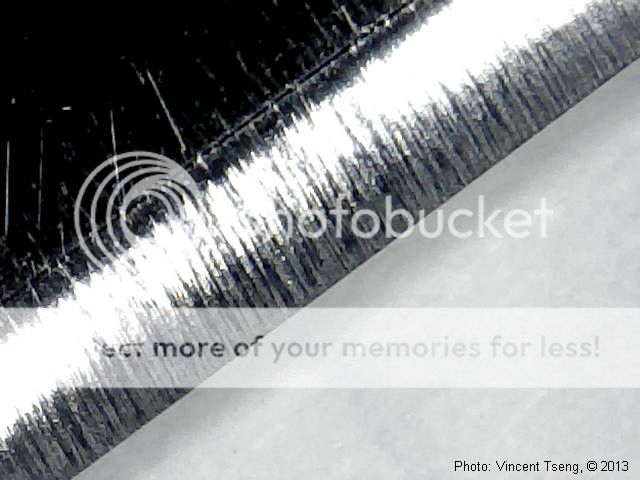
First, one of my most cherished and now irreplaceable knives -
a late Bill DeFreest "Gordon" knives drop-point hunter with ironwood handles.
Bill and I discussed, and he custom made to order for me:

Normally I wouldn't sharpen a custom knife - but this was one of my early acquisitions and I tried to hand sharpen it -
although I did get a good edge - it was pretty obvious it had been hand sharpened.
I did sharpen it with the original Work Sharp (belt grinder) Knife Sharpener - see Post #33 (link) in that thread.
But I took it one step further by finishing it up on this KO edition - resulting in a very fine edge - as shown in this usb microscope pic (about ~110x)
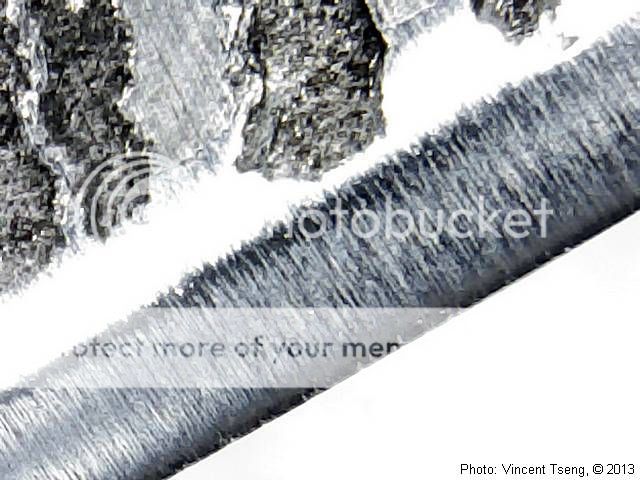
Another review knife that needed some sharpening was the Harnds CK6015 Viper (link to review)

The blade was not that sharp - kind of passable but not that good -
Before shot of original edge:

I proceeded to put a 20deg convex edge on this knife and it turned out to be one of my best looking/finished edges -

and this knife is really sharp now.
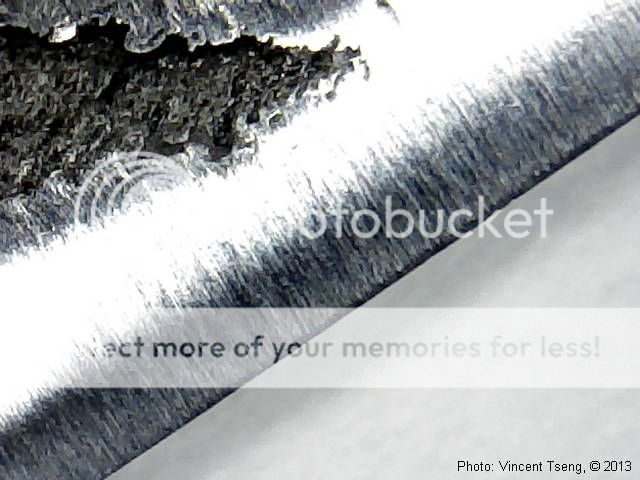
Lastly I got an inexpensive true Damascus knife - Colt CT813 all Damacus folder

it had a really poor excuse for an edge -
about as sharp as a butter knife.
When I went to sharpen it it took a lot of passes before the bevel even approached the actual edge - before even a hint of a burr was formed -
the original edge was that obtuse.
Original edge -

horrible, horrible edge (hurts me just to look at it)
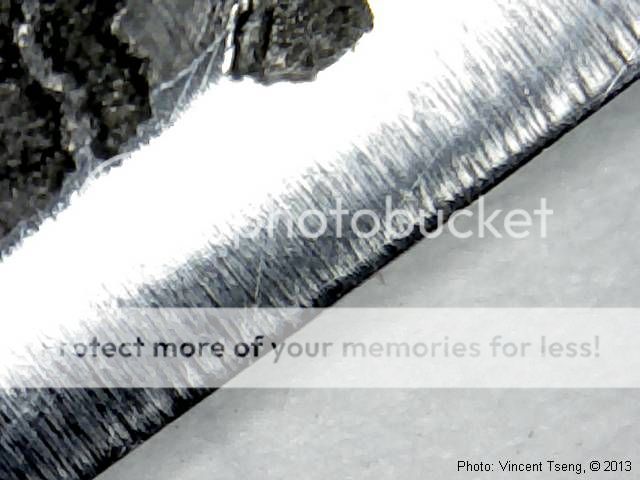
Edge after sharpening -

Looks pretty darned good - but note how wide the new convex bevel is - showing how much had to be ground away.
Imagine having to do that by hand?
So this WSKTS Ken Onion Edition is my automatic go to for sharpening knives - not only does it do it easily and efficiently - it gives such a good finish and I can't even approach the results by hand -
and I've hand sharpened (and thought I was pretty good) for decades.
In this case I am more than happy to be made totally redundant by this WSKTS KO edition!
--
Vincent
http://picasaweb.com/UnknownVincent?showall=true
http://UnknownVincent.Shutterfly.com
http://UnknownVT.Shutterfly.com
I thought it would be worthwhile showing some of the knives I have used this sharpener with -
and the resultant edges using my cheapo usb microscope.
First, one of my most cherished and now irreplaceable knives -
a late Bill DeFreest "Gordon" knives drop-point hunter with ironwood handles.
Bill and I discussed, and he custom made to order for me:

Normally I wouldn't sharpen a custom knife - but this was one of my early acquisitions and I tried to hand sharpen it -
although I did get a good edge - it was pretty obvious it had been hand sharpened.
I did sharpen it with the original Work Sharp (belt grinder) Knife Sharpener - see Post #33 (link) in that thread.
But I took it one step further by finishing it up on this KO edition - resulting in a very fine edge - as shown in this usb microscope pic (about ~110x)

Another review knife that needed some sharpening was the Harnds CK6015 Viper (link to review)
The blade was not that sharp - kind of passable but not that good -
Before shot of original edge:

I proceeded to put a 20deg convex edge on this knife and it turned out to be one of my best looking/finished edges -

and this knife is really sharp now.
Lastly I got an inexpensive true Damascus knife - Colt CT813 all Damacus folder

it had a really poor excuse for an edge -
about as sharp as a butter knife.
When I went to sharpen it it took a lot of passes before the bevel even approached the actual edge - before even a hint of a burr was formed -
the original edge was that obtuse.
Original edge -

horrible, horrible edge (hurts me just to look at it)
Edge after sharpening -

Looks pretty darned good - but note how wide the new convex bevel is - showing how much had to be ground away.
Imagine having to do that by hand?
So this WSKTS Ken Onion Edition is my automatic go to for sharpening knives - not only does it do it easily and efficiently - it gives such a good finish and I can't even approach the results by hand -
and I've hand sharpened (and thought I was pretty good) for decades.
In this case I am more than happy to be made totally redundant by this WSKTS KO edition!
--
Vincent
http://picasaweb.com/UnknownVincent?showall=true
http://UnknownVincent.Shutterfly.com
http://UnknownVT.Shutterfly.com
Did you use the stock belt progression on these?
Thanks Andrew.
Yes, the stock belt progression - but mostly the finer X4 then 6000MM on this KO edition.
I had been starting on the original WSKTS since I was used to it -
and because it has a coarser belt in the P80 grit.
But that's kind of a misconception because the KO edition has much wider belts it seems almost as efficient with finer P120.
I am still timid in their usage because I know how efficient and fast they are
and it's much better to find I haven't yet ground enough, and have to repeat -
than to find I have ground off too much
(because I can't put that back!
- whereas not enough, simply means I have to grind a bit more).
That Colt CT813 all Damacus lockback was a good case in point -
the blade was so thick toward the edge and the original edge was so obtuse that it took a lot of grinding to actually form a burr -
I did use the full set/progression of KO ed stock belts to grind and sharpen that one -
Although there was a lot of grinding to do
I just had to be patient in working and grinding it -
so that I only took off just enough to reach the edge (forming the burr) -
and even then I found on one side I was just shy of the actual edge -
although shows my error, it was kind of re-assuring that I know I had not taken off too much.
Even though I am kind of OCD on knives and sharpening - I had to bear in mind that obsessive sharpening means I am removing more steel -
therefore wearing out the knives prematurely
(eg: even a single "extra" pass on a coarse belt is probably equivalent to a lot of wear....think about it) -
so my method is to remove as little metal as necessary, to achieve the edge that I want -
hence my over-cautious timidness.
--
Vincent
http://picasaweb.com/UnknownVincent?showall=true
http://UnknownVincent.Shutterfly.com
http://UnknownVT.Shutterfly.com
Thanks Dave -Those edges look really good. Did you use the guide or freehand?
"guided freehand" is the best way to describe it.
I keep the guide in place - but don't actually make contact with it -
as I sharpen to 20 deg/side and that is the native angle to the belt when holding the blade vertically/up-down.
That is quite easy to do - but I keep the guide in place to give me a visual guide so I can see if I deviate/wobble etc.
The visual aid is useful especially to maneuver the blade round the belly to the tip.
The belt angle is not 20deg to the vertical as I first thought - that is because to achieve 20 deg at the actual edge, belt flex has to be taken into account -
These are Dan Dovel's (designer of the WSKTS) words, from two separate messages
Note that quote - there is a huge advantage to using the guide - because they take the belt flex into account so the guide's angle setting is the actual angle at the edge.Our bevels are convex ground so there isn’t a true bevel angle. Our guided belt sharpeners report the edge angle on the guides. This is the angle that the belt leaves the cutting edge. Both KTS and KO have a defined deflection in the guides so I included this allowance in the angle setting. The guides also include a small allowance for primary angle of the blade itself. (e.g. the 20° setting on the KO guide will produce a 20° edge angle on the target blade.)
Further emphasized by this second quote -
The new sharpening cassette angle is 35° or 17.5°/side. The actual edge angle when free hand sharpening will vary depending on deflection. At approximately .300” vertical deflection, the bevel angle at the cutting edge is about 20°. This will vary a little based on how far you are away from the lower pulleys and the stiffness of the belt as well.
and sent this diagram:

--
Vincent
http://picasaweb.com/UnknownVincent?showall=true
http://UnknownVincent.Shutterfly.com
http://UnknownVT.Shutterfly.com
Last edited:
I posted this about sharpening and testing the edge, in my review thread on the
Colt CT813 all Damacus folder
but thought it was relevant here -
Looking at that photo above - I can see that the finish didn't seem to quite reach the very edge.
This is despite me feeling an easily defined burr along the full length of the blade.
So I think there is a difference between when the burr first forms - which is literally just when the grinding/sharpening just reaches the actual edge)
vs. what I am looking for under a microscope - a finish right to the edge.
So since I had used the blade to cut through corrugated cardboard - I sharpened it again -
this time taking the blade to the microscope to make sure the finish was right to the edge -
but dong this the long-winded overly cautious way of making sure I got the finish just when it reaches the edge -
so as not to take off any more steel than I needed to.
Ah! but here's something I learned -
Knowing that it was one side that the finish didn't reach the edge I worked only on that side using the WSKTS Ken Onion Ed
using the coarsest P120 stock belt - single pass raise the burr, then single pass X65 - felt the easy burr - then couple of passes on X22 - same thing easily felt burr - then finally 3 passes on the X4 - with one pass on other side to knock off the burr - then finish with the 6000MM (2µm) belt - still favoring the side I was grinding - examined under usb microscope - - not quite there yet!!!
Repeat the process - this time it looked good under the microscope......
So it ought to be really sharp - right?
Not so fast!
Remember I had a bias on one side which formed the burr that I carried through the process?
It's not that there was still a burr - but the minimal grinding/sharpening on the other side - although knocked off the burr left a crude edge!!
Hence the unsharp results - unable to cut paper cleanly......
so back to the sharpener - this time doing it from the X65 single pass each side - then progressively on the stock belts - but this time even/equal on both sides -
finally gave a much better result and finish
Results under usb microscope -
this was the side where the photos shows the finish didn't quite reach the edge.
opposite side -
One can see the finish/grinding only just reach the very edge - but that is nice and clean - so the knife will cut paper cleanly -
but still not through things that well, because of the poor geometry, presenting a thick profile -
then those opening studs hinder the blade passing through.
Still it's an experience and I am quite pleased with the "knife" -
it is very good looking to my eyes/taste -
and it will now just barely pass as an excuse for a real knife!
--
Vincent
http://picasaweb.com/UnknownVincent?showall=true
http://UnknownVincent.Shutterfly.com
http://UnknownVT.Shutterfly.com
Colt CT813 all Damacus folder
but thought it was relevant here -
these are the usb microscope photos after 7 long cuts through corrugated cardboard against the grain.

Looking at that photo above - I can see that the finish didn't seem to quite reach the very edge.
This is despite me feeling an easily defined burr along the full length of the blade.
So I think there is a difference between when the burr first forms - which is literally just when the grinding/sharpening just reaches the actual edge)
vs. what I am looking for under a microscope - a finish right to the edge.
So since I had used the blade to cut through corrugated cardboard - I sharpened it again -
this time taking the blade to the microscope to make sure the finish was right to the edge -
but dong this the long-winded overly cautious way of making sure I got the finish just when it reaches the edge -
so as not to take off any more steel than I needed to.
Ah! but here's something I learned -
Knowing that it was one side that the finish didn't reach the edge I worked only on that side using the WSKTS Ken Onion Ed
using the coarsest P120 stock belt - single pass raise the burr, then single pass X65 - felt the easy burr - then couple of passes on X22 - same thing easily felt burr - then finally 3 passes on the X4 - with one pass on other side to knock off the burr - then finish with the 6000MM (2µm) belt - still favoring the side I was grinding - examined under usb microscope - - not quite there yet!!!
Repeat the process - this time it looked good under the microscope......
So it ought to be really sharp - right?
Not so fast!
Remember I had a bias on one side which formed the burr that I carried through the process?
It's not that there was still a burr - but the minimal grinding/sharpening on the other side - although knocked off the burr left a crude edge!!
Hence the unsharp results - unable to cut paper cleanly......
so back to the sharpener - this time doing it from the X65 single pass each side - then progressively on the stock belts - but this time even/equal on both sides -
finally gave a much better result and finish
Results under usb microscope -

this was the side where the photos shows the finish didn't quite reach the edge.
opposite side -

One can see the finish/grinding only just reach the very edge - but that is nice and clean - so the knife will cut paper cleanly -
but still not through things that well, because of the poor geometry, presenting a thick profile -
then those opening studs hinder the blade passing through.
Still it's an experience and I am quite pleased with the "knife" -
it is very good looking to my eyes/taste -
and it will now just barely pass as an excuse for a real knife!
--
Vincent
http://picasaweb.com/UnknownVincent?showall=true
http://UnknownVincent.Shutterfly.com
http://UnknownVT.Shutterfly.com
I was sent this knife free and unsolicited from eBay vendor sbc_trading -


he just said :
He wasn't kidding -
look at the blade -


There is absolutely no edge bevel
and the point/tip -
there is none!
usb microscope pics -

original tip....

original "edge" or lack of.
Since it was a freebie and there was a "challenge" of sorts -
I took it to this WSKTS Ken Onion Edition -
it was basically a straightforward sharpening proposition except for the rounded tip -
I thought I may have to grind the blade edge on first to shape it.
But thought I'd just try sharpening and grind a little more on the tip.
I used the coarsest supplied belt - P120 grit - set a bevel at the native belt angle when the blade is held vertical -
ought to result in an edge at 20deg/side.
The first few passes the new/forming bevel followed the contour of that rounded tip.
So when the blade only had that part on the belt (ie: toward the end of the stroke)
I held it there longer and could see that shape was pretty quickly being ground away -
and started to look more continuous. In fact being a novice - I had just started to grind too much away -
probably because I held too much of the blade on the belt - so there is a very slight "kink" in the bevel.
Once I got definite burr along the full length of the blade and the tip looked about right -
I progressively walked through the belts all the way to the finest 6000MM (2µm)
So the knife now looks like -


Close up of the blade


and the usb microscope pics (~110x magnification)

new tip

new edge.
Yes, it is sharp - the steel is supposed to be AUS-8 - so ought to be able to support a 20deg/side bevel especially since it is convex (more support) -
as I am a light user of knives - I use more precise cuts.
But what really shocked me was how quick it was to do all this -
by looking at the time-stamp of my photos it was less than 45 minutes for the grinding and sharpening -
from blunt with protruding rounded tip, to sharp knife with convex edge and good tip
--
Vincent
http://picasaweb.com/UnknownVincent?showall=true
http://UnknownVincent.Shutterfly.com
http://UnknownVT.Shutterfly.com


he just said :
and I did sent one more knife (5.11 Tactical DRT Folding Knife)to you, but the knife is unsharpen at all, so I think you can just play with it, may be you can sharpen it.
He wasn't kidding -
look at the blade -


There is absolutely no edge bevel
and the point/tip -
there is none!
usb microscope pics -

original tip....

original "edge" or lack of.
Since it was a freebie and there was a "challenge" of sorts -
I took it to this WSKTS Ken Onion Edition -
it was basically a straightforward sharpening proposition except for the rounded tip -
I thought I may have to grind the blade edge on first to shape it.
But thought I'd just try sharpening and grind a little more on the tip.
I used the coarsest supplied belt - P120 grit - set a bevel at the native belt angle when the blade is held vertical -
ought to result in an edge at 20deg/side.
The first few passes the new/forming bevel followed the contour of that rounded tip.
So when the blade only had that part on the belt (ie: toward the end of the stroke)
I held it there longer and could see that shape was pretty quickly being ground away -
and started to look more continuous. In fact being a novice - I had just started to grind too much away -
probably because I held too much of the blade on the belt - so there is a very slight "kink" in the bevel.
Once I got definite burr along the full length of the blade and the tip looked about right -
I progressively walked through the belts all the way to the finest 6000MM (2µm)
So the knife now looks like -


Close up of the blade


and the usb microscope pics (~110x magnification)

new tip

new edge.
Yes, it is sharp - the steel is supposed to be AUS-8 - so ought to be able to support a 20deg/side bevel especially since it is convex (more support) -
as I am a light user of knives - I use more precise cuts.
But what really shocked me was how quick it was to do all this -
by looking at the time-stamp of my photos it was less than 45 minutes for the grinding and sharpening -
from blunt with protruding rounded tip, to sharp knife with convex edge and good tip
--
Vincent
http://picasaweb.com/UnknownVincent?showall=true
http://UnknownVincent.Shutterfly.com
http://UnknownVT.Shutterfly.com
- Joined
- Jan 23, 2013
- Messages
- 8,236
I brought three of my mom's kitchen knives back from the dead last night with mine. I am still learning and going very slowly, examining the edge after every single pass. Also getting a feel for technique as well. Her 10 chef's knife was laughable initially, wouldn't cut me if I tried. 10 minutes later it effortlessly sliced phonebook paper.
Thank you for responding -I brought three of my mom's kitchen knives back from the dead last night with mine. I am still learning and going very slowly, examining the edge after every single pass. Also getting a feel for technique as well. Her 10 chef's knife was laughable initially, wouldn't cut me if I tried. 10 minutes later it effortlessly sliced phonebook paper.
Really enjoy hearing successes like this.
Despite me considering myself experienced in sharpening -
as far as grinding and using powered sharpeners are concerned -
I still consider myself a novice (especially compared to some posters)
also I am a bit of a wimp/coward/timid -
so like you, I tread very cautiously and progress slowly with things I haven't done before.
What shocks me - is how easy the WSKTS KO Ed produces great results -
far better than anything I can do by hand - not only that - end up with a an edge better than any factory -
in both performance, and looks.
I have actually used it on a cherished and irreplaceable knife -

not only does that knife perform better than new -
it looks as good (if not better) than new -
and I am talking about a custom handmade to order knife, priceless to me -
(please see Post #22 (link) above)
--
Vincent
http://picasaweb.com/UnknownVincent?showall=true
http://UnknownVincent.Shutterfly.com
http://UnknownVT.Shutterfly.com
Vincent, love the reviews. How do you define sharp? Shaving, paper slicing, hait popping etc? Have you ever used the WSKO to get a hair popping edge? I'm highly intrested in reading your test results. Thnks for taking the time to do them.
I cut free hanging paper while sharpening to make sure it is "sharp" - this can be any waste paper hanging around quite often it is old newspaper -
it is pretty humid where I am (laundry room) but not exactly "damp" - this would tend to hang in cutting easier, to show the edge is not that sharp.
When done I try to cut a very thin strip along the top edge of free hanging paper - sharp edges will do that well - then general cutting -
but I can usually tell by how well the edge bites.
However after all those descriptions this is only part of the story - that shows how well the actual edge is - but says almost nothing about how well the blade will cut through things.
This is where the convex edge comes in - it definitely improves over any conventional beveled edges -
but then this is also very dependent on the actual blade geometry - how thin the blade is behind the edge and the profile of the blade itself.
One of the sharpest knives I have and I use it extensively every single day for cutting/preparing food is the Shigeki Tanaka VG10 damacus (clad) Santoku

it isn't just sharp at the very edge, I use probably a 15-18deg at the very edge (using the blade grinder attachment reviewed in Post #2 -
but because it is very thin behind the edge -
using the pinch test (pinch the blade face and pull to and off the edge) it feels like there is no separate bevel -
the edge is really just a micro-bevel -
then the blade is thin and the whole blade face is convex.
So it cuts hanging paper, single layered rolled up paper, tomato dropped onto blade (this is actually very easy for most good kitchen knives) - taking a thin slice off the top of a free standing tomato.
But most of all I can feel it using it every day - that it's sharp -
what can I say? it's ad-hoc.
BUT the fact is I use the WSKTS on most of my knives to get a 20 deg edge - this is already more acute than most general purpose outdoors knives -
ie: it's the angle for most good Western kitchen knives (on my Japanese kitchen knives I use the Blade Grinder attachment set to 15degs - but because of belt flex the actual edge angle is greater)
Then add the fact it is convex which has two benefits - it cuts through better than normal bevel and it can support a more acute angle at the edge.
Hope that helps a little?
--
Vincent
http://picasaweb.com/UnknownVincent?showall=true
http://UnknownVincent.Shutterfly.com
http://UnknownVT.Shutterfly.com
Last edited:
- Joined
- Oct 17, 2012
- Messages
- 2,163
Vincent,
Do you ever notice if the left side blade edge (sharpened on the down stroke) has a larger face to it than the right side blade edge (sharpened on the up stroke)? I seem to be noticing it mostly on my coated blades, which tends to make the bevel size more apparent.
Do you ever notice if the left side blade edge (sharpened on the down stroke) has a larger face to it than the right side blade edge (sharpened on the up stroke)? I seem to be noticing it mostly on my coated blades, which tends to make the bevel size more apparent.
Not usually -Do you ever notice if the left side blade edge (sharpened on the down stroke) has a larger face to it than the right side blade edge (sharpened on the up stroke)? I seem to be noticing it mostly on my coated blades, which tends to make the bevel size more apparent.
there are a couple reasons why one might get asymmetrical bevel -
(1) different pressure on the sides.
I try to use the lightest possible touch.
(2) the blade itself is not vertically symmetrical -
if sharpening without the guide and trying to keep the blade vertical
For an example of this please see
Review - Harnds CK6015 Viper
In theory - I think if one uses the guide -
that ought to eliminate this asymmetry -
since the guide uses the blade's opposite face to set the angle.
--
Vincent
http://picasaweb.com/UnknownVincent?showall=true
http://UnknownVincent.Shutterfly.com
http://UnknownVT.Shutterfly.com
I have the original WS and notice what fetzer85 mentions. I have now gone to not using the guide and only using the down stroke to sharpen. At first, that was a little tricky to do. However, with some practice my results have been excellent. For some knives I will use the guides and they get very sharp, very quickly. If the knife is more special to me I will take the time to remove the guide and free hand on the down stroke. These are just my observations, and I have been using the WS for over a year and a half. Hope this helps, Bradley
In theory there shouldn't be any limit.Is there a limit to the blade length that can be sharpened? From reading the thread the longest I have noted was 14". What about longer?
In practice it depends on how well one can hold a longer length.
The edge guide (as opposed to the sharpening angle guide) could help somewhat.
But without the angle guide and freehand one can use two hands to hold each end of the knife.
There is a really good video (link) showing how
--
Vincent
http://picasaweb.com/UnknownVincent?showall=true
http://UnknownVincent.Shutterfly.com
http://UnknownVT.Shutterfly.com