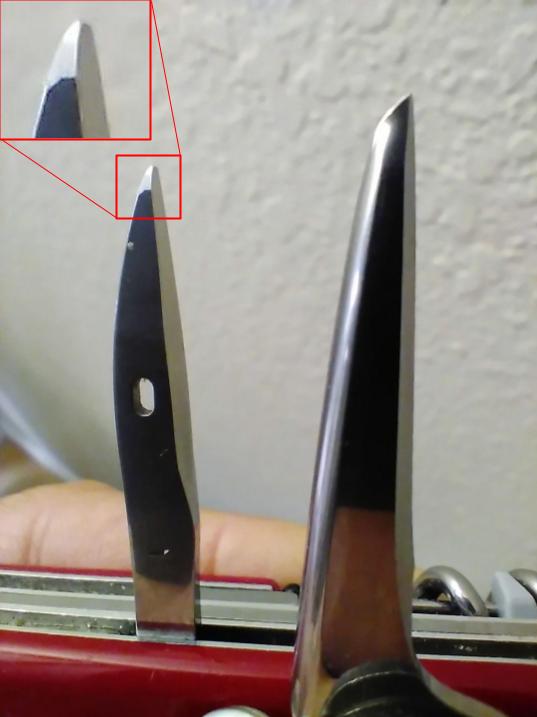
At least two old versions of the back side awl had a similar tapered tip to the one you made. I have an old explorer that came with metal ended tweezers (instead of grey plastic) and it has an awl tip like that. I also got one from an old camper that I disassembled for parts. SAKwiki may have something about it if I recall, but maybe not and I'm too lazy/tired to go check right now. kamakiri might know more about it.I tried out the reamer on my Camper on a scrap piece of pine yesterday. It worked, but it also split the wood. Today I took a look at the reamer of my Farmer and noticed the tip had a nice taper to it. I started wondering if I could do the same to the Camper's awl.
You can see, I did not remove a lot of material. I didn't want to risk weakening the tip too much. I can always remove more steel later if I want, but this seemed to make a difference. It feels pointier to the touch, and I was able to make a couple of holes without splitting my stick.
You are using an out of date browser. It may not display this or other websites correctly.
You should upgrade or use an alternative browser.
You should upgrade or use an alternative browser.
SAK Mods! Post your pics, questions and ideas
- Thread starter Spikediesel
- Start date
If it works for you it’s all goodI tried out the reamer on my Camper on a scrap piece of pine yesterday. It worked, but it also split the wood. Today I took a look at the reamer of my Farmer and noticed the tip had a nice taper to it. I started wondering if I could do the same to the Camper's awl.
You can see, I did not remove a lot of material. I didn't want to risk weakening the tip too much. I can always remove more steel later if I want, but this seemed to make a difference. It feels pointier to the touch, and I was able to make a couple of holes without splitting my stick.

 I am not so sure that it is the point that makes the wood split when you drill it, if a sharp point is needed not to split while drilling, the point of drill bits would be pointier …
Last edited:
Well, I did touch up the edge with a ceramic rod, which did help.If it works for you it’s all good
However, I do not agree on the drill bit analogy. Drill bits have a cutting edge ground on their blunt tip, the reamer on the SAK has but one linear edge. I think a pointier tip does help get the hole started.
It's the fat end of a wedge that does the splitting. The thin end is just to get in the door, so to speak.If it works for you it’s all good
") You can't go in with the fat end first. giggity?
You can't go in with the fat end first. giggity?Most of the work of a drill is done by the "fins" starting in opposite positions around the outside edge of the tip and spiraling up around the drill. When you resharpen a bit, this is what you focus on. The tip of a drill mainly helps to keep it centered, but there may be some material that gets removed by the tip through friction?

IDK, LOL ¯\_(ツ)_/¯
I am not going to argue with your experience, if it works for you it´s all goodWell, I did touch up the edge with a ceramic rod, which did help.
However, I do not agree on the drill bit analogy. Drill bits have a cutting edge ground on their blunt tip, the reamer on the SAK has but one linear edge. I think a pointier tip does help get the hole started.
The long side of the awl may only have one sharp straight line on it, but the tip have a few angles to it if looking at it from the tip, making it work pretty well for drilling small holes. Sharpening the longside (wich you also did with a caramic rod), not drilling on a weak part of the wood, twist & pressure, there are many factors that can save wood from not splitting. Even when drilling with a drill bit. The point may help to get the hole started, but you argued it helped with not splitting the wood.
Yes that makes sense.I am not going to argue with your experience, if it works for you it´s all good
The long side of the awl may only have one sharp straight line on it, but the tip have a few angles to it if looking at it from the tip, making it work pretty well for drilling small holes. Sharpening the longside (wich you also did with a caramic rod), not drilling on a weak part of the wood, twist & pressure, there are many factors that can save wood from not splitting. Even when drilling with a drill bit. The point may help to get the hole started, but you argued it helped with not splitting the wood.
My first 3 layer build, I added a saw and spring from a “my first Vic” to a Sportsman.
I was going for as thin as possible with 0,5mm brass liners.
Unfortunately my homemade burlap micarta made it a bit thicker than what I wished for . I had to decide if I should keep it fat but with a very nice looking pattern of the micarta, or take down the thickness…
I went with the latter, this should be a tool after all, not a pretty picture to look at.
I learn something new with every build, so it’s not a total waste. On the next 3 layer build I will go for 0,5mm liners in the middle and make the outer liners part of the scales, making them in 3-4mm micarta or carbon or G-10
I was going for as thin as possible with 0,5mm brass liners.
Unfortunately my homemade burlap micarta made it a bit thicker than what I wished for
. I had to decide if I should keep it fat but with a very nice looking pattern of the micarta, or take down the thickness…I went with the latter, this should be a tool after all, not a pretty picture to look at.
I learn something new with every build, so it’s not a total waste. On the next 3 layer build I will go for 0,5mm liners in the middle and make the outer liners part of the scales, making them in 3-4mm micarta or carbon or G-10
Last edited:
- Joined
- Apr 29, 2022
- Messages
- 360
I think it looks great…and arguably better. I like the underlying fiber to show some contour. But I understand that’s not everyone’s preference.I went with the latter, this should be a tool after all, not a pretty picture to look at.
Original factory liners in Alox models are 0.4mm nickel silver and pretty hard tempered.
Ed G
Gold Member
- Joined
- Aug 13, 2010
- Messages
- 2,537
I can relate … I know others may find it useful, but I generally find the split ring ungainly and in sometimes a ‘nuisance’ location (especially on the Alox knives).Not much of a mod, but I removed the key ring and replaced it with a loop of braided twine on my Camper. It has already prevented my awl from accidentally closing on the metal ring.
My semi-solution is to replace it with a smaller split ring (6mm dia). It still allows me to attach a lanyard or nano clip.
I get ‘em in the fishing tackle section at discount stores - #3 split ring. They seem to be corrosion resistant and decent quality and they’re pretty inexpensive to boot.
- Joined
- Apr 29, 2022
- Messages
- 360
I don’t see a problem with tapering the tip a bit, but I also don’t feel there’s a need for it, unless you are trying to make very small sub-millimeter or so holes. Victorinox used to taper the ‘hidden’ awls similarly to your mod…from their introduction in 1961 to right about 1980. Part of the spine is also eased in various ways for a bit over the first decade too. Both help making smaller diameter holes that are a teeny bit deeper for a given width. I’d see that as the main advantage.I tried out the reamer on my Camper on a scrap piece of pine yesterday. It worked, but it also split the wood. Today I took a look at the reamer of my Farmer and noticed the tip had a nice taper to it. I started wondering if I could do the same to the Camper's awl.
You can see, I did not remove a lot of material. I didn't want to risk weakening the tip too much. I can always remove more steel later if I want, but this seemed to make a difference. It feels pointier to the touch, and I was able to make a couple of holes without splitting my stick.
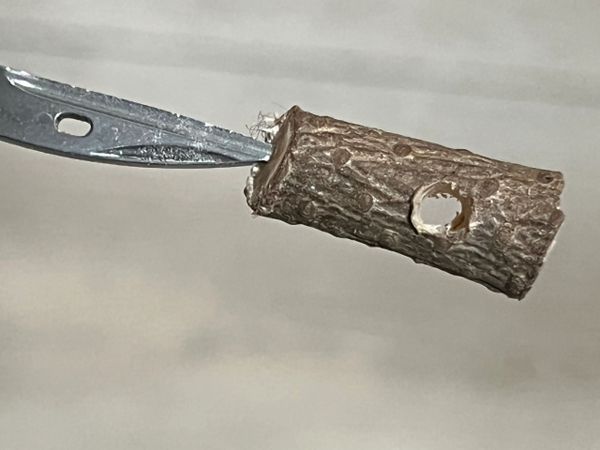
I didn’t have a problem putting a 3.5mm hole in a 9.0mm section of pine twig, worked from both sides:
I just copied
D
dogstar
s wharncliffe shape of the penblade and made a new 3 layer 84mm build with saw
I still have some material missing before I try to make the “thin” 3 layer 84mm that I want. I got a sheet of 0,15mm brass that i plan on having inside of the carbon scales, just so I can have the toothpick and tweezers on it (if I manage to get the slots done in the carbon). I really don’t mind scales without them (I never use the toothpick, and rarely the tweezers), but to me a 3 layer is more of a multi-tool than a 2 or single layer which is more of a gentleman’s carry, so I want to ad them…
I still have some material missing before I try to make the “thin” 3 layer 84mm that I want. I got a sheet of 0,15mm brass that i plan on having inside of the carbon scales, just so I can have the toothpick and tweezers on it (if I manage to get the slots done in the carbon). I really don’t mind scales without them (I never use the toothpick, and rarely the tweezers), but to me a 3 layer is more of a multi-tool than a 2 or single layer which is more of a gentleman’s carry, so I want to ad them…

Thank youGreat build, as usual!
I can't take credit for the wharnie mod... lots of people have done it before me
Thanks for the shout out!
 I have made reshapes in Lambsfoot-style on some of my 91´s, but it was after seeing your wharnie I took the leap I think this pointy little blade will be very handy. The Lambsfoot is great for cutting leather and other thick materials that needs a lot of pressure behind it, this will be a more precise tool
 - Joined
- Apr 29, 2022
- Messages
- 360
Gotta get melty!After I found out that it´s quite easy to save the badge from ruined celidor scales, I have tried to use them on a few of my own scales.
Does any one else reuse the badge, and how do you attach it again?

I use heat and pressure. Done lots of repairs and re-sets…and some mods for the fun of it. Also set some in nylon, but I can’t say I can get that to look good or right without a lot of effort. That’s about as much as I share on the subject. I can post some pics later of finished stuff.
Interesting, needs some looking in to…Gotta get melty!
I use heat and pressure. Done lots of repairs and re-sets…and some mods for the fun of it. Also set some in nylon, but I can’t say I can get that to look good or right without a lot of effort. That’s about as much as I share on the subject. I can post some pics later of finished stuff.
- Joined
- Apr 29, 2022
- Messages
- 360
Maybe try some experiments with a few scales you’ve taken off? I started by repairing ones that were peeling up in a corner or two.Interesting, needs some looking in to…
I understood after reading again that you meant on celidor (restoring). I was thinking more about putting them on custom scales.Maybe try some experiments with a few scales you’ve taken off? I started by repairing ones that were peeling up in a corner or two.
Of what kind exactly? You probably can't do it very easily with your usual wooden scales. I'm not sure if you could really do much at all without making a mould first.I was thinking more about putting them on custom scales.
You could either make a mould of the shield and then use that to create a branding iron to burn the logo into the wood, or maybe you could try making a mould for the entire scale and then pour it with the shield inside so that it's stuck in place once the scale solidifies.
You could also try just heating up the shield itself to use it for hot branding a wood scale, but I'm not sure how well the shield would hold up to that kind of heat. I suppose it's worth experimenting to find out. The shield doesn't have to hold up if it can at least survive long enough to give you one good branding before it starts losing its shape.
Depending on how deeply you can burn the wood, maybe you can even use that depression to glue a shield in place.