-
The BladeForums.com 2024 Traditional Knife is available! Price is $250 ea (shipped within CONUS).
Order here: https://www.bladeforums.com/help/2024-traditional/
You are using an out of date browser. It may not display this or other websites correctly.
You should upgrade or use an alternative browser.
You should upgrade or use an alternative browser.
5 or 6 Loveless patterns - The Road to Pasadena Knife Expo
- Thread starter David Sharp
- Start date
- Joined
- May 23, 2008
- Messages
- 954
Getting to the end of this adventure. It has been confirmed as of this afternoon that there will only be 5 finished knives. The last one had a catastrophic failure of the handle material (looks like dog doo).
After polishing it is time to attach the guards (pin and solder). Prior to doing that though I use temp pins and rough shape the guards.

Plenty of blue tape to protect my investment of time in the polished blade. Pre-shaping the guard allows you to more successfully hide the pins. Instead of peening or pressing or both into stainless that is going to be ground away you are peening very close to the finished level. This usually insures an invisible pin.

Grinding

A close to finish dimension guard.

6 guards ready to attach, all sanded out to 15 micron ;close to 1000 grit. Prior to affixing the guards I clean everything thoroughly with duplicolor wax remover and alcohol so that I don't end up with an surprises when I solder.

My peening surface, ( I would eventually like to own a nice post anvil for different beating jobs) a 4x4 steel leg supporting 3/8" steel top with an additional 3/4" plate on top of that; works pretty well. I have so far been successful without a pin press so I will probably continue with this method.

Peening and peening...

and done. On to soldering.

Being new and still anxious about some processes I didn't get many action shots of this, also for what ever reason my camera refused to focus on this part. So just a few to move us further along. I use a piece of rectangular brass stock as a graver. I round both top and bottom to give a nice concave fillet.

Set-up in my mini vise and ready for solder. I use the same process detailed in the SRJ sub-hilt DVD.

Post solder clean-up aided by my...

copy of Nick's desk lamp. After I am happy with the solder joint I move on to handle material.

Flatten all of the handle material.

Blast both liner and handle material, and then...

wipe down with alcohol...

glue...

clamp...

and then clean-up of the pre-glued liner and handle material. This may seem like a lot of work but I do this process in the evenings because the day job won't allow much more and it is still forward progress! As you can see mostly Micarta, (much to Steven's chagrin).
After polishing it is time to attach the guards (pin and solder). Prior to doing that though I use temp pins and rough shape the guards.
Plenty of blue tape to protect my investment of time in the polished blade. Pre-shaping the guard allows you to more successfully hide the pins. Instead of peening or pressing or both into stainless that is going to be ground away you are peening very close to the finished level. This usually insures an invisible pin.
Grinding
A close to finish dimension guard.
6 guards ready to attach, all sanded out to 15 micron ;close to 1000 grit. Prior to affixing the guards I clean everything thoroughly with duplicolor wax remover and alcohol so that I don't end up with an surprises when I solder.
My peening surface, ( I would eventually like to own a nice post anvil for different beating jobs) a 4x4 steel leg supporting 3/8" steel top with an additional 3/4" plate on top of that; works pretty well. I have so far been successful without a pin press so I will probably continue with this method.
Peening and peening...
and done. On to soldering.
Being new and still anxious about some processes I didn't get many action shots of this, also for what ever reason my camera refused to focus on this part. So just a few to move us further along. I use a piece of rectangular brass stock as a graver. I round both top and bottom to give a nice concave fillet.
Set-up in my mini vise and ready for solder. I use the same process detailed in the SRJ sub-hilt DVD.
Post solder clean-up aided by my...
copy of Nick's desk lamp. After I am happy with the solder joint I move on to handle material.
Flatten all of the handle material.
Blast both liner and handle material, and then...
wipe down with alcohol...
glue...
clamp...
and then clean-up of the pre-glued liner and handle material. This may seem like a lot of work but I do this process in the evenings because the day job won't allow much more and it is still forward progress! As you can see mostly Micarta, (much to Steven's chagrin).
- Joined
- Jul 19, 2011
- Messages
- 83
Fantastic WIP so far... See you in the morning
- Joined
- May 23, 2008
- Messages
- 954
6:30 PST- two hrs till I leave; glad this wasn't real time!
So I got all the handle material glued up and ground an angle in the handle material so that the handle material meets the guard correctly. Now the issue lies with getting an angled hole drilled through the handle material when the tang hole is straight.
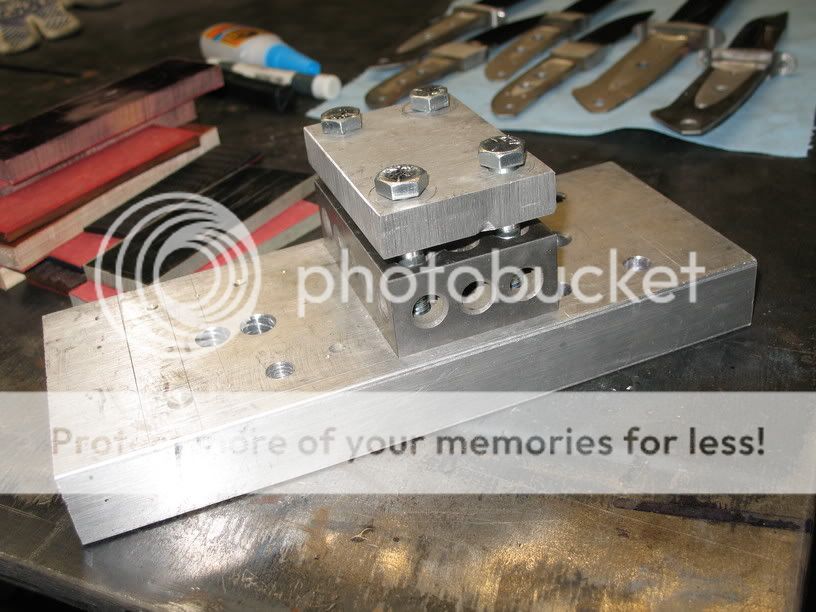
My tapered tang handle drilling fixture. It consists of a 1-2-3 block, a few bolts, and some aluminum. BTW a similar fixture is shown in Nick's and Charles' epic build threads.

Clamp the knife by the flat ricasso. If you blade is straight then you should be able to drill straight through the tang hole. I use two drops of glue to hold the handle material to the tang as well as a Micarta wedge to support the handle while drilling. The glue may be an old trick but I will credit Mr. Terzoula; I read about it in his folder book.

In the mill vise.

And drilling.


Knife and handle material blasted and ready for glue up.

Glued, bolted and dry. You can see I already started grinding the hardware flush.

Getting rid of the excess and material and starting the handle shaping.

Most of the excess is gone and shaping the front near the guard.

Grinding the handle hollow.

Rough shaped close to slack belt time.

100-15 micron to get to the finished handle.

And you end up with this!
And after some fine tuning you end up with the finished knives (buffing, logo etch, satin flats, etc..). I will need to post the 5th knife later I just finished it yesterday.


Traditional Chute with green linen. The color is off in the second photo.


A Mini-Wilderness with maroon Micarta


A standard 4.5" Utility Hunter.

A Utility Stiff Horn with jigged bone. This one has a very small guard; after finding pictures that indicate there are some that came form the Loveless shop this way (Mr. Merritt confirmed this). It makes for a better feeling knife.
The last is a traditional Stiff Horn ( picture not available yet)
Thanks for looking!!!
After doing this I have a much larger respect for those that try to document their work. I am only able to work on knife projects Friday evening through Sunday. I calculate that this process took about 2 weekends worth of time.
So I got all the handle material glued up and ground an angle in the handle material so that the handle material meets the guard correctly. Now the issue lies with getting an angled hole drilled through the handle material when the tang hole is straight.
My tapered tang handle drilling fixture. It consists of a 1-2-3 block, a few bolts, and some aluminum. BTW a similar fixture is shown in Nick's and Charles' epic build threads.
Clamp the knife by the flat ricasso. If you blade is straight then you should be able to drill straight through the tang hole. I use two drops of glue to hold the handle material to the tang as well as a Micarta wedge to support the handle while drilling. The glue may be an old trick but I will credit Mr. Terzoula; I read about it in his folder book.
In the mill vise.
And drilling.
Knife and handle material blasted and ready for glue up.
Glued, bolted and dry. You can see I already started grinding the hardware flush.
Getting rid of the excess and material and starting the handle shaping.
Most of the excess is gone and shaping the front near the guard.
Grinding the handle hollow.
Rough shaped close to slack belt time.
100-15 micron to get to the finished handle.
And you end up with this!
And after some fine tuning you end up with the finished knives (buffing, logo etch, satin flats, etc..). I will need to post the 5th knife later I just finished it yesterday.
Traditional Chute with green linen. The color is off in the second photo.
A Mini-Wilderness with maroon Micarta
A standard 4.5" Utility Hunter.
A Utility Stiff Horn with jigged bone. This one has a very small guard; after finding pictures that indicate there are some that came form the Loveless shop this way (Mr. Merritt confirmed this). It makes for a better feeling knife.
The last is a traditional Stiff Horn ( picture not available yet)
Thanks for looking!!!
After doing this I have a much larger respect for those that try to document their work. I am only able to work on knife projects Friday evening through Sunday. I calculate that this process took about 2 weekends worth of time.
- Joined
- Apr 16, 2008
- Messages
- 814
Those look great, Thanks for doing this, learned a lot.
Have fun at the show.
Have fun at the show.
")
Superb thread David.
I've learnt several new tricks that I'll be putting to use in the near future.:thumbup:
Many thanks for taking the time to put this all together...I'm well aware how much time it takes to do a 'work in progress' thread and it's very much appreciated.
Oh...and by the way, the finished knives look absolutely superb.
Ian
Josh Mason
Tombstone hand. Graveyard mind.
- Joined
- Jun 15, 2011
- Messages
- 1,512
This is sticky worthy. Awesome work David! I learned a ton from these pics.
- Joined
- Dec 3, 1999
- Messages
- 9,437
Totally first class David--- I'm REALLY impressed!!! :thumbup:
Professional approach with professional/beautiful results!!! :thumbup: :thumbup: :thumbup:
And thank you for the mention... I'm not a credit hound, but it's nice to see the mention because it makes me glad to know some guys not only paid attention, but made use of some of the ideas.
Professional approach with professional/beautiful results!!! :thumbup: :thumbup: :thumbup:
And thank you for the mention... I'm not a credit hound, but it's nice to see the mention because it makes me glad to know some guys not only paid attention, but made use of some of the ideas.
- Joined
- Sep 22, 2004
- Messages
- 587
David,
I enjoyed your work in progress and the the end results of your work are great.
I learned a couple things along the way that I'll be trying out shortly.
As Nick stated, thank you for the mention.
Hope your show is going well.
Keep up the good work.
Take care
Charles
I enjoyed your work in progress and the the end results of your work are great.
I learned a couple things along the way that I'll be trying out shortly.
As Nick stated, thank you for the mention.
Hope your show is going well.
Keep up the good work.
Take care
Charles
- Joined
- Aug 17, 2010
- Messages
- 883
Really incredible, David.
Your work makes me want to quit. You are so damn encouraging, though.
It was a pleasure to see you and Charlene in Pasadena. Thanks for the fun and the great post.
Your work makes me want to quit. You are so damn encouraging, though.
It was a pleasure to see you and Charlene in Pasadena. Thanks for the fun and the great post.
- Joined
- May 23, 2008
- Messages
- 954
Thanks for all the kind comments all! I am happy that you guys found it informative (it definitely was not ground breaking). I am so stoked that I got a comment from Bruce, Nick, and Charles, three of my knife making heroes. All three have posted epic WIPs that definitely gave me a good foundation.
- Joined
- Jun 2, 2009
- Messages
- 1,564
A fantastic thread displaying your processes and an even better display of craftsmanship. Those knives are SMOKIN'! Great job!